
All leading pentesting certifications, including OSCP, require hands-on pentesting skills. While many online 'vulnerable-systems-as-a-service' platforms offer excellent practice environments for a monthly fee, building your own virtual lab gives you unlimited time, complete control, and costs nothing beyond disk space and electricity.
This guide covers how to create a virtual hacking lab in four configurations of increasing complexity.
First, we’ll cover a basic setup that has your attack box and a vulnerable machine to work on; perfect for the single targets on the OSCP exam.
Second, we’ll chain vulnerable machines together, so you have a virtual lab network to practice pivoting through.
Thirdly, we’ll get you up and running with an Active Directory domain controller for an enterprise-level experience.
Finally, we'll help you build your own vulnerable, multi-machine, full Active Directory forest with multiple domains, great practice for certifications like OSEP.
What Is a Virtual Hacking Lab?
If this is old news, feel free to jump down to the Preparation section. Otherwise, we encourage you to read on.
A virtual hacking lab is a simulated environment with intentionally vulnerable machines for you to attack within your home network. These vulnerable hosts will be run through virtualization software, allowing them to run inside your current host machine as if they were their own physical computer. We are basically creating computers within your computer - no need for additional physical hardware.
Once set up, you will use your attacking machine to scan these targets for vulnerabilities and attempt to break into them. There are benefits and downsides to a setup like this.
The biggest benefit is cost. All the examples we will be showing you are absolutely free! You can start right now without a credit card. You also have the ability to customize your lab however you like, so long as you have the technical skills. Finally, you have unlimited time to work on a target. You can leave these machines open or save their state and shut them down until later.
It’s not perfect, however. You need to have the physical resources to handle your lab. This means a CPU capable of virtualization (you probably have this, but it’s not a guarantee) and enough RAM to partition out. It also means you are handling technical issues and troubleshooting on your own.
Paid vulnerable-systems-as-a-service, such as HackTheBox, handle all of this for you (at a cost, of course).
Despite this, a home lab remains a great option for hacking in a virtual environment. Being forced to troubleshoot is a great learning experience, and with our walkthrough, you shouldn’t have much issue. Now, let’s talk about preparation.
How to Create a Virtual Hacking Lab: Preparation
Let’s make sure you have what you need to get started before building out the labs.
What Hardware Do I Need?
Firstly, let’s talk about hardware. You will need a CPU that can handle virtualization. If you’re on Windows, hit ctrl+shift+esc to open the task manager and click the Performance tab. If it says “Virtualization: Enabled”, you’re good to go.

Alternatively, you can check your CPU online to see if it qualifies. Most modern CPUs (made in the last five years) won’t have any issues.
You’ll also need sufficient RAM. For our Level 1 build, you can probably get away with 6GB on the low end (8GB preferred). When you start running multiple machines (three or more), you’ll want to have at least 16GB to run the machines and your host system. For our last build in the list, you’ll need a lot of resources, but we’ll explain that more when we get there.
Now let’s get you the software.
What Software Do I Need?
You’ll need your hypervisor - the virtualization software we’ll use to run the machines. There are many opens, including HyperV and VMWare (learn how to install Kali Linux on VMWare here), but we will install VirtualBox by Oracle in this article.
Visit the VirtualBox website and download the latest version for your operating system. They have versions for Windows, macOS, Linux, and Solaris systems. The standard installation options will be fine (we trust this isn’t your first time installing a program, so we’ll leave you to it).

Once you have VirtualBox installed, we’ll need an attack box. There are several operating systems designed for this purpose, such as ParrotOS and BlackArch Linux, but we will be installing Kali Linux, as it still holds the greatest market share.
To install Kali Linux, go to the Kali Linux website and select “Virtual Machines.”

You will want to download the VirtualBox 64-bit image file. This one is already pre-configured for VirtualBox, so you don’t have to go through the trouble of installing it as a fresh image.

Your download will finish as a zipped file. Double-click the downloaded file to open it with your default zip program. (Don’t have one? Try 7zip.) Once opened, drag the compressed file to a location of your choice and wait for the extraction to complete.

Navigate to the extracted folder and double-click on the .vbox file.

Once you click open, it will launch VirtualBox and the virtual machine will appear listed in the left panel of your VM manager.

With your Kali Linux instance highlighted, click on “Settings” (the yellow gear icon), and go to Network. Make sure that Adapter 1 is set to NAT.

Then move over to the Adapter 2 tab and select Host-only Adapter.

Click “OK” to close the settings box. You can now launch Kali Linux by clicking the Start button with the green arrow up top. The default login credentials are
- Username kali
- Password kali
You should now have access to your Kali Linux attack box.

If you want a more in-depth tutorial on setting up Kali on VirtualBox, you can see our article here.
Level One: Single Target
There are many famous vulnerable virtual machines on the internet, including OWASP Broken Web Application, Damn Vulnerable Web App, and Metasploitable 1-3. These and more can be found on VulnHub, a massive collection of different vulnerable VMs free for download.
Which new virtual machine you start with will depend on your skill level and what types of attacks and vulnerabilities you want to practice. Since this is a beginner-level lab, we’ll use Metasploitable 2 for our example.
Download and Install Metasploitable 2
In VulnHub, search Metasploitable 2, and download. As of the time of writing, the direct download link for Metasploitable 2 is here, but this can change without notice.
Many of the machines on VulnHub will come as VirtualBox Machine Image files that only require a double-click to import. Metasploitable, however, only comes as a .vmdk file, which will take a few extra steps to set up.

- In VirtualBox Manager, select New
- Fill in the “Name” you want to call this VM (we’ll call it metasploitable2)
- Choose a folder to save the VM to (we suggest keeping all your VMs together in one place)
- Select the Type of system (in this case, Linux)
- Choose the Version (we will simply select Other Linux 64-bit)
- Click Next

- You can leave the default RAM allocation as-is and click Next again.
- When you reach the Hard Disk screen, choose “Use an existing virtual hard disk file” and click the folder icon. A Hard Disk Selector screen will open up. Click Add.

- Navigate to the location of the .vmdk file and choose it.

- It will then be added to the Selector List. Select it and click Choose.

- Finally, click “Create” and the machine will appear in VirtualBox Manager underneath your Kali Linux VM.
- Follow the steps in the Preparation section to set Metasploitable’s Network Adapter to Host-only (not NAT).
Booting the Lab
To boot a virtual machine, highlight it in the manager and click start. Boot both up now. You will have your Kali Linux instance and the Metasploitable VM open.

All you need to do now is discover Metasploitable’s IP address, and you can start hacking away. Note that this VM has no graphical user interface.
Since you are both on the same network, you use a tool like Netdiscover or Nmap to scan the network. You can also go the quick route and log in to Metasploitable with the credentials username msfadmin and password msfadmin, and use the ifconfig command to get the IP address.
We’ve gone through the two primary ways you will have to install a vulnerable machine; .vbox and .ovf files only need to be double-clicked while .vmdk requires extra steps. We’ve also seen what we consider the best source for vulnerable hacking machines on the web, VulnHub. There are lots of machines to keep you busy with your favorite pentesting tools, but if you want to add to your challenge, let’s talk pivoting.
CompTIA PenTest+ Courses Bundle
Ace your PenTest+ exam with our CompTIA PenTest+ Courses Bundle, containing a top-rated PenTest+ prep course, a beginners penetration testing course, 3 full length practice exams, and over 500 study flashcards!
Level Two: Pivoting Lab
The level one lab is great to practice attacks on websites, databases, email servers, and other services that are typically exposed to the internet. In reality, the target you’re after is likely within a network you cannot access directly. What you need to do is find an exposed machine or service, hack into it, and use the newly compromised machine as your entryway.

This system would connect to both the network we have access to, such as the public internet and to the target’s internal network, which we cannot access. By compromising this machine, we can pass our traffic through it and continue our attack. Let’s set this up now.
Adapter Settings
We need to make once changes to our network. Go to the preferences menu in your VirtualBox manager.

Select Network and click the button with the plus sign on the far right to add a NAT Network adapter.

We will be adding two adapters. The first we will call External with a Network CIDR of 192.168.100.0/24, and the second we will call “Internal” with a Network CIDR of 10.10.3.0/24. Note that it really doesn’t matter what IP ranges you use so long as they are valid internal IP CIDRs with different ranges.

With both of these adapters ready, we can set up our boxes.
Virtual Machines
For this lab environment, we will require three machines.
- Our attack box
- Our pivot box
- Our internal target machine
We already have our attack box, and we can use Metasploitable as our internal target machine. All we need is one more machine to act as a pivot point. For this demonstration, I will be using a simple Ubuntu instance. You don’t need to follow along with this section, this is just to demonstrate the proof-of-concept.
Go into the settings for each box as we did in Level One. We will use the following network settings.
| Kali Linux | Pivot Box | Target | |
|---|---|---|---|
| Adapter 1 | NAT | NAT NetworkExternal | NAT Network Internal |
| Adapter 2 | NAT Network External | NAT Network Internal |

Now we can launch all three machines to see what has happened to their network settings.
You can use either the “ip a” or “ifconfig” commands in a terminal to see your current IP address.

Our Kali Linux box has two IP addresses. The 10.0.2.15 address is from the standard NAT adapter. The 192.168.100.5 address is part of the “External” network we created. Your IP addresses will be different but will fall within the same networks.
In our lab, we ended up with the following

Our attacker computer is capable of seeing and attacking our pivot machine but cannot see the Metasploitable VM. So what now?
We won’t be covering a detailed lesson on lateral movement and pivoting in this article. But this lab will allow you to practice using tools and techniques like Metasploit’s autoroute feature, SSH tunneling, port forwarding, and Chisel.
Now it’s your turn. Pick two different boxes from VulnHub. Make one your pivot and one your internal target. Hack the first and once you’ve gained root access, scan the internal network for your next target and tunnel your attacks through the pivot machine.
VulnHub has a section called “series”, where several machines by the same author share a theme, often meant to be done one after the other. Try chaining two or more of those together and see how you do. Consider Empire, Harry Potter, or SickOS as series worth trying.
Almost all practical exams now require a basic to intermediate understanding of network pivoting. Get used to the way port forwards and tunneling work. See how some tools (such as Nmap) operate differently through a tunnel.
To learn different ways to pivot through a network, try some of the following articles:
- How to Use Ligolo-ng (Easy to Follow Pivoting Tutorial)
- How to Use PsExec (Remote Pentesting Guide)
- PowerShell Remoting for Hackers: Domain Takeover
- How to Use Proxychains (Kali, Linux & Windows)
When you’re done having fun with pivoting, let’s talk about Active Directory.


Level Three: Active Directory Server
The first two levels of the lab are great practice for Linux systems. The vast majority of the internet runs on Linux. Websites, mail servers, databases, and other infrastructure are typically built on Linux systems. Inside a network, however, Windows holds the market share.
It’s estimated that over 90% of global fortune 1000 companies use Microsoft Active Directory for their networks. While “popping boxes” from the previous sections is a great way to learn how to breach the perimeter through a forward-facing machine, you need to know AD to be a great hacker.
You won’t find many Windows-based vulnerable machines for free on the internet because, unlike Linux, Windows isn’t free. Any service that provides vulnerable Windows machines (such as Offsec’s Proving Grounds or Hack The Box) has to pay Microsoft licensing fees. Fortunately, there is still a way to practice at home.
Setting Up Windows Server 2019
Microsoft offers free evaluation versions of Server 2019 and Windows 10 Workstations. You can download the .iso file, launch it in a virtual machine, and play with it as much as you like at no cost to you. Of course, it is a base system with no vulnerabilities… yet.
Let’s start by getting an evaluation copy of Windows Server 2019. Click “Download the .iso.” It will take you to a page where you are asked to fill out your name, company information, and contact details. There is no email confirmation or account registration, so you can simply fill in junk information if you want. Once the required fields are filled in, click the “Download now” button.
You have two options for a home lab - the .iso file, which is the same format as an installer disk, and the .vhd file, which is already configured for a hypervisor. While installing Server 2019 from an ISO is great practice and something I strongly recommend learning, today we will work smarter, not harder. Download the VHD.

Once downloaded, we will follow similar steps to set up this VM as we used with Metasploitable.
In your VirtualBox manager, click New. Give your OS a name, choose Microsoft Windows as the Type and Windows 2019 (64-bit) as the version. Click Next.

You can keep the RAM at 2048MB if you want, though I recommend going higher to speed things up during installation. If you have the memory to spare, you should double it to 4,096. Click Next.
Once again, you will be asked if you want to create a hard disk or use an existing virtual disk file. Select the option to use an existing disk and navigate to the file you downloaded.

You will now be ready to create. Once it is in your VirtualBox Manager pane, click Start.
After the machine boots, you must go through the typical Windows installation process.

Choose your keyboard and country. Agree to the license agreement. When asked to choose a password, you can pick anything so long as you can remember it. Since this will not be running an actual network, a simple Password123! will be enough.

For those who have never used Windows Server, you need to press ctrl+alt+del to open the login screen. You cannot use that particular command in VirtualBox without your computer assuming you’re trying to end a task. Instead, click Input, Keyboard, and Insert ctrl+alt+del.

Sign in. If you are asked if you want to allow this PC to be discoverable by other PCs and devices on the network, say “Yes.”
Before moving forward, be sure to create a snapshot. This will allow us to roll back to this fresh install should we wish to start over. Choose Machine, Take Snapshot. Pick a name like “Fresh Install” and click OK.

Lastly, open a command prompt by clicking the windows icon in the taskbar, typing “cmd” and pressing enter. Test your internet connection by trying to ping google with the command:
ping google.com

If you get a reply, you are good to go. If not, try changing the network adapter settings in VirtualBox. For this, you will want to be on NAT.
We also recommend installing guest additions so you can cut and paste to and from the VM.
Your Windows Server 2019 is ready. Now let’s give it some vulnerabilities.
Vulnerable Scripts
A Google search for “vulnerable Active Directory Github” or a similar phrase will return several great options for us to use. These different scripts were written by pentesters and enthusiasts who wished to give back to the InfoSec community.
By running one of these PowerShell scripts on our server, user accounts, poor passwords, and different misconfigurations will be put into place. This will make our machine vulnerable to many of the common attacks you might see in a real environment, such as pass-the-hash, kerberoasting, and golden ticket attacks.
We have no connection with any of the individuals who have created these vulnerable systems and no involvement in the development or maintenance of any scripts we mention in this article. They have been created by generous and talented individuals for anyone to use and enjoy.
We are choosing one as an example to walk you through the setup process, as most will function in a similar fashion.
Under NO CIRCUMSTANCES should you run this on an actual Active Directory network.
For the purpose of this walkthrough, we will be using Vulnerable AD Plus by WaterExecution. The README file lists a wide range of attack vectors and vulnerabilities, and the repo contains a walkthrough and password list to use in your practice.
Installing it requires running some commands in PowerShell. Let’s start by opening PowerShell as an Administrator.
Click on the Windows icon in the taskbar and type PowerShell. Right-click on Windows PowerShell and select “Run as administrator.”

To run PowerShell scripts from sources outside of Microsoft, we need to set the Execution Policy to bypass using this command:
Set-ExecutionPolicy -ExecutionPolicy Bypass

See our PowerShell Cheat Sheet for a list of useful commands applicable to network administration and ethical hacking.
Following the guidelines in the GitHub, we can run their script to establish this server as the primary domain controller for our Active Directory domain.
First, we install Active Directory Domain Services
Install-windowsfeature AD-domain-services
Then import ADDSDeployment
Import-Module ADDSDeployment
Now we can run their script
Install-ADDSForest -CreateDnsDelegation:$false -DatabasePath "C:\\Windows\\NTDS" -DomainMode "7" -DomainName "change.me" -DomainNetbiosName "change" -ForestMode "7" -InstallDns:$true -LogPath "C:\\Windows\\NTDS" -NoRebootOnCompletion:$false -SysvolPath "C:\\Windows\\SYSVOL" -Force:$true
Note: The -DomainName flag is currently set to “change.me” and -DomainNetbiosName is “change”. You can be creative if you want, but the domain “change” is hard-coded and invoked in the PowerShell script we’ll be downloading.
Either you can leave it as “change” and “change.me” or copy the raw file, save it as a .ps1 on your virtual machine, edit the last line of the code with your custom domain name, and invoke it from there.
If that sounds way more technical than you’re ready for, just leave it as “change.me” for now, and we’ll do the same for this walkthrough.
It will ask you for a Safe Mode Administrator Password. We can keep our trusty Password123! for this one as well.
When completed, the system will sign us out and apply the changes. This process can take a while.

You will notice that the login is for your newly created domain.

Now we can upload the invoke the Vulnerable AD Plus script. The GitHub instructions say to run one command to download and another to invoke with flags to state the domain name and limit the number of users created. However, examining the script, the invoke command and flags are already hard coded, so we can skip that part.
All we need to do is open PowerShell as Administrator again, set ExecutionPolicy to bypass, then run the following
IEX((new-object net.webclient).downloadstring("https://raw.githubusercontent.com/WaterExecution/vulnerable-AD-plus/master/vulnadplus.ps1"));
Once the script finishes, the server will reboot, and it’s ready for hacking. The write-up by WaterExecution states initial access is attained through anonymous LDAP query and kerberoasting. Explaining these methods is beyond the scope of this article, but you now have a playground to practice those attacks and many other Active Directory hacking techniques.
You can also take a look at the following labs:
Of course, understanding the misconfigurations of a lone domain controller is one thing, but what about having an entire Active Directory network to play in?
CompTIA PenTest+ Voucher
Launch your pentesting career with a discounted CompTIA PenTest+ Voucher. Save up to 30% and earn your certification with an authorized CompTIA partner.
Level Four: Creating an Entire Active Directory Network Lab
Much like the previous lab, some passionate and generous hackers have assembled complete vulnerable networks for download, free of charge to you.
Usually, paid access to something like this can run $30 to $60 USD per month for shared lab access; this means others will be hacking the lab, modifying files, and possibly taking down machines that will need to be reset by moderators.
If you have the system for it, you can avoid the cost and have a dedicated lab to yourself.
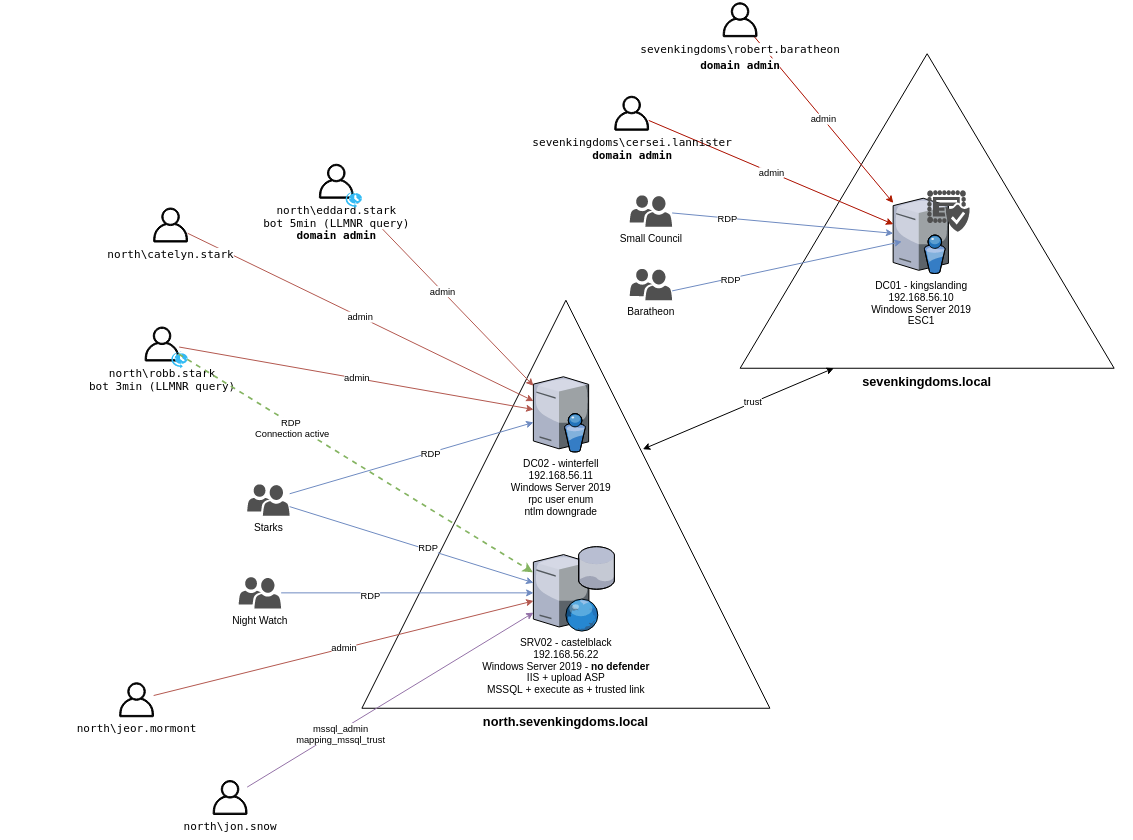
This walkthrough will cover the setup of “Game of Active Directory.” GOAD is a multi-domain and multi-forest network inspired by Game of Thrones, which will allow you to test an impressive list of hacking techniques to take over the network.

Taken from the Game of Active Directory GitHub
What Kind of System Do I Need to Run This?
The nice thing about the latest version is that there are multiple lab sizes to choose from.
GOAD (Full Lab)
The complete lab consists of five Windows virtual machines, spread across two forests with a total of three domains. This is great if you want to practice cross-forest trust abuse.

This is extremely resource-heavy. The virtual network lab alone, without consideration of the host operating system or attack box, requires roughly 20GB of RAM! That’s 3GB per Domain Controller (9GB total), 5GB to one server, and 6GB to the second.
A Windows 10/11 host system without superfluous software running will usually use 6-7GB of RAM (you can view this in your task manager), while a low-resource Linux system, like Mint, will only use about 2.5GB.
If you are running your Kali Linux instance on the same system, remember it needs at least 2GB of RAM to run smoothly. Usually, people will increase RAM to 4-8GB, depending on the software they intend to run at once (Burp Suite, Wireshark, Metasploit, etc.).

If you’re using a Windows system with 32GB of RAM and a Kali Linux instance using 2GB of RAM, you should be okay, though you may experience some lag on the systems.
The full lab also requires roughly 115GB of free disk space.
Goad Light
This is going to be the sweet spot for most people. It contains three machines, one forest, and two domains.
While the full GOAD is great practice for exams like OSEP and CRTP, GOAD Light should suffice for OSCP candidates. By removing two Windows virtual machines, you’re saving 8GB of memory.
Don’t get us wrong, 12GB of memory for the lab before considering your host system and attack machine is still a lot. The creator recommends 20GB of system RAM to run this lab comfortably, but again, your base OS and Kali VM play a big part in determining your needs.
Other Installation Options
If your main machine can’t handle this lab, there are some alternatives.
Firstly, GOAD can provision on AWS or Azure. This will allow you to rent time in the cloud, which can be much cheaper than most paid labs, so long as you remember to shut the lab down when not in use. Leaving a cloud instance running will rack up a bill fast.
Alternatively, if you have a retired gaming PC with a lot of RAM, you can install a low-resource Linux system on it and turn it into a dedicated hacking lab. This will save you about 5GB of RAM by ditching Windows and allow you to provision more resources to your Kali Linux instance if you run it on a different physical machine.
To make this scenario work, add a jump box - a low-resource Linux machine on the lab PC. Dual-home it so it sits on both the GOAD network and has a bridged adapter. Get SSH running on it, and you should be able to remote into it from your Kali machine on a different computer.
Using a program like Ligolo-ng to tunnel your attacks will actually simulate an external pentest really well.
What Software Will I Need for this?
The virtual machines themselves will still use VirtualBox as their hypervisor.
You will also require Vagrant, WSL (Windows Subsystem for Linux), and Visual C++. The rest will be installed by the GOAD lab.
Installing Visual C++
First, you need to install Visual C++. You can get the Visual C++ installer here.

Double-click and follow the instructions.

Installing Vagrant
Next, we need Vagrant. Vagrant is a free software used to manage virtual environments. It will allow us to launch all of our machines at once and run them in the background.
You can get the Vagrant installer here.

Double-click and follow the installation wizard.

Now, we’re going to assume you already have VirtualBox installed.
If you run into any issues during the installation of this lab, first check your version of VirtualBox. At the time of writing, Vagrant is compatible with vbox7.1.x or lower, so you may need to downgrade. Improvements and updates are made constantly, so this may no longer be an issue by the time you begin building your lab.
Once both Vagrant and VirtualBox are installed, you will need to install some dependencies. Open a PowerShell terminal and execute the following command.
vagrant.exe plugin install vagrant-reload
vagrant-vbguest winrm winrm-fs winrm-elevated

Installing Windows Subsystem for Linux
Now, let’s install Windows Subsystem for Linux. Windows Subsystem for Linux (WSL) lets you run Linux on your Windows computer without needing a separate virtual machine or dual-boot setup. It gives you access to Linux tools and command-line utilities while still using Windows normally.
Installation is very straightforward. In PowerShell, run:
wsl --install
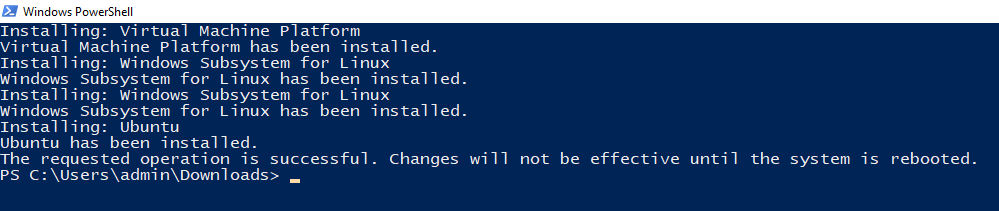
By default it will install Ubuntu. This is fine for our purposes. You will be required to reboot your computer.
Your installation of WSL is likely to be verson 2. We can confirm this with the command:
wsl -l -v

GOAD installation works better on version 1, so you'll want to downgrade. We can change that to version 1 with the following command:
wsl --set-version Ubuntu 1
Now, we switch into our Linux terminal by typing the following command into either PowerShell or the Command Prompt:
wsl -d Ubuntu
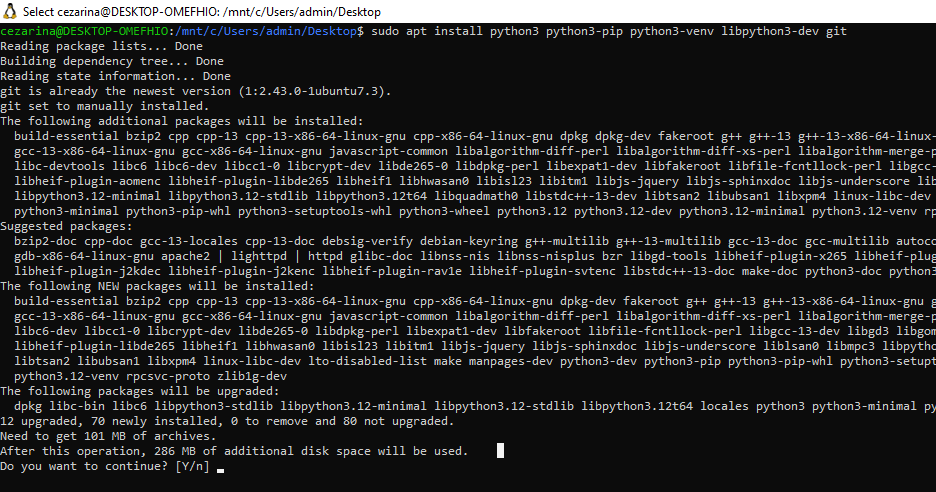
The last step before downloading GOAD is to update our Linux machine and install Python and git.
Updating the system is as simple as:
sudo apt update

Now you’ll install Python and git with the following command:
sudo apt install python3 python3-pip python3-venv
libpython3-dev git
Confirm your version of Python is at least 3.8 or higher with python3 --version

Now we can finally provision our lab.
GOAD Lab Setup
We’re going to walk through setting up GOAD Light locally. However, you’ll see the directions are the same regardless of the lab you choose; The interactive installer will ask you which lab to install, so choose what’s best for you.
First, you need to choose where to clone GOAD. Move to the location using:
cd /mnt/c/whatever_folder_you_want
This path must be a folder and drive letter on your PC (e.g., C:/).

Here is where we will clone the Game of Active Directory git repo.
sudo git clone
https://github.com/Orange-Cyberdefense/GOAD.git

Now cd into the GOAD directory, and run it with:
./goad.sh

After all the packages are installed, you will be brought to the install interface.

We can see all the options available to us by pressing "?"

You’ll want to check our dependencies before installing. However, you will notice that the default installation option is “vmware.” As a result, GOAD will look for the wrong dependencies. Let’s switch to VirtualBox.
If you’re unsure of what options are available for any of the commands, run the command without any flags, and it should provide you with a list of possibilities. You can also type the command and hit TAB twice to get an autocompleted list.
Below, we chose set_provider with no flags, and it told us what providers were available.
We used set_provider virtualbox and then ran check.

Any missing dependencies should be installed automatically by GOAD.
Now to choose our lab. We typed set_lab GOAD and hit double TAB. The installation offered GOAD (the full lab), GOAD-Light, and GOAD-Mini (a single machine).
- We set_lab GOAD-Light.
- Our provisioner is already set to local (this is where you could choose Docker, etc.).
- We are not adding any extensions (GOAD offers optional devices such as an Exchange Server and an IDS).
- The default IP Range is fine with us, but this can also be customized.
With that, we can type install and confirm.

GOAD will begin creating a lab instance.
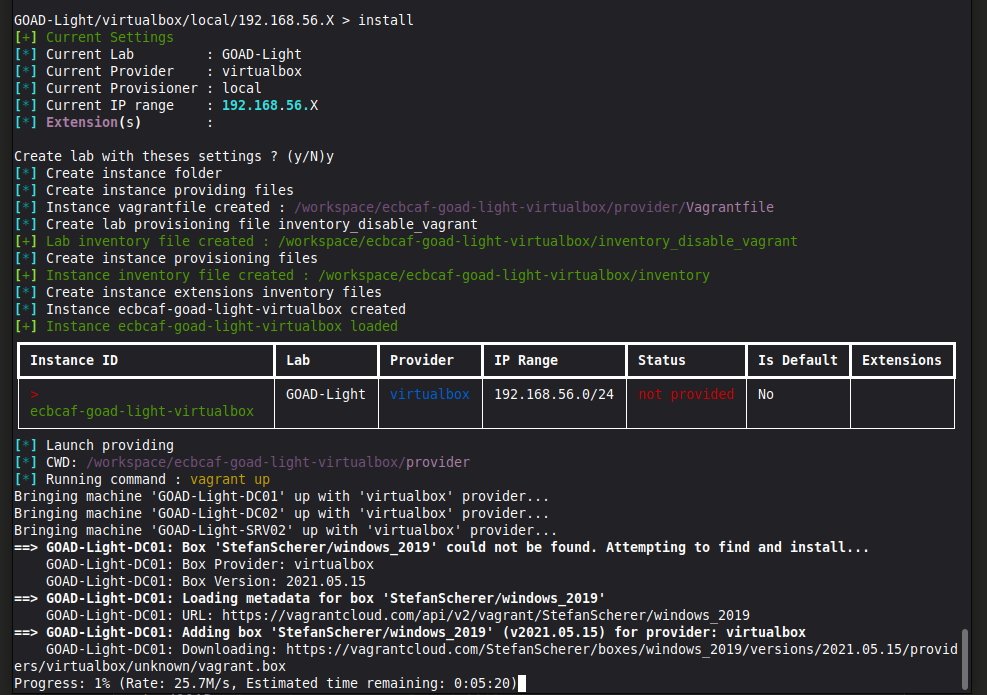
Provisioning time varies based on your hardware (RAM, CPU, HDD vs SSD), internet connection, and which lab size you choose. It could be done in as little as 20 minutes or exceed four hours. Let the lab run. GOAD is downloading and installing Windows virtual machines, creating groups, users, permissions, and misconfigurations.
When everything is complete, you will be given a notice that the lab has been successfully provisioned, and you will see no failures in the recap. If something went wrong, just run the install again - GOAD will know where the last successful change was made and continue from that point.

Running GOAD
Ok, our lab is created. Now what?
If you hit "?" again, you’ll be brought to the menu with many new options. You’ll also see the command line lists a unique lab ID.

You can use the highlighted commands to:
- Check if the lab is running,
- Start all the machines,
- Stop the machines,
- Destroy the lab (deleting it entirely),
- Take a snapshot of the lab,
- Revert to a snapshot
Starting the lab will boot all of the machines in headless mode. This means you can see them running in VirtualBox, but they do not open their own window.

You can access them directly by clicking "show" in the VirtualBox manager if you want, but it shouldn't be necessary unless you're troubleshooting something.

When you’re done with the lab for the time being, you can use the stop command to shut the machines down.
Any time you want to boot the lab again, simply open goad.sh in WSL, select your lab instance using "list" to see all options and "load" to indicate the instance ID (if you only have one, it will likely be the default). Then start it as normal.

Now that you know how to set up a network lab, you can also try the following:
Conclusion
We’ve covered a lot of information here. You already know real practice is essential to learn hacking. The theory is great, but without actually doing it, you won’t know what challenges you can face and won’t gain the experience of troubleshooting, reevaluating, and trying again.
Paid services have their benefits, but you’d be denying yourself some important skills by not trying your own labs. Setting them up yourself gives you a better understanding of how networks operate, which you can then apply to your hacking.
All practical exams now require pivoting and most Active Directory; this includes OSCP. So take advantage of the free resources available to you. For an added experience, review the vulnerable Active Directory scripts, see how they work and what they’re doing, and try creating your own vulnerable machines to share with the hacker community.
To dive deeper into network hacking and penetration testing, consider joining the StationX Masters Program. You'll get access of over 30,000 courses and labs, a custom certification and training roadmap, mentorship, mastermind groups, career assisstance, and much more.
Be sure to check out our Red Team Hacker Course Bundle! Learn reconnaissance, Active Directory attacks, firewall evasion, API hacking, phishing, and much more.
This bundle includes:
- Red Teamer Hacking Course: Learn Ethical Hacking Volume 1
- Red Teamer Hacking Course: Learn Ethical Hacking Volume 2
- Red Teamer Hacking Course: Learn Ethical Hacking Volume 3
And these bonus courses:
- Windows API Hacking Course With Python
- Breaching The Perimeter With Enterprise Phishing Training
- Get a Red Team & Penetration Tester Job Course
- The Complete Nmap Ethical Hacking Course


OMG. I have rarely seen such detailed and generously delivered hacking tool. You really took the time to give us all we need to get started. Thank you again.
Really a great layout. A noob like me got so much outta this..
[…] Source: https://www.stationx.net/how-to-create-a-virtual-hacking-lab/ […]
Will this lab work on VMWare Workstation Pro? If so, does it require changes/adjustments, particularly to the network setup (i.e. NAT)? Thanks for providing such a great resource.