
Are you struggling to learn how to use Burp Suite effectively? You're not alone! As a comprehensive suite of tools designed for web security testing, Burp, as it’s sometimes referred to, has become a go-to choice for those interested in web application security, such as penetration testers and bug bounty hunters.
This guide will help by walking you through the entire process. We'll cover everything from setting up your environment and configuring the Burp Proxy, to using essential features like the Repeater, Comparer, and Intruder.
By the end of this article, you should have a solid understanding of the features of Burp. Remember that practice is essential, so be prepared to apply what you've learned from this Burp Suite tutorial to deliberately vulnerable labs, such as OWASP juice shop and DVWA.
So, buckle up and join us on this journey with our step-by-step guide on what Burp Suite can do.
What Is Burp Suite?
Burp Suite was developed by PortSwigger and started in 2003 by creator Dafydd Stuttard, who wrote the first version of Burp, with actual burping sounds. A favorite of bug bounty hunters, Burp is a collection of web application testing tools designed for penetration testing.
At its core, Burp functions as an interception proxy, allowing users to redirect browser traffic through the Burp proxy server while targeting specific web applications, making it an essential tool for identifying and addressing web application vulnerabilities.
Burp Suite tools include features such as Proxy, Repeater, Intruder, Comparer, Extender, and Extensions, which allow for rapid and versatile testing of web applications.
By intercepting and modifying HTTP/HTTPS traffic between a user's browser and a target web application, it enables security professionals to identify vulnerabilities and potential attack vectors.
In this article, we will use the Community Edition of Burp, installed by default in Kali Linux. The Community Edition is a free version of the tool, and it includes the essential features required for the manual testing of websites and web services.
Portswigger also offers a Burp Suite Professional edition and a Burp Suite Enterprise edition, which provide advanced features and added functionality suitable for more complex testing scenarios.
At the time of writing, Burp Suite Professional retails for $449, while the Burp Suite Enterprise edition starts at $8,395
Now that you have a brief understanding of Burp Suite and its purpose, we will dig deeper into how to use it in the following sections.
Setting Up
Before starting, ensure you have the latest version of Burp Suite installed on your system and the appropriate proxy settings. Installing the latest version helps keep Burp updated with essential features and fixes.
Updating Burp Suite
First, open a terminal and type: sudo apt update -y

This will update the system's package manager's lists. The package lists downloaded by the update command contain information about the latest version of the software packages available.
Next, to check if Burp Suite needs to be updated, type: sudo apt upgrade burpsuite

If an update is available, it will update to the newest version for Kali. Now that we have everything up to date, it’s time to move on to our last step, which is installing a proxy addon to the browser.
Foxy Proxy
We recommend installing the FoxyProxy extension for your browser. This extension lets you quickly toggle between proxy configurations, enabling you to use Burp Suite when needed instead of manually entering settings in the browser. It is commonly used with Burp Suite to forward network traffic to Burp. FoxyProxy has a browser addon for Firefox and Chrome.
Follow these steps to set up FoxyProxy in Firefox:
- Install the FoxyProxy Standard extension in your browser.

- Click on the FoxyProxy icon and select Options.
- Create a new proxy configuration with the following settings:
| Title: | Burp |
| Proxy Type: | HTTP |
| Proxy IP: | 127.0.0.1 |
| Port: | 8080 |

- Save the proxy configuration and set it as active from the toolbar whenever using Burp Suite.

You can start Burp Suite in a few different ways. The first way is to open a terminal and type burpsuite.
The second way is to open Burp Suite from the applications menu under “Web Application Analysis.” Click on “burpsuite” to start the application.

You will be presented with an error about JRE, just ignore this message and hit “OK”

Next, you will see a screen asking you if you would like to create or open a project. For our demonstrations, we will be using the default setting. Click “Next.”

Finally, on the last screen, leave the settings as default and click “Start Burp.”

Adding an SSL Certificate to the Browser
We must add a certificate to our browser in order to intercept and analyze encrypted communication between a client and a server.
When your browser requests a secure website (HTTPS), the transmission is encrypted using SSL/TLS encryption. Burp Suite acts as a "man-in-the-middle" by intercepting and decrypting the communication using a generated certificate.
However, to do this, the client must trust the generated certificate. By importing Burp's CA certificate into the client's trust store, the client will authorize the interception and decryption performed by Burp Suite.
If we try to visit https://google.com with our intercept on, we get the following error message.
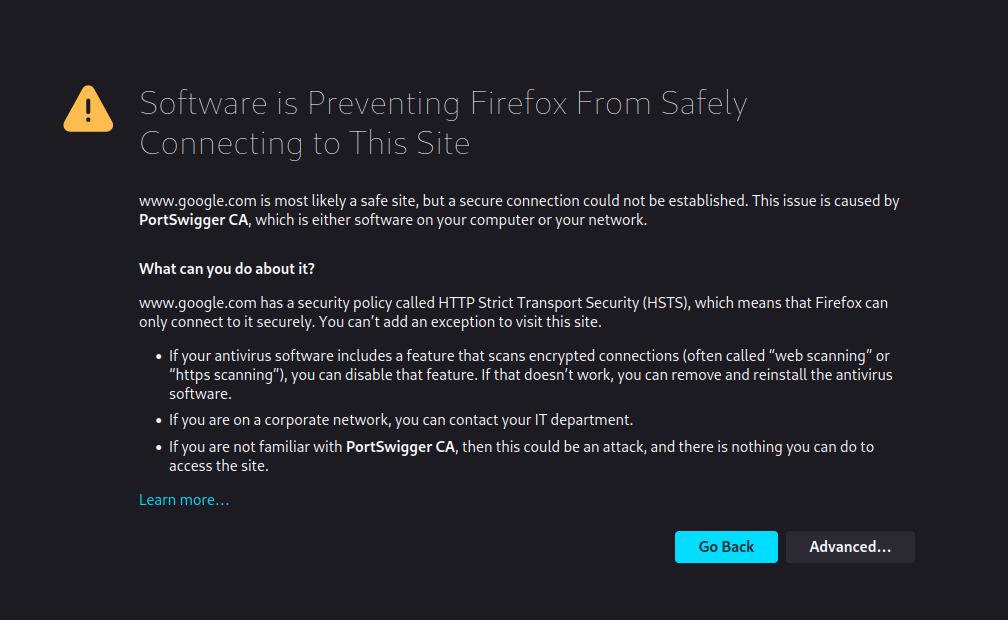
To fix this error, follow these steps to install the CA certificate:
- Launch Burp Suite and navigate to the Proxy tab.
- Click on the Intercept sub-tab and ensure the Intercept button is turned on.
- Visit http://burpsuite in your browser and click “CA Certificate” to download and save it to your Downloads folder. The file is called cacert.der.

- Next, type about:preferences into your Firefox search bar and press enter; this takes you to the settings page. Search for “certificates” and find the option to “View Certificates.”

The “View Certificates” button lets you see all your trusted CA certificates. You can register a new certificate for Portswigger by pressing “Import and selecting the file we downloaded.

In the menu that pops up, select “Trust this CA to identify websites,” then click OK.

Any encrypted traffic should flow through Burp Suite, allowing us to intercept requests. Now that we have everything set up for Burp Suite let’s look at the cool features this program has.
Burp Proxy
To get started using Burp Suite, we need to turn on its proxy and start intercepting traffic.
Ethical Hacking Courses Bundle: Learn Hacking for Beginners
Just starting out? The Ethical Hacking Courses Bundle teaches you how to think like a hacker, exploit common weaknesses, and build the foundational skills for penetration testing.
How a Proxy Works
A proxy, in simple terms, is a server between a client (such as a browser) and a server (such as a web application).
You can think of a proxy like a translator between two people who speak different languages. The translator (proxy) listens to one person (client), translates their message, and relays it to the other person (target server). Then, the translator listens to the response, translates it, and forwards it to the first person.
In this analogy, the translator can modify the message or response as needed, just like a proxy can manipulate network traffic between a client and a server.

When using Burp Suite, it's crucial to understand how to work with its proxy feature effectively. The Burp Proxy will enable you to intercept HTTP requests to inspect and modify the network traffic between your browser and the target application.
From this point forward, we will use the DVWA (Damn Vulnerable Web Application) as our target to show you how to use the tools in Burp Suite. There are many other programs to help you learn web application testing using Burp Suite, such as OWASP juice shop and bWAPP to name a few.
If you are looking for a way to set up your own virtual hacking lab, see our How to Create a Virtual Hacking Lab: The Ultimate Hacker Setup.
Setting Target Scope
The next step in our Burp Suite tutorial is setting the scope. The target scope defines the range of the project and ensures that the test is performed only on the specified domains, subdomains, and URL paths, rather than the entire internet.
To define the target scope in Burp Suite, follow these steps:
- Go to the Target tab at the top of the interface.
- Select the Scope settings sub-tab to define your target application's scope.
- Click the Add button in the "Target scope" section to specify which URLs or domains to include in the target scope.

A pop-up window will notify you about “Proxy history logging.” Click “Yes,” this will prevent Burp Suite from logging any out-of-scope requests. It enables you to avoid accumulating project data for out-of-scope items.

Modifying Intercept Client Requests
Adjusting client request intercept options in Burp Suite allows you to control which requests get intercepted and viewed while you work.
This will enable you to continue browsing the internet and visiting other sites, as Burp Suite will only intercept in-scope items.
Follow these steps to modify the settings:
- Navigate to the Proxy tab at the top of the Burp Suite interface.
- Select the Proxy settings sub-tab to access Burp Proxy settings.
- In the "Request intercept rules" section, you can define the conditions for capturing requests.
- Enable “And/URL/is in target scope” and click OK.
- Make the same changes in the “Response intercept rules” section

With these settings configured, Burp Suite will now intercept only the HTTP and HTTPS requests that are in scope, enabling a more focused and efficient analysis of your target application's traffic.
Let’s look at how the Burp Proxy works using DVWA. We will attempt to log in to the application.
username:admin
password:admin

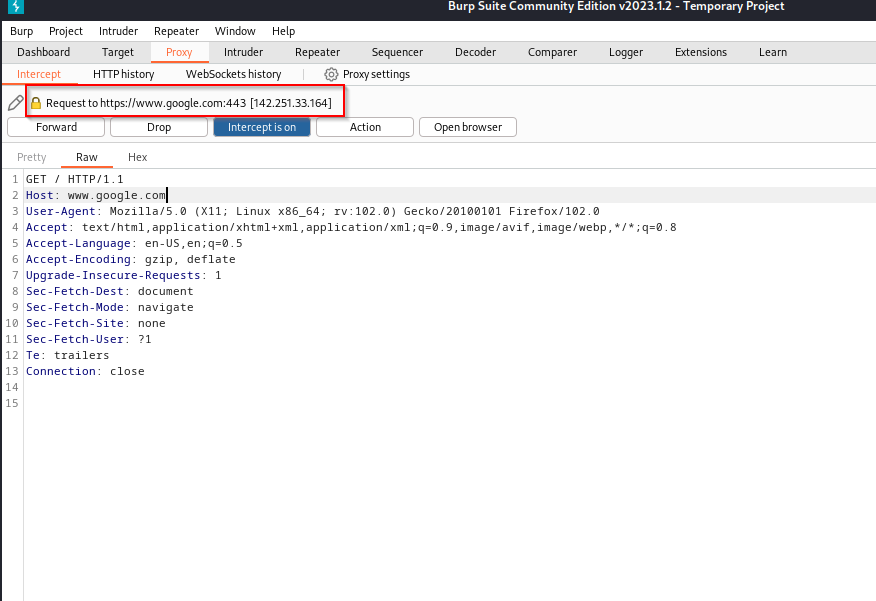
When we click the login button, the request we make to the server will be intercepted by Burp Suite, and we will have the option to edit the parameters before sending it to the server for a response.

At this point, we can forward the request as is, drop the request or even change what we send to the server, such as changing the username or password values in the header.
Let’s forward the request to the server and see what happens.

After we forwarded the request to the server, we can see that we could not log in with the credentials provided. In our section on the Intruder option, we will look at how we can attempt to brute force our login to the application.

Always adjust the Burp Proxy according to your needs and project requirements. This will help you stay more efficient and organized when working with Burp.
Creating a Site Map
One feature that Burp Suite has is the ability to create a map of the site you are testing. It’s a great feature as it gives you a look at the site's structure. You can use the site map to send content to Burp's other tools.
To create a site map, ensure that intercept is off, FoxyProxy is enabled, and the target site is added to the scope. Afterward, navigate to the "Target" tab and select the "Site map" sub-tab.
Start navigating the target site, and Burp Site will build a sitemap.
Once Burp Suite has completed its crawl, you can review the discovered content in the "Target" tab under the "Site map" sub-tab. This comprehensive view of the site's structure is valuable for further testing and analysis, enabling you to identify potential vulnerabilities.
The tree view in the left-hand pane contains a hierarchical representation of content. The tree view shows URLs as Domains, directories, files, and parameterized requests.

Burp Repeater
In this section of our Burp Suite tutorial, we will discuss how to use the Repeater tool and its use in manual vulnerability assessments.
The Repeater tool allows you to modify and resend HTTP or WebSocket messages. This can be useful to test for input-based vulnerabilities or varying parameter values.
We can grab a request with the Burp Proxy, make changes, and then send the same request over and over as many times as we want, such as when we create requests from scratch using a command line tool like cURL.

First, let’s look at a local file inclusion vulnerability within DVWA. Local file inclusion is a vulnerability that allows an attacker to access, read, or include files from the server that they were not intended to access.
We can look at this in action using Burp's Repeater option. Ensure that Burp is running and you have Intercept and FoxyProxy enabled.
First, we intercept a request from the file inclusion page and inspect it in Burp. The element we are most interested in is after the = sign. The value we can change.
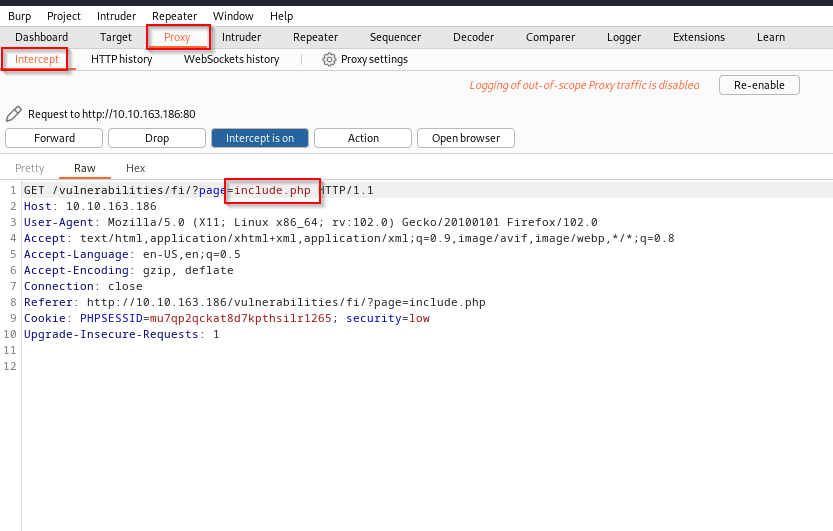
Next, we will send this to Repeater to further investigate the vulnerability. To do this, click anywhere in the request section and select “Send to Repeater.”

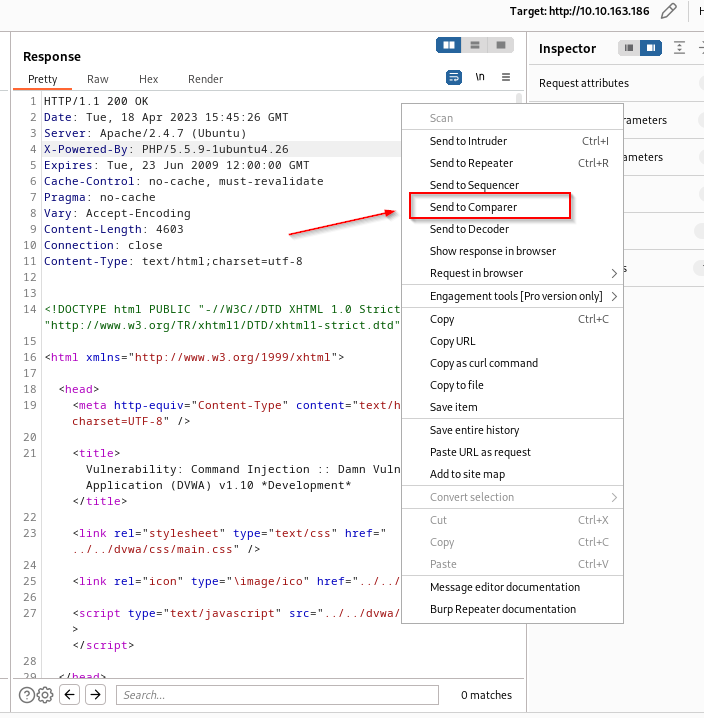
Once you have the request in Repeater, you can alter the parameters, headers, or other elements to test the target application adequately. To send a request to the server for a response, click “Send.” The response from the server will be displayed in the Raw tab.

We can gather a lot of information from a server response. In this case, we can see that this application is running Apache and PHP on Ubuntu. This can be helpful when doing web application penetration testing.
You can also see responses in the “Pretty, Hex, or Render” view. Pretty provides a formatted and easy-to-read representation of the response. The Hex view displays raw binary data, best used for non-textual data. Render provides an in-browser-like display similar to Burp’s embedded browser, letting you see how the content would appear in a browser.
As we are dealing with a file inclusion vulnerability on a Linux system, we can attempt to read the /etc/passwd file. A file in Linux containing information about each user account on the system.
To accomplish this, we can change the GET request value after ?page= from include.php to /etc/passwd and click “Send” to check the response in Repeater.

It worked. We can see all the users who are part of the system.
At times, you may want to compare the results of different requests within Burp Suite. The Comparer tool is handy for this purpose.
Once you have multiple requests or responses in Comparer, you can compare them to understand their variations. The Comparer tool highlights the differences, making analyzing how the target application processes the input easier.
We can look at this using the command injection vulnerability in DVWA.

First, we need to intercept the request in Burp Suite. Once we have the request, we can send it to Repeater. Once in Repeater, send the request to the server.

From here, we need to right-click on the response side and send it to Comparer.
Since Comparer needs more than one response, we must send a different request to the server. As this is a command execution vulnerability, we should be able to run the ls command. We will add the command after the IP address in the request and send it to the server. Then, right-click on the response and send this to Comparer.

The Comparer data can be broken down into three sections. The main window is where you can see the items you are comparing, such as item numbers, length, and data. On the top right side of the screen are options to “Paste, Load, Remove, or Clear” data. The bottom right of the screen gives you two options to compare the data. Either by “Words” or by “Bytes.”

We can see by the length of the data that there is a difference in the responses. We will compare our two responses by “Words” and see our results. Enable “Sync views” so both windows move simultaneously, making it easier to spot differences.
Comparer will display data in three different colors. Orange for “Modified,” blue for “Deleted,” and yellow for “Added.”
If we scroll down, we can see some differences in the data we received from the server. We were able to successfully perform command execution and display the contents of the directory.

Burp Intruder
Burp Suite's Intruder is a powerful tool for automating customized attacks against web applications. You can use it to test various inputs and identify potential vulnerabilities. For example, by intercepting a request using a login attempt, we could use Intruder to switch out the username and password fields for values from a wordlist.

To fully utilize the speed of Intruder, Burp Professional is required. Although Intruder can still be used with Burp Community, it is significantly rate-limited. Therefore most people use alternative tools for this task.
In this section, we will discuss how to use Intruder to perform a brute force attack.
We will be using DVWA’s brute force section to demonstrate Intruder. Once we have intercepted the request for the login page, we can send the request to Intruder by right-clicking and selecting “Send to Intruder.”

Once inside the Intruder tab, we must set all the options to run our attack. Burp Suite, by default, will highlight all the potential payload variables in the color green and enclose them with the $ character. We won’t need all of them as we are only interested in the username and password fields.
To clear the payload positions, click on “Clear.”

We need to choose which attack type we want to use. The different attack types are listed below.
There are four common attack types in Intruder:
- Sniper: Uses one payload set and injects the payloads one by one into all selected positions.
- Battering ram: Uses one payload set and injects the same payload into all selected positions simultaneously.
- Pitchfork: Requires two or more payload sets and uses corresponding payloads from each set for each position.
- Cluster bomb: Requires multiple payload sets and tests payloads in all combinations for each position.
For our scenario, we will use the “Cluster bomb” attack to iterate through each payload set, testing all possible combinations we provide.
Next, add only the username and password value by highlighting admin and admin and clicking “Add.”

Next, click the "Payloads" sub-tab, and we can configure the payloads we want to use in the attack. Since we set two payload positions, we must set up each set. The first set is for the username, and the second is for the password.
We can leave the payload type as “Simple list” for this exercise but do know that there are other options, such as “Custom iterator and “Character substitution,” which we won’t be going into for this tutorial.
There are six options in the “Payload Settings” section, which you can see below. These allow us to load a list or add items manually. For this exercise, we will be adding our own items.
- Paste - Insert a list from your clipboard.
- Load - Load a list from a file.
- Remove - Delete the highlighted item.
- Clear - Delete all items in the list.
- Deduplicate - Remove duplicate entries from your list. This increases the efficiency of your attacks by reducing the number of requests sent.
- Add - Enter a new item.

Once everything is set, click “Start attack.”

The results of the attack will be displayed in a new window. Analyze the responses by looking for discrepancies or indicators of a potential vulnerability.
In the attack results window, you can sort through columns such as Status, Length, and Error to help you identify variations in responses that may indicate a successful login to the web application.

You can usually identify interesting responses through the following:
• A different HTTP status code.
• A different length of response.
• The presence or absence of certain expressions.
• The occurrence of an error or timeout.
We can sort the Length column and see if we have any differences in the size.
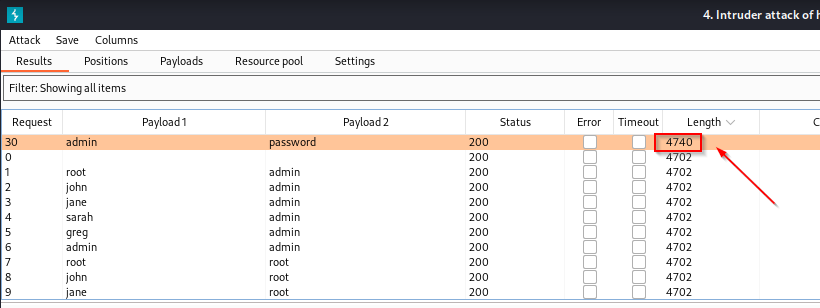
As you can see, there is one length that is different from the others, this could indicate that we have a successful login. We can verify this by attempting to log in to the application with the credentials.

We are able to successfully log in with the username:admin and the password:password.
CompTIA PenTest+ Voucher
Launch your pentesting career with a discounted CompTIA PenTest+ Voucher. Save up to 30% and earn your certification with an authorized CompTIA partner.
Burp Extensions
Burp Suite extensions allow you to customize and enhance the functionality of Burp Suite. To add and manage extensions, navigate to the Extender tab and access the BApp Store.

There are numerous free extensions available in the BApp Store, compatible with the Burp Suite Community edition. Some popular examples include:
Param Miner: Useful for discovering hidden parameters in web applications.
Hackvertor: A tool that will transform, interpret, encode, decode, cipher, decipher, generate hashes, condense, expand, modify, and manage data.
CO2: A collection of tools, including SQL Mapper, JWT Decoder, and Hasher, designed to simplify and automate various tasks in the testing process.
Remember to explore the BApp Store regularly, as new extensions are added frequently. Try different extensions to find the ones that best suit your needs.
HotKeys
Now that you have a good understanding of how to use the tools above, here are some shortcuts that will help speed up your process.
| Navigational Hotkeys | |
| Ctrl-Shift-T | Target Tab |
| Ctrl-Shift-P | Proxy Tab |
| Ctrl-Shift-R | Repeater Tab |
| Ctrl-Shift-I | Intruder Tab |
| Ctrl-Shift-O | Project Options Tab |
| Ctrl-Shift-D | Dashboard Tab |
| Ctrl-Equal | Next tab |
| Ctrl-Minus | Previous tab |
| Tool Specific Hotkeys | |
| Ctrl-F | Forward Request (Proxy) |
| Ctrl-T | Toggle Proxy Intercept On and Off |
| Ctrl-Space | Send Request (Repeater) |
| Double-click <TAB> | Rename a tab |
Conclusion
In this Burp Suite tutorial, you've learned quite a bit about how to use this great piece of software. We walked through the setup and configuration. We discussed what a proxy is and how Burp is a proxy.
We showed you how to use Burp with the Repeater function to analyze requests and responses. We showed you how to use Comparer, and we also walked you through using Intruder to brute force a login page. Finally, we showed you where you could access extensions to increase the functionality of Burp Suite.
As you become more proficient with Burp, you'll be better equipped to test web applications for vulnerabilities.
Remember that continuous learning and practice are essential to staying current with the ever-evolving field of web application security and penetration testing. So, keep exploring new features and techniques within Burp Suite to enhance your skills and expertise.
Are you ready to take it to the next level? Check out our StationX Master’s Program for a vast array of courses available to support your journey.
Master the art of bug bounty hunting and web hacking with this course bundle. Learn ethical hacking, recon, web exploitation, privilege escalation, and real-world reporting techniques used by professionals to uncover and report vulnerabilities - lifetime access for a one-time purchase.
This Bug Bounty Hunter Course Bundle includes:


Nice information
One of new method were learned from this blog of burf suite