
If you want to conduct a vulnerability scan, you can use Nmap, which is a popular tool for the security testing process. Nmap is a powerful and versatile network scanning tool that lets you map out hosts and services on your network and provides valuable information to analyze for vulnerabilities.
In this article, we’ll discuss what Nmap is, demonstrate how to use its core features, and show you a few other scanning options available. Throughout this experience, we’ll provide you with screenshots for greater clarity and some helpful tips we’ve learned along the way so that you’re equipped with everything you need to know to get started scanning for vulnerabilities.
Let’s get ready to dive into how to scan vulnerabilities with Nmap.
What Is Nmap?
Nmap is a free and open-source tool designed for network discovery and security auditing. In short, it’s a tool that can help you conduct port scanning, network inventory, and identify vulnerabilities from multiple sources.
You can use Nmap to scan a single target or a large network rather quickly and gather valuable insight into the open ports, hosts, services, and operating systems contained in the network. This allows you to analyze the information and inform your efforts, whether you’re looking for an avenue of attack for further penetration testing or areas to shore up your defenses.
This is one of the default tools included in Kali Linux, which is what we’ll use to demonstrate it. However, it can also easily be added to any custom operating system environment through your preferred package manager.
If you need to install Kali Linux, follow our guide here:
How to Install Kali Linux on VirtualBox & Start Hacking Now
Or if you need to set up a practice lab for hacking, we have a guide for that here:
How to Create a Virtual Hacking Lab: The Ultimate Hacker Setup
What is the Nmap Scripting Engine?
Another powerful feature of Nmap is the ability to run scans using various scripts to automate your efforts or customize the security audits to your needs. You can use these scripts to gain even greater versatility and functionality out of Nmap through its native Nmap Scripting Engine (NSE).
The NSE comes with a large collection of scripts already included. Many of these scripts are created and maintained by security professionals who contribute to them as vulnerabilities and exploits evolve. Before you begin each session run the command <nmap –script-updatedb> (this requires <sudo> if you’re not in the root account).
The scripts are categorized by network discovery, sophisticated version detection, vulnerability detection, backdoor detection, and vulnerability exploitation. Some of the scripts use simple techniques, and others use complex techniques. You can also create your own scripts in the Lua programming language.
Disclaimer
We want to be absolutely clear on this point. Even though it might seem innocent enough to perform a scan on your neighbor's wireless network, a server hosting a website, or other networks, don’t do it. You need to have permission from the network owner if you are to do any kind of hacking or penetration testing on their systems.
It might not seem like a big deal, but hacking or evening scanning a system without permission can hold extremely steep legal penalties, including jail time, depending on your location. Such laws include:
- The Computer Fraud and Abuse Act (United States)
- Sections 184, 342.1, 380, and 430 of the Criminal Code of Canada (Canada)
- Computer Misuse Act 1990 (England)
- Sec. 202a and 202b of the German Criminal Code (Germany)
- Information Technology Act Sec. 43 and 66 (India)
- The Act on the Prohibition of Unauthorised Computer Access (Japan)
Read our article Is port scanning legal? to learn more about this topic and to make sure you’re operating in the clear.
Basic Scanning
Before we get too deep into this section, we’ll first explain the Nmap Command Arguments.
There are three elements included in a Nmap command:

Scan Type - This tells Nmap what type of scan will be performed, such as: -sS for TCP SYN scan, -sU for UDP scan, or -sn for a ping scan.
Options - This allows you to specify additional elements of the scan, such as: -O for the operating system, -p for port range, or -A for detailed information.
Target - This defines the target as either a single IP address, a range of IP addresses, or a domain.
These commands can be quite daunting to remember. In our Nmap Cheat Sheet: All the Commands, Flags & Switches you’ll find them all in an easy-to-use format.
A well crafted scan is considered to be the foundation of scanning for vulnerabilities with Nmap. The results of this type of scan will return information about which ports are open and what services are running on them.
We can perform such a scan with a command such as <nmap -p- -A <target IP>>.
This command tells Nmap to scan all ports using the -p- flag and return detailed information about the target host using the -A flag. These results can then be used to identify potential security risks and vulnerabilities present on the target host.

This scan gets you started but doesn’t provide all the information you may need to understand the posture of the host. So let’s look at some other ways to leverage Nmap to scan for vulnerabilities.
Scanning for Vulnerabilities
You can see above that even a standard scan returns some useful information about a network that can aid you in understanding the network environment you’re researching. Scanning for ports is only one function of Nmap and is important for a hacker because a port represents a communication endpoint that allows two devices to relay information between them.
Each port is represented by a number and relates to the services or protocols that run on them. Understanding the common port numbers is a valuable concept for hackers and cyber security professionals alike.
Check out the helpful cheat sheet we put together for you in the article Common Ports Cheat Sheet: The Ultimate Ports & Protocols List.
OK, we know how Nmap scans for ports and that each port identifies a service or protocol. So how does that help us?
This is where vulnerability scanning with scripts comes into play. We’ll cover three powerful ways to do this in the next sections. We’ll start by demonstrating the vuln flag, then move to the vulners flag. Both of these scripts are already included in Nmap. Finally, we’ll show you how to install and run vulscan scripts.
Enough talk, let’s do.
Information Security Courses Bundles
Want lifetime access to expert-led cyber security training? Explore our Information Security Course Bundles — one-time purchase packages covering top topics like Ethical Hacking, Cloud, Linux, DevSecOps, and CompTIA certifications.
Using Vuln
We’ve already mentioned that Nmap comes stock with a host of flags you can craft into a command suited to your needs. But what if you aren’t exactly sure which vulnerability set you’re looking for? Or what if you want a wide starting point to reference and then dig down into a certain element that interests you?
This is where the <--script vuln> comes into play. It tells Nmap to run all of its detection scripts contained in the NSE against the target host. These vulnerability scripts are then executed and return any known vulnerabilities with a running service and also provide detailed information about the vulnerability.
You can also check out the references listed in the results for each discovered vulnerability for a better idea of what it is and how it might be exploited or remediated.
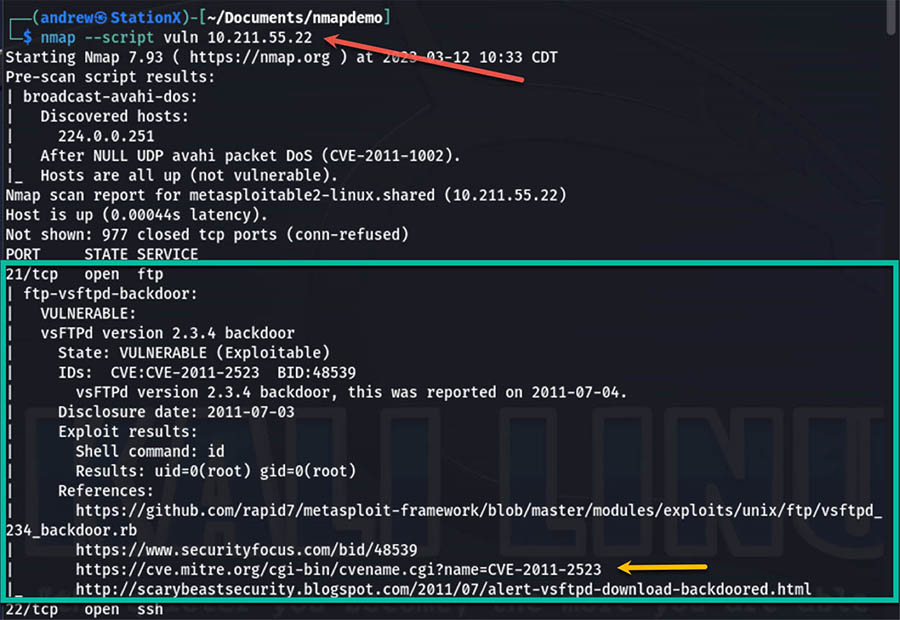
Since this command is running a large number of scripts against the target host, it can take a long time to complete depending on the size of the host and the number of IP addresses and ports open.
Tip:
Sometimes you may not want to know all vulnerabilities, such as those with low CVSS scores.
In this case, you can use the flag <--script-args=mincvss=X.X> to only show vulnerabilities with a certain score or higher.
The complete command would look like this:
<nmap --script vuln --script-args mincvss=7.0 <target>>
Using Vulners
Another powerful script that you can use for vulnerability scanning is the <--script vulners> flag. Remember that this script comes pre-installed with Nmap, so there’s no setup needed to start using it.
To use this flag, you need to ensure that you use the <-sV> flag to have Nmap attempt to determine the version of the service running on each port. Otherwise, it’s executed in similar ways that you ran the vuln scan just a moment ago.
The great thing about the vulners script is that it’s intended to be run in a very straightforward way. The basic command to execute this is:
<Nmap -sV --script vulners <target>>

The value of using the vulners script is that it pulls from the vulners.com database with over 2 million security advisories and articles and 197 software vendors and other resources. And this list is frequently updated and expanded with an average time of 24 hours to publish and update exploits.
Another advantage of the database is maintained on a regular basis is that this scan will often reveal information that some other scans might miss.
There are two key reasons to consider the vulners flag to scan with: speed and accuracy. This script is very efficient and in we tend to see it run a scan in as little as 25% of the time as the vuln scan. Even with the relative quickness of the scan it still provides accurate and detailed results.
Using Vulnscan
The last vulnerability scan we’ll demonstrate is vulscan. This script extends the functionality of Nmap and pulls in vulnerability databases from several different sources, such as NVD, CVE, and OVAL, among others.
Vulscan performs the scan by checking the banners and service versions on the target. It is essentially a custom-built scan using Nmap functions and leveraging them against key, reputable sources for vulnerabilities.
One key benefit of vulscan over scripts such as vulners is that the vulnerability databases are downloaded on your device rather than called from online (as in vulners). This gives you the ability to run scans on a local network even when offline.
In order to use this script, you will need to download it from their GitHub repository.
The installation process is very straightforward and only requires two commands.

If you are not in the root account, then you will need to call the git command with <sudo>.
Because this script isn’t included in Nmap, it won’t update the databases when you run the <nmap --script-updatedb> mentioned at the beginning of this article. Instead, you’ll need to use two commands to update the database for vulscan.
Initially, give yourself permission to the file:
<chmod 744 update.sh>
Then when you want to update the database run this from the vulscan folder:
<./update.sh>
If you’re not exactly sure what permissions 744 gives, we wrote Linux File Permissions Cheat Sheet to explain this in detail.
Running a vulnerability scan with vulscan requires two components: the <--script vulscan> flag and the path to the database.
A basic command for this scan looks like this:
<nmap -sV --script=vulscan/vulscan.nse <target>>

While this scan didn’t discover any vulnerabilities for port 21 on our instance, you can see how the results are provided in an iterative fashion as vulscan checks against each vulnerability database. This makes the organization easy to follow and directs you where to find information about the vulnerability.
CompTIA Voucher Hub
Planning your next CompTIA exam? Save up to 30% with our CompTIA Voucher Hub — official partner discounts for all CompTIA certifications, including Security+, Network+, A+, and more.
Tip:
As you might be starting to realize, these scans can provide volumes of information about your target host. While it’s quite possible to read and reference this information straight from the terminal print out that’s not always friendly.
Can you just pipe the results to a file like any other terminal command? Yes.
But Nmap already thought of this and allows for a more elegant method all within the original command. The great part of this is that using Nmap’s flags automatically still prints the results to the terminal without needing additional commands.
You can use several flags for different output options, but one useful method is to save it as an XML file that you can use in another program. To do this, you simply use the <-oX> flag followed by the file name.
The complete command would look like this:
<nmap --script vuln -oX file.xml <target>>
To make it even more beautiful for easy reading by humans add the --webxml flag, like this:
<nmap --script vuln –webxml -oX file.xml <target>>
Which results in this easy-to-view format that can open in your browser. Much better, right?

Conclusion
Nmap is a powerful tool for scanning for vulnerabilities and identifying potential risks to your network. It contains a host of commands, and a versatile scripting engine with many included and downloadable scripts which can be combined into precision scanning or automated for broad results.
With the vuln, vulners, and vulscan vulnerability scans that we covered in this article you already have the beginning means to automate your network discovery skills and learn how to analyze the results. You should also now understand how to narrow your scan results to look for the most critical vulnerabilities based on their CVSS score.
By scanning for vulnerabilities, you can identify potential attack vectors or vulnerable services that are running on your devices. This gives you actionable intelligence on your network and allows you to exploit weaknesses or mitigate the vulnerabilities before they can be exploited by others.
Nmap is an essential tool for network mapping and vulnerability scanning for security professionals or ethical hackers and penetration testers alike. See how it compares to other vulnerability scanners here.
The StationX Master’s Program gives you unlimited access to 30,000+ courses, labs, mentorship, certification roadmaps, career guidance, and more.
Purchase our Nmap Course Bundle below to get started with Nmap today. Click the banner below.
The Nmap Course Bundle includes:


