
If you’re trying to figure out whether Nmap or Wireshark is best suited for your task, you may struggle to weigh the pros and cons of each tool in achieving your goal. Both are popular and handy tools in computer networking, and problems network security engineers encounter can call for either or both.
Below, we’re going to compare Nmap vs Wireshark: their functions, their purposes, various use cases, and their differences in operation. You’ll clearly understand the connection between networking problem categories and the roles of Wireshark vs Nmap in those scenarios.
Best of all, thanks to this article, you can make brilliant snap decisions under pressure regarding problems calling for either tool, whether you’re a student or professional in IT or cyber security. Without further ado, let’s dive in.
About Nmap and Wireshark
We briefly discuss Nmap and Wireshark below. Both are free and open-source reconnaissance tools that come pre-installed with Kali Linux, and you may install them on major operating systems such as Windows and macOS.
See "How to Install Nmap on Ubuntu: A Comprehensive Guide" and "How to Install Wireshark on Windows, macOS, and Linux."
What Is Nmap?
Nmap (short for “Network Mapper”) is a network discovery and security auditing utility invented in 1997.
It’s useful for the following tasks:
- port scanning,
- vulnerability checking,
- network mapping,
- network inventory,
- auditing network services,
- managing service upgrade schedules, and
- monitoring host or service uptime.
The inventor, Gordon Lyon, created Nmap under the pseudonym Fyodor Vaskovitch, and he and a community of developers maintain and update this tool.
What Is Wireshark?
Wireshark is a packet sniffer and computer network protocol analyzer. It lets you capture network packets and interactively browse network traffic. Its original name when it first appeared in 1998 was Ethereal.
It’s useful for:
- capturing live packet data,
- network analysis,
- network troubleshooting,
- software and communications protocol development, and
- education.
The creator and lead developer is Gerald Combs, and a team of developers (“the Wireshark Team”) maintain the software.
What Are Nmap and Wireshark For?
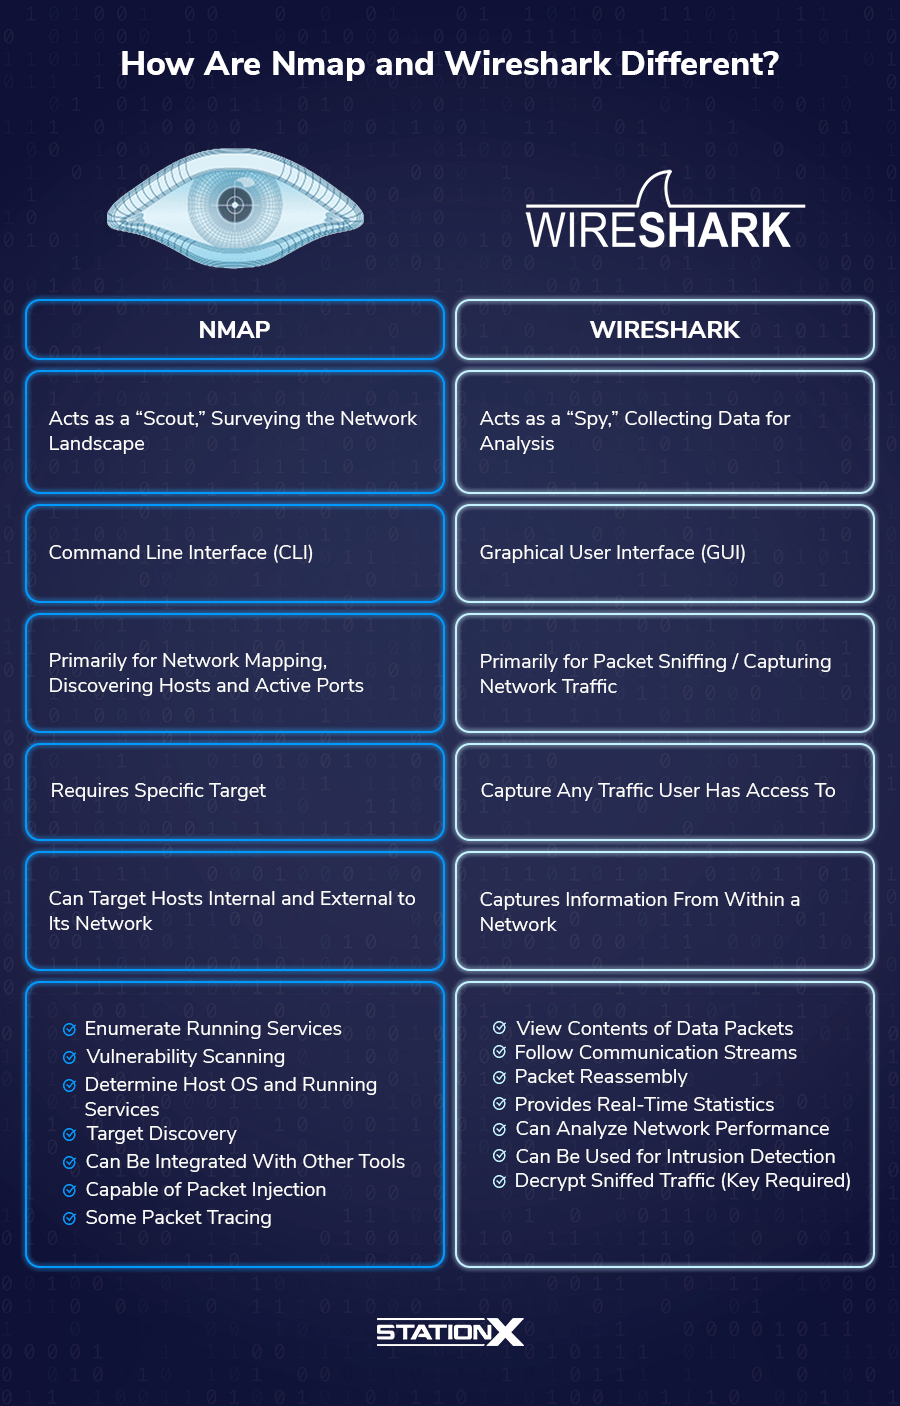
This section deals with the functions and purposes of Nmap and Wireshark. Nmap is a scout, whereas Wireshark is a spy.
What Is Nmap For?
The chief purpose of Nmap is host discovery on a network: rapidly recognizing devices, ports, and services on a network. It supports simple commands (check our Nmap cheat sheet for examples) and complex scripting through the Nmap Scripting Engine.
A simple Nmap scan can help you quickly locate servers, routers, switches, mobile devices, and other machines on individual or multiple networks. Better still, Nmap can scan numerous hosts simultaneously, facilitating the management of vast network infrastructure.
The other major function of Nmap is port scanning: looking for open network ports and running services. This feature enables you to identify web servers, DNS servers, and other common applications running on a system, including application versions and operating system details, which may suggest existing vulnerabilities for penetration testing.
Zenmap, the graphical user interface of Nmap, allows you to visualize mappings for easier usability and reporting.
CompTIA Network+ Training Bundle
Master the N10-009 exam with our CompTIA Network+ Training Bundle (N10-009): 4 Courses, featuring two complete Network+ training courses, 5 full-length practice exams, and over 500 study flashcards to reinforce the essential networking concepts you need to pass.
What Is Wireshark For?
Wireshark’s most important capability is packet capture: it collects IP packets transmitted over a network, including the packet headers and contents.
The following are the 14 fields in the IPv4 header, with brief explanations of the corresponding IPv6 field if it exists:
1. Version
The first header field in an IP packet is the 4-bit version field. For IPv4, this is equal to 4; for IPv6, it’s the constant 6 (bit sequence 0110).
2. Internet Header Length (IHL)
The IPv4 header is variable in size due to the optional 14th field. The maximum IP header size is 480 bits (60 bytes), while the minimum length is 160 bits (20 bytes).
3. Differentiated Services Code Point (DSCP)
Originally defined as the type of service (ToS), this field specifies differentiated services (DiffServ) per RFC 2474. For IPv6, the six most significant bits of the 8-bit Traffic class field contain the DSCP.
4. Explicit Congestion Notification (ECN)
Defined in RFC 3168, it enables end-to-end notification of network congestion without dropping packets. For IPv6, the two least significant bits of the 8-bit Traffic class field contain the ECN.
5. Total IP Header Length
The 16-bit field defines the packet size in bytes, including both header and data section, with an upper limit of 65,535 bytes and a lower limit of 20 bytes (header without data). The IPv6 analog is the 16-bit Payload Length field.
6. Identification
This field identifies the group of a single IP datagram. When two or more IP datagrams have the same identification value, these IP datagrams are fragments of a single large IP datagram.
7. Flags
This is a 3-bit field to control or identify fragments.
8. Fragment Offset
It specifies the offset of a particular fragment relative to the beginning of the original unfragmented IP datagram in units of 8-byte blocks.
9. Time To Live (TTL)
An eight-bit TTL field causes datagrams to expire if they circulate on the Internet for too long. For IPv6, this corresponds to the 8-bit Hop Limit field.
10. Protocol
This field defines the protocol used in the data portion of the IP datagram.
11. IP Header Checksum
We apply this 16-bit header checksum field to error-checking in the IPv4 header.
12. Source Address
This field is the IPv4 address of the packet sender. The IPv6 analog is a 128-bit field containing the unicast IPv6 address of the sending node.
13. Destination Address
It is the IPv4 address of the packet receiver. The IPv6 analog is a 128-bit field containing the IPv6 unicast/multicast address of the destination node or group of nodes.
14. Options
This is the only optional field. Note that the IHL field must include enough extra 32-bit words for this field to work. IPv6 has extension headers.
After you’ve captured a lot of packets using Wireshark, it helps to sift through them for interesting data.
If you want to filter them according to the network protocols you’re looking for, use the Wireshark “Follow Stream” functions, which isolate a particular protocol-specific conversation between two or more hosts. For example, to follow a TCP conversation, use the “Follow TCP Stream” function; for UDP, use “Follow UDP Stream.”
Other packet filters in Wireshark allow you to look for specific IP addresses, MAC addresses, source and destination ports, and other data found in packets.
How Are Nmap and Wireshark Used?
Let’s have a quick overview of typical Nmap and Wireshark use cases.
How Nmap Is Used?
Most professionals using Nmap rely on a few common flags:
-pfor port scanning- Use this option to tell Nmap which ports you want to scan. It admits individual port numbers and ranges separated by a hyphen (e.g., 1-1023). Nmap can also scan port zero, but you must specify it explicitly.
- Syntax:
nmap -p <port number or numbers> <target>
-snor-sPfor active host discovery- With this option, Nmap will only print the names of hosts that have responded to the host discovery probes without any port scan. By default, this option is slightly more intrusive than the list scan. Use this option as a “ping sweep” to count available machines on a network or monitor server availability.
- Syntax:
nmap -sn <target> or nmap -sP <target>
--scriptto use the Nmap Scripting Engine- Nmap runs a script scan using the comma-separated list of filenames, script categories, and directories.
- Syntax:
nmap --script <script type> <target>
-Ato enable OS detection, version detection, script scanning, and traceroute- This flag combines several advanced and aggressive functions and simplifies your operations requiring the above.
- Syntax:
nmap -A <target>
-Tfor speed (Nmap timing templates)- Timing templates allow users to specify how aggressively they wish to conduct their operations, leaving Nmap to pick the exact timing values. The template names are paranoid (0), sneaky (1), polite (2), normal (3), aggressive (4), and insane (5).
- Polite mode slows the scan to use less bandwidth and target machine resources to evade intrusion detection systems.
- Syntax:
nmap -T<a number from 0 to 5> <target>
Here is an example of a port scan:

Here are examples of host discovery scans:

Here’s a scan involving the -T flag. It asks Nmap to use the fastest possible speed to scan the ports on localhost (nmap -T5 127.0.0.1):

How Wireshark Is Used?
Wireshark is a graphical user interface, so it’s much easier to master than the command-line Nmap. This section is a quick rundown of Wireshark’s operations.
When you open Wireshark, it greets you with an interface like the following:
")
When you open a Wireshark packet capture dump file (.pcap), the output looks like the following:
")
Now that we know what to expect from a Wireshark dump, we start a packet capture session by clicking on an active network interface:

Packet capture begins now:

More packets pour in. Now let’s stop this packet capture session by clicking on the red square button on the top left corner:

As soon as the red square grays out, the packet capture has stopped:

Now we open a packet and display the different types of information in it:

We can convert the hexadecimal data into binary data:


To follow a stream (in this case, a UDP stream), select a packet you’re interested in:

Next, right-click the packet, and select “Follow” > the protocol of your choice:

Finally, you get a dialog popup displaying the packet outputs in the protocol stream you’ve selected:

But you may wonder, “What if I could use both Nmap and Wireshark for my task? Which is more appropriate?” For instance, you might ask, “Aren’t Nmap’s --packet-trace function and Wireshark’s packet capture the same?” The next section is for you.
When Should You Use Nmap vs Wireshark?
Choosing between Nmap vs Wireshark is like deploying a scout or a spy. Nmap is for scouting and knowing the landscape, while Wireshark is for stealthily collecting what could be interesting data and bringing them back to camp for analysis.
CompTIA Network+ Voucher
Prepare to validate your networking skills for less. Grab a CompTIA Network+ Voucher and save up to 30% on your exam through StationX’s authorized CompTIA partnership.
Nmap Use Cases
When you begin penetration testing, Nmap is indispensable for mapping the attack surface as a standard operating procedure. Nmap allows you to locate open ports, thus helping you identify vulnerabilities and running services on which you can take action. Nmap doesn’t assume your target machines are online, or your target ports are open.
Nmap also allows users with internal access to a network to detect the machines in operation, the services that may be on them, and other internal network resources. Therefore, network administrators may use Nmap to audit the internal network.
A note on crossover functionality: Nmap’s --packet-trace function is similar to Wireshark’s packet capture, but it focuses on a limited number of packets, giving verbose output. Meanwhile, Wireshark permits filtering beforehand (“capture filters”) and afterward (“display filters”), but you must expand captured packets to inspect their contents.

Wireshark Use Cases
As Wireshark eavesdrops on an active network, you can only use it once inside. It can only sniff packets on online machines and ports in use.
If hacking is your intent, you’ll look for unencrypted credentials and sensitive information among the packets you’ve captured. With such information, you might use it to access certain network resources or escalate your privileges.
If your purpose is system auditing, you will focus on bottlenecks in transmitting and receiving data packets, strange patterns in the captured packets, and digital forensics. The idea is you look at the forest (volumes of data) for the trees (irregularities).
Conclusion
We hope this article comparing Nmap and Wireshark has been helpful to you and that you gain a better understanding of Nmap vs Wireshark. To learn more about using Nmap and Wireshark, check out our Nmap cheat sheet, our Wireshark cheat sheet, and consider our StationX Master's Program, offering over 30,000 courses and labs, including the ones below.
Purchase our Nmap Course Bundle below to get started with Nmap today. Click the banner below.
The Nmap Course Bundle includes:
Frequently Asked Questions

Guarantee Your Cyber Security Career with the StationX Master’s Program!
Get real work experience and a job guarantee in the StationX Master’s Program. Dive into tailored training, mentorship, and community support that accelerates your career.
- Job Guarantee & Real Work Experience: Launch your cybersecurity career with guaranteed placement and hands-on experience within our Master’s Program.
- 30,000+ Courses and Labs: Hands-on, comprehensive training covering all the skills you need to excel in any role in the field.
- Pass Certification Exams: Resources and exam simulations that help you succeed with confidence.
- Mentorship and Career Coaching: Personalized advice, resume help, and interview coaching to boost your career.
- Community Access: Engage with a thriving community of peers and professionals for ongoing support.
- Advanced Training for Real-World Skills: Courses and simulations designed for real job scenarios.
- Exclusive Events and Networking: Join events and exclusive networking opportunities to expand your connections.
TAKE THE NEXT STEP IN YOUR CAREER TODAY!


