
Are you overwhelmed by the countless Nmap commands and their descriptions in the official documentation? We hear you, and we’ve got you covered. The good news is no one needs to master every element of Nmap to start using it effectively day-to-day.
We’re here to share the top 20 Nmap commands you’ll use in your career. Whether you’re an ethical hacker, a student learning the trade, or a fan of capture-the-flag events, these top 20 basic Nmap commands will get you through almost every situation.
No longer will Nmap’s complex ins and outs burden you. Let’s scroll down and start scanning our targets for vulnerabilities now.
What Is Nmap?
Network Mapper (Nmap) is a command-line-based multi-platform (Windows, Mac OS X, Linux, etc.) network scanning application designed to detect hosts and services on a computer network.
Nmap is a vital tool for any student or professional in cyber security. This free and open-source utility helps you gather network information and assess the security posture of devices in the networks you scan with it. Nmap can identify a host’s operating system, running applications, open ports, firewall information, and more.
If you don’t have it yet, install Nmap here.
How To Use Nmap
The Nmap command syntax is the “nmap” keyword followed by at least two arguments:
nmap <flag(s)> <target/file>
All flags begin with one (-) or two (--) hyphens, and a single Nmap command may contain multiple flags. A target is typically an IPv4/IPv6 address or address range.
Some flags apply to files instead of targets; those are for Nmap commands that read from a file or write Nmap scan results to files.


Top 20 Commands
Now that you know how to operate Nmap, we’re showing you 20 Nmap commands that’ll come in handy.
All 20 Commands at a Glance
The following table lists our top 20 Nmap commands:

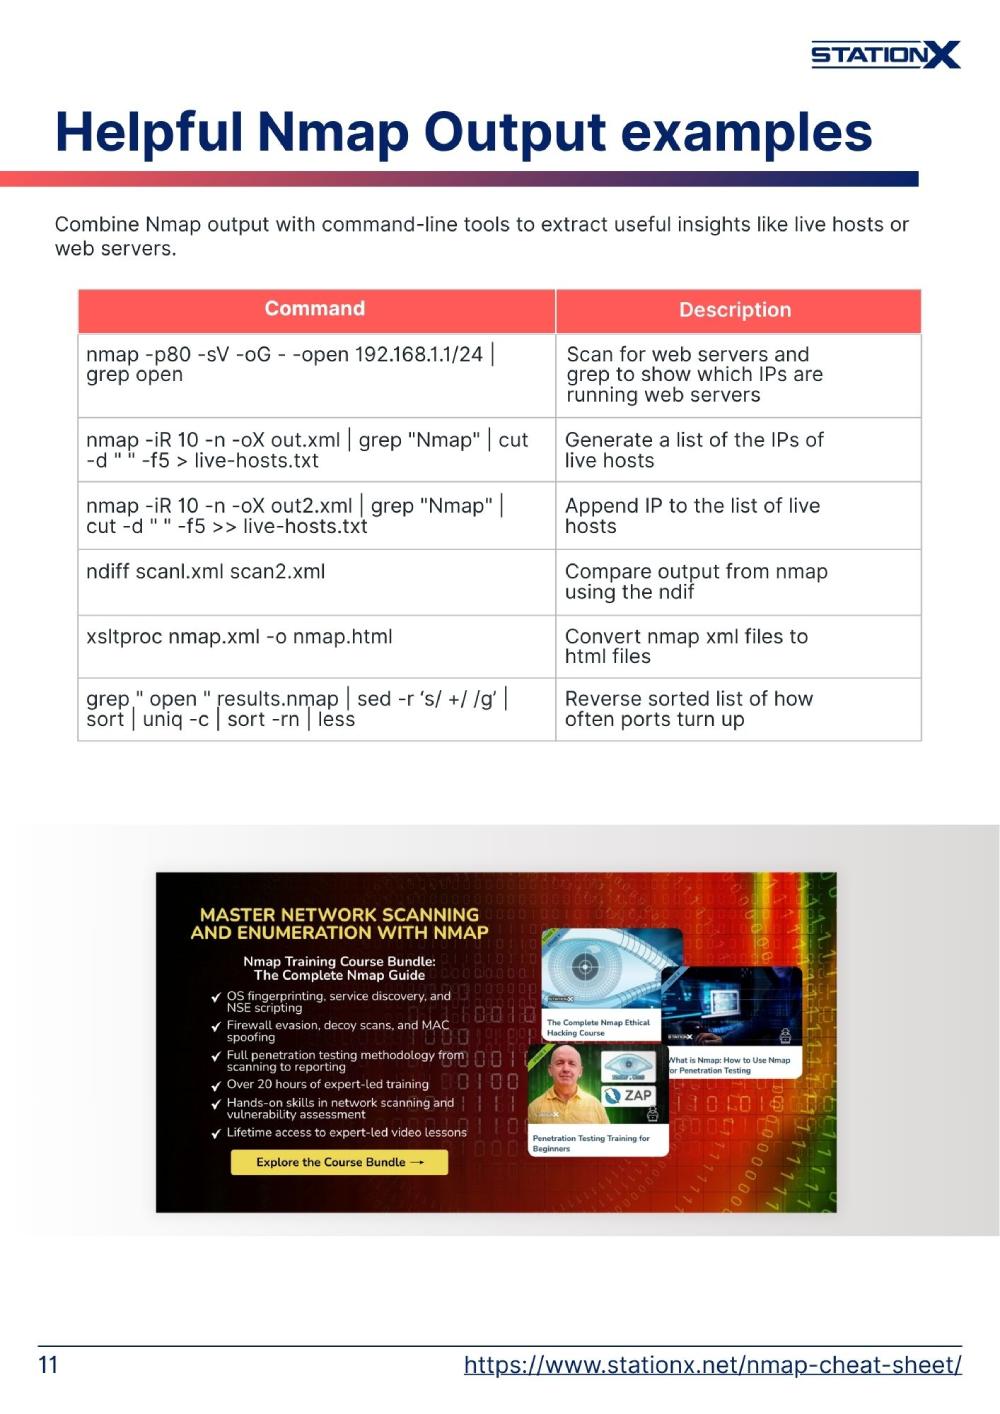
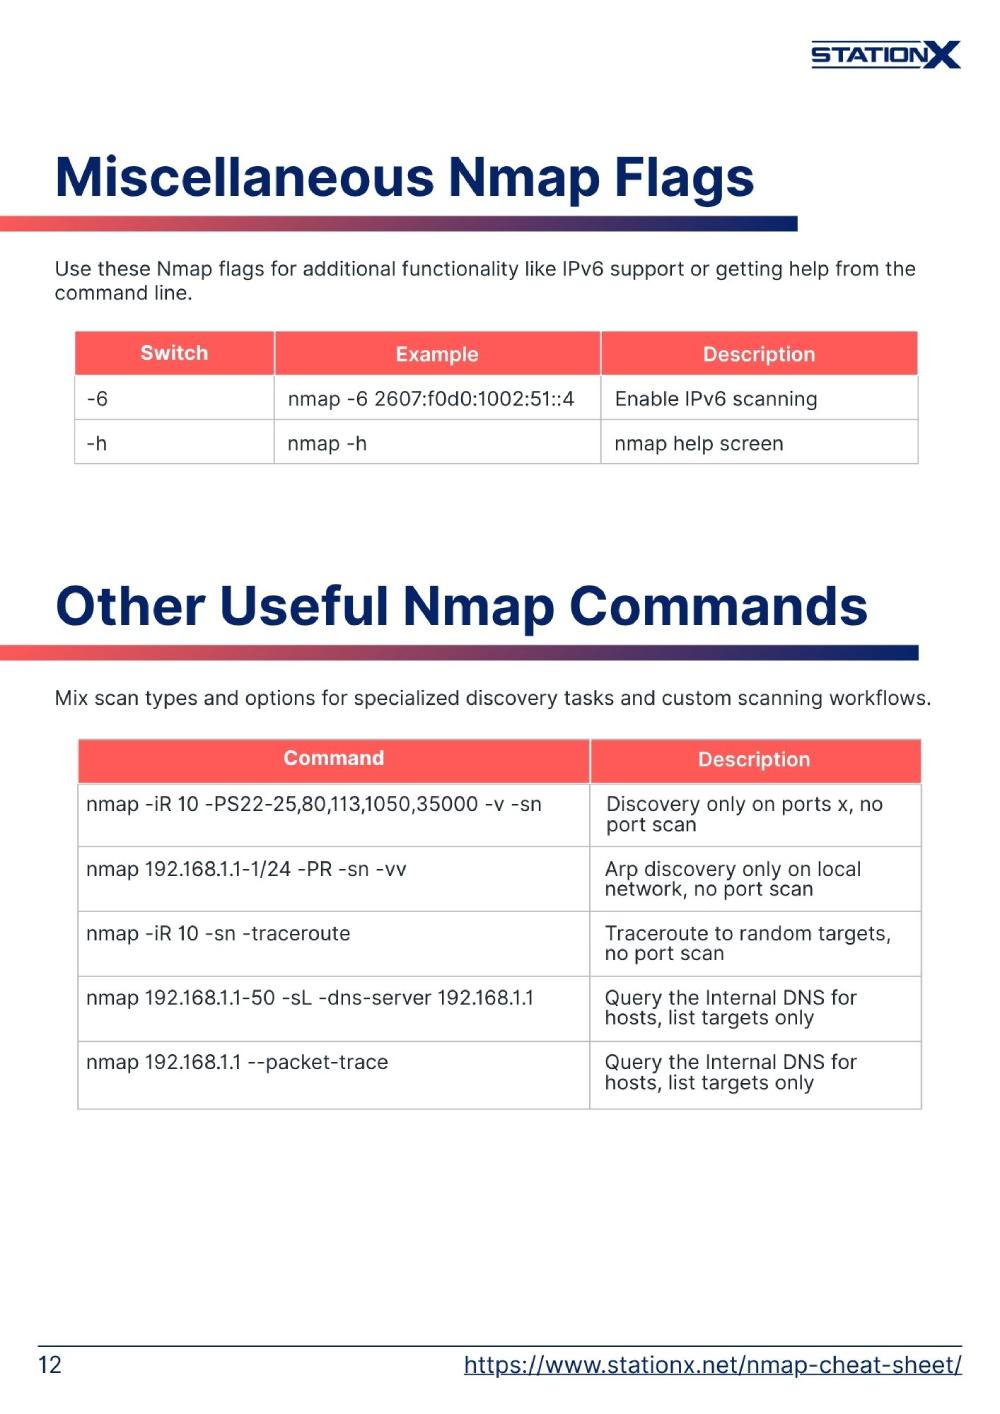
For more Nmap commands, refer to our Nmap cheat sheet.
Nmap Command Generator
Say goodbye to the hassle of trying to remember the exact syntax for your Nmap commands! With our Nmap Command Generator, you can simply say what you need Nmap to do and we will generate the command for you.
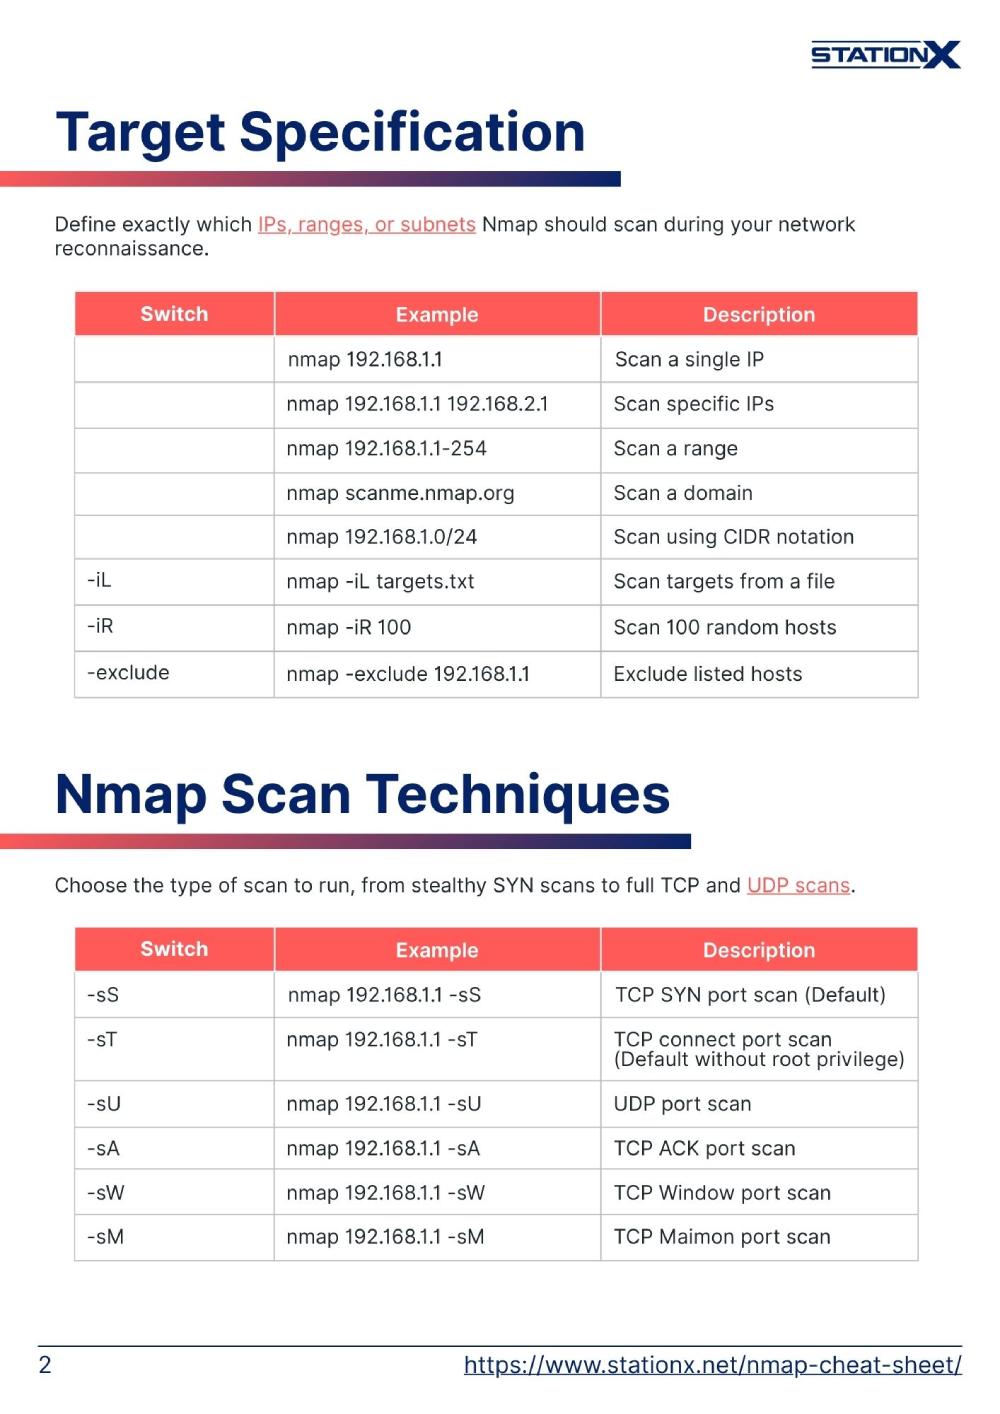
1. List all hosts on a network
nmap -sL <target>
This type of scan (list scan) is a version of host discovery that only lists each host on the selected network (s) and doesn’t send any packets to the target hosts. By default, Nmap does a reverse DNS lookup to get host names.

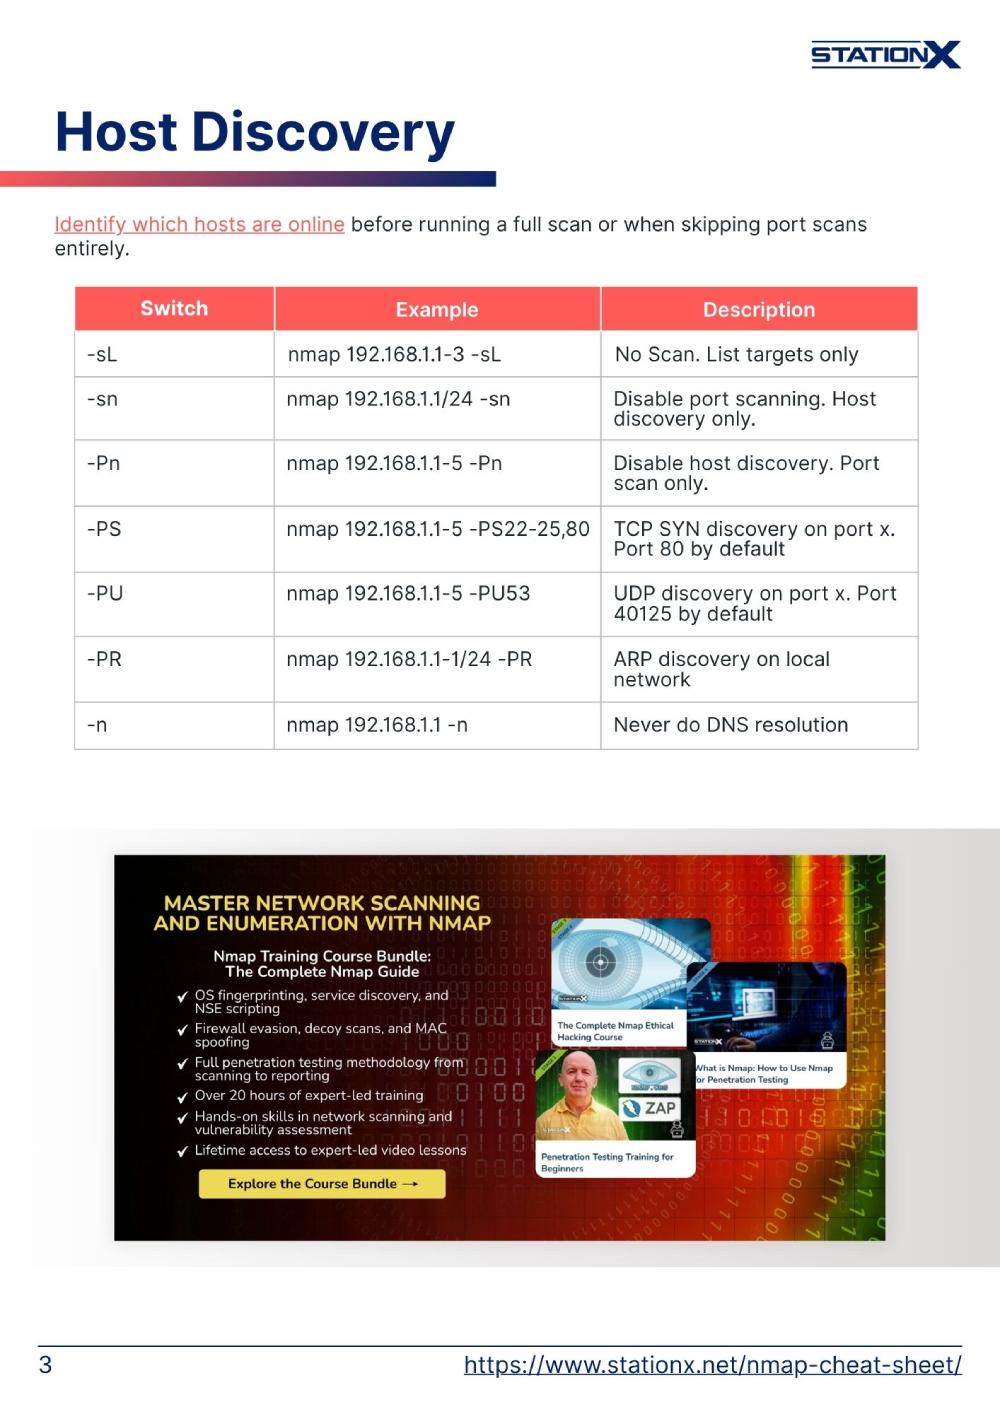
2. Disable port scanning and only discover active hosts
nmap -sn <target>
nmap -sP <target>
With this option, Nmap will only print the names of hosts that have responded to the host discovery probes without any port scan. By default, this option is slightly more intrusive than the list scan. Use this option as a “ping sweep” to count available machines on a network or monitor server availability.


3. Discover the network path to a host
nmap --traceroute <target>
A packet may traverse several hosts before reaching its destination. This option allows you to trace this packet’s journey from host to host.

4. Scan for open ports and version information of services
nmap -sV <target>
When preparing for and doing pentesting, the command above helps you find open ports and determine the versions of running processes. Having accurate version numbers enables you to assess a device’s vulnerabilities.

5. Scan the ports specified
nmap -p <port number or numbers> <target>
Use this option to tell Nmap which ports you want to scan. It admits individual port numbers and ranges separated by a hyphen (e.g., 1-1023). Nmap can also scan port zero, but you must specify it explicitly.
When scanning a combination of protocols (e.g., TCP and UDP), you can specify a particular protocol by preceding the port numbers using a single-letter qualifier:
T: for TCP,U: for UDP,S: for SCTP, andP: for IP Protocol.
The qualifier lasts until you specify another qualifier. For example, the argument -p U:53,111,137,T:21-25,80,139,8080 would scan UDP ports 53, 111, and 137, and the listed TCP ports.

6. Scan all ports on a target
nmap -p- <target>
This command will scan ports numbered 1 through 65535.

7. Scan for open ports on the target
nmap --open <target>
Only show hosts with open or likely open ports, and list those ports. Here, “open ports” refer to any ports that may be open, which includes the port states “open,” “open|filtered (open or filtered),” and “unfiltered.” The Nmap official documentation has more on port states.

8. Scan for the specified number of most common ports
nmap --top-ports <number> <target>
Specify an arbitrary number of the most commonly open ports for Nmap to scan. Nmap scans the <number> highest-ratio ports found in nmap-services file after excluding all ports specified by --exclude-ports. <number> must be at least 1.

9. Perform a TCP connect scan
nmap -sT <target>
A TCP connect scan is where Nmap asks the underlying operating system to establish a connection with the target machine and port by issuing the “connect” system call. The “connect” system call is the same high-level system call that web browsers, P2P clients, and most other network-enabled applications use to establish a connection.

10. Scan for UDP ports
nmap -sU <target>
In a UDP scan, Nmap sends a UDP packet to every targeted port, usually without extra data, except for ports where a payload would increase the response rate, such as 53 and 161. If Nmap receives an error message, the port is unavailable. Avoid rushing UDP scans, as operating systems such as Linux and Solaris impose strict rate limits.

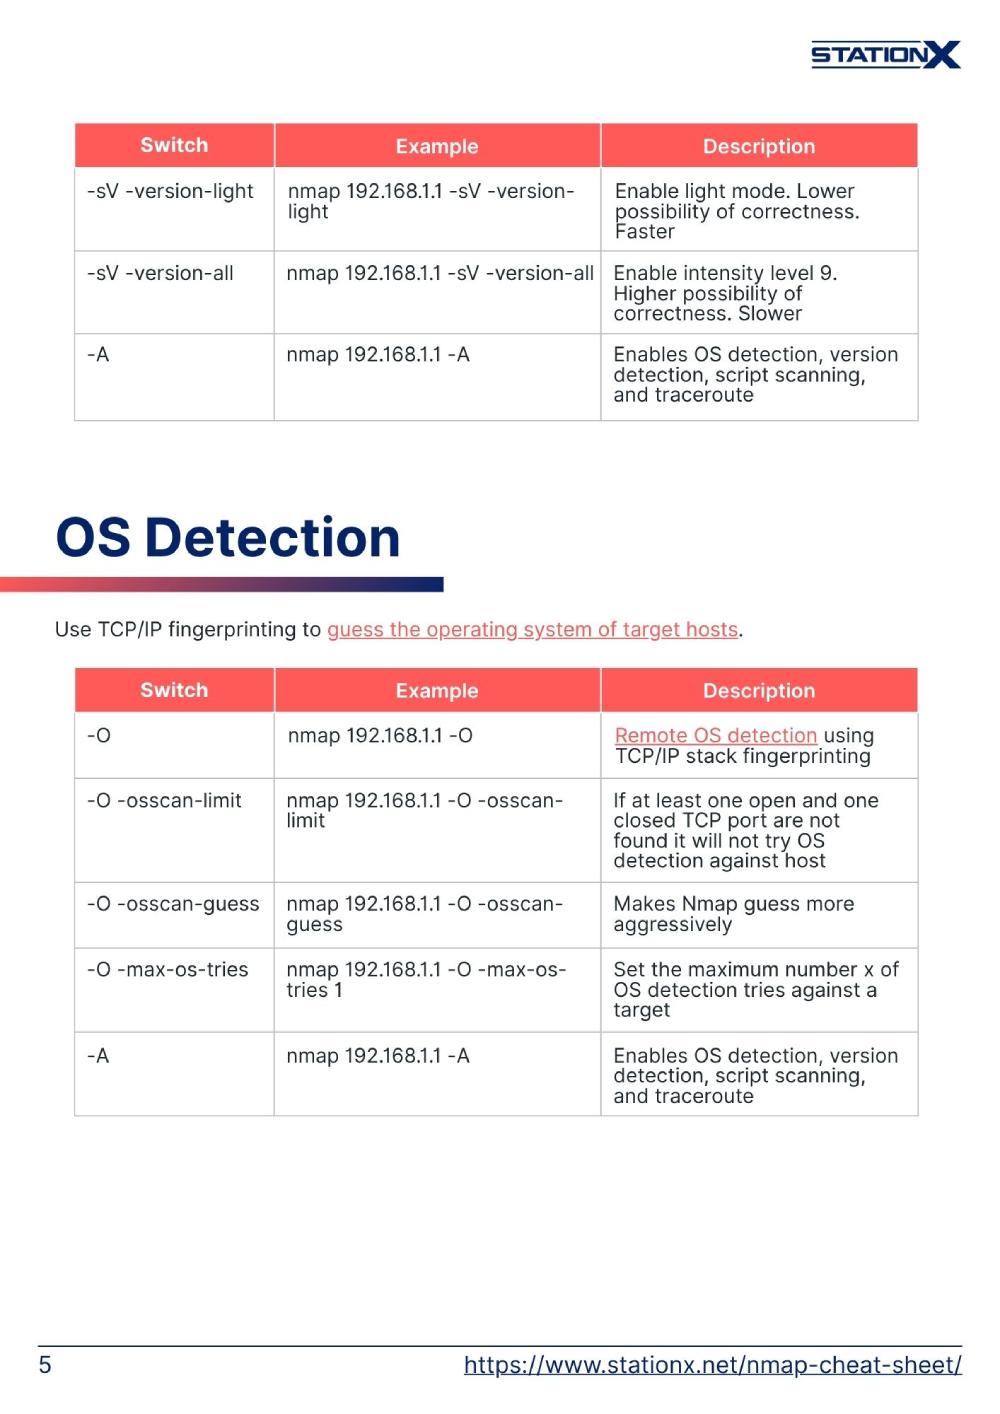
11. Enable OS detection, version detection, script scanning, and traceroute
nmap -A <target>
This option turns on operating system detection and the advanced and aggressive functions mentioned above.

12. Scan for remote operating system
nmap -O <target>
Perform remote operating system detection using TCP/IP stack fingerprinting: Nmap sends a series of TCP and UDP packets to the remote host, examines every bit in the responses, compares its nmap-os-db database of more than 2,600 known operating system fingerprints, and prints out the operating system details if there is a match.

13. Scan a target with a specific timing template
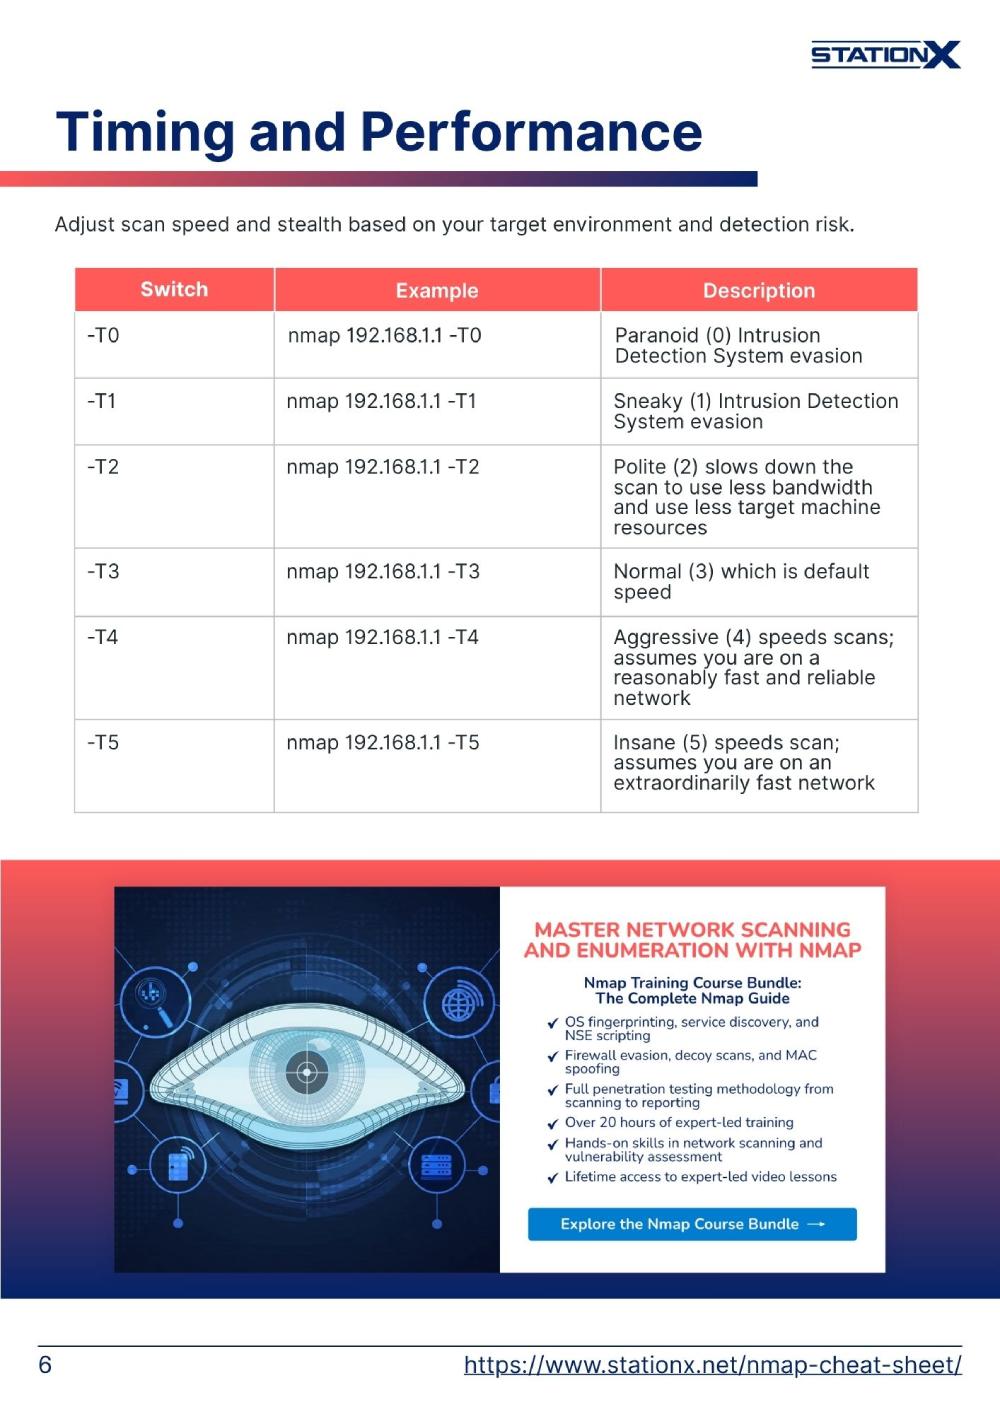
nmap -T<timing template: 0-5> <target>
Timing templates allow users to specify how aggressive they wish to be, leaving Nmap to pick the exact timing values. The template names are paranoid (0), sneaky (1), polite (2), normal (3), aggressive (4), and insane (5). Polite mode slows the scan to use less bandwidth and target machine resources to evade intrusion detection systems.

14. Increase the verbosity of the output (second level)
nmap -vv <target>
A single -v flag increases the verbosity level, causing Nmap to print more information about the scan in progress, such as open ports found in real-time and completion time estimates for scans that may take considerable time. Use it twice or more for even greater verbosity: -vv, or give a verbosity level directly, for example -v3.

15. Scan for commonly used ports and services
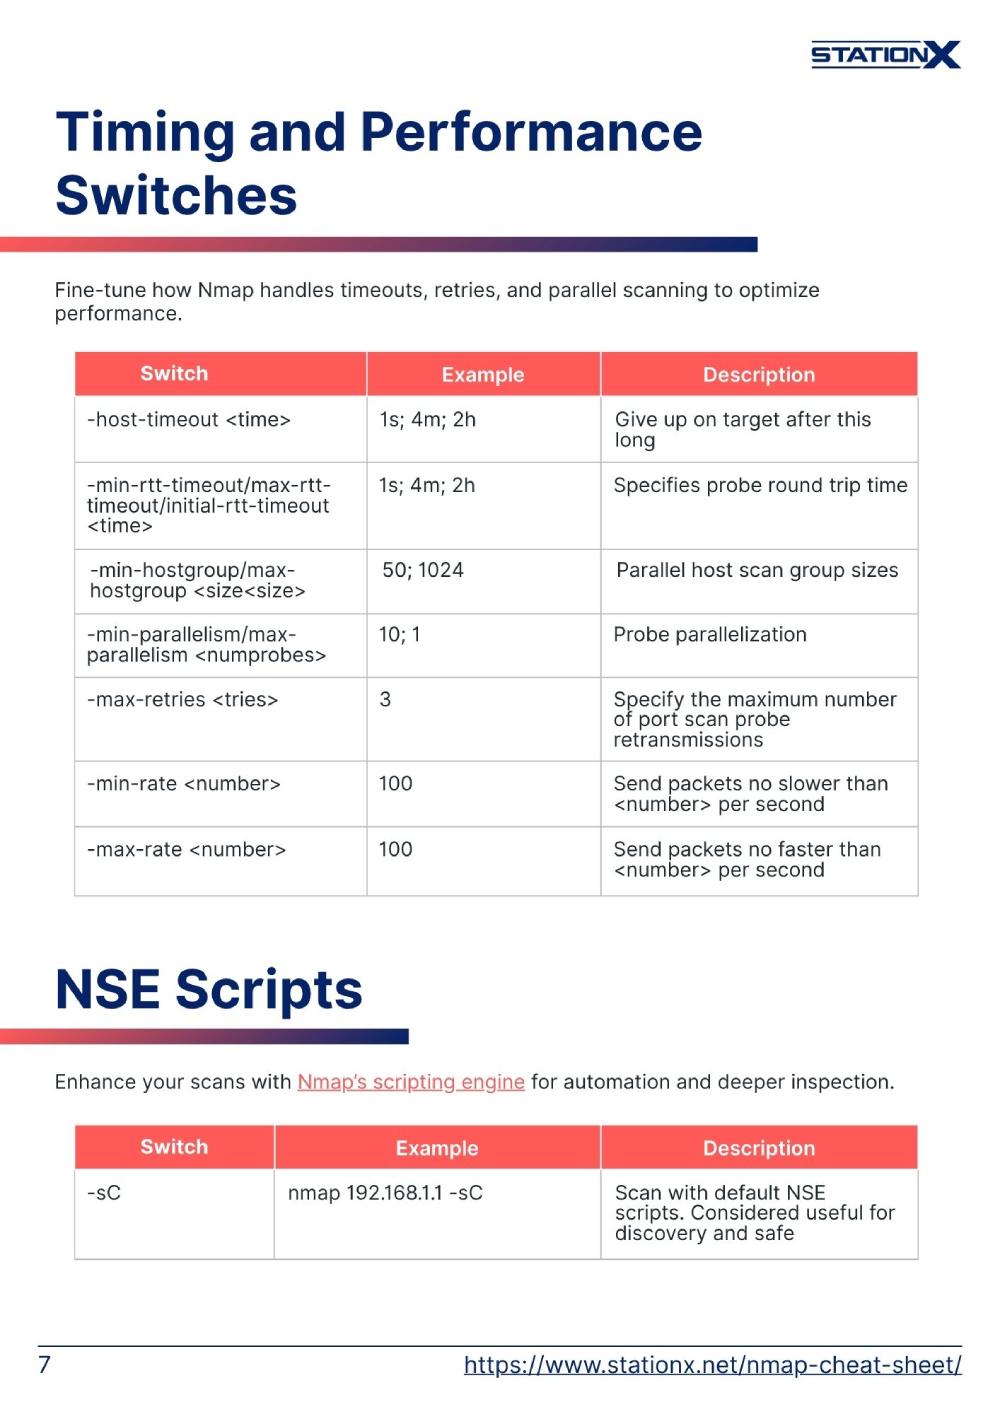
nmap -sC <target>
This command is equivalent to nmap --script=default <target>. It uses Nmap’s default Nmap Scripting Engine (NSE) scripts to scan for individual ports and protocols, including HTML and POP3. The scripts are mostly safe but contain intrusive processes. For example, the default script “jdwp-info” tries to exploit Java’s remote debugging port.

16. Run a script on the target
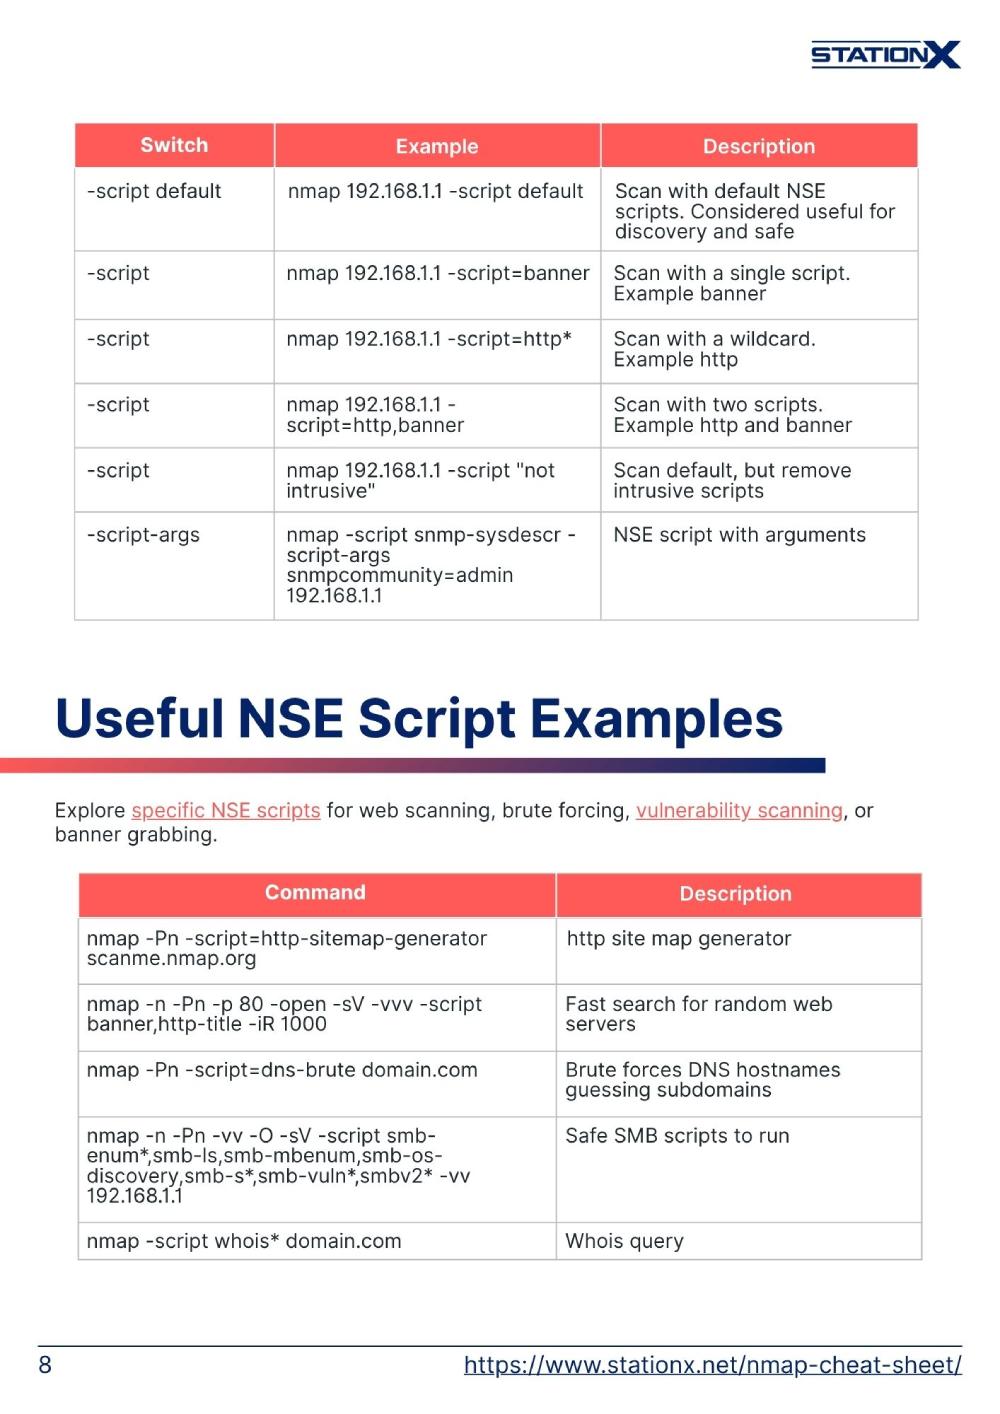
nmap --script <script type> <target>
Nmap runs a script scan using the comma-separated list of filenames, script categories, and directories.

17. Run all vulnerability scans on the target
nmap --script vuln <target>
The vuln scripts check for specific known vulnerabilities, and Nmap generally only reports results when it finds any. Examples include realvnc-auth-bypass and afp-path-vuln.

18. Read targets from a text file
nmap -iL <file>
Nmap reads a list of targets from a file as input. Entries can be in any format Nmap accepts on the command line (IP address, hostname, CIDR, IPv6, or octet ranges). Each entry must have spaces, tabs, or newlines as delimiters. The input file may contain comments that start with # and extend to the end of the line.

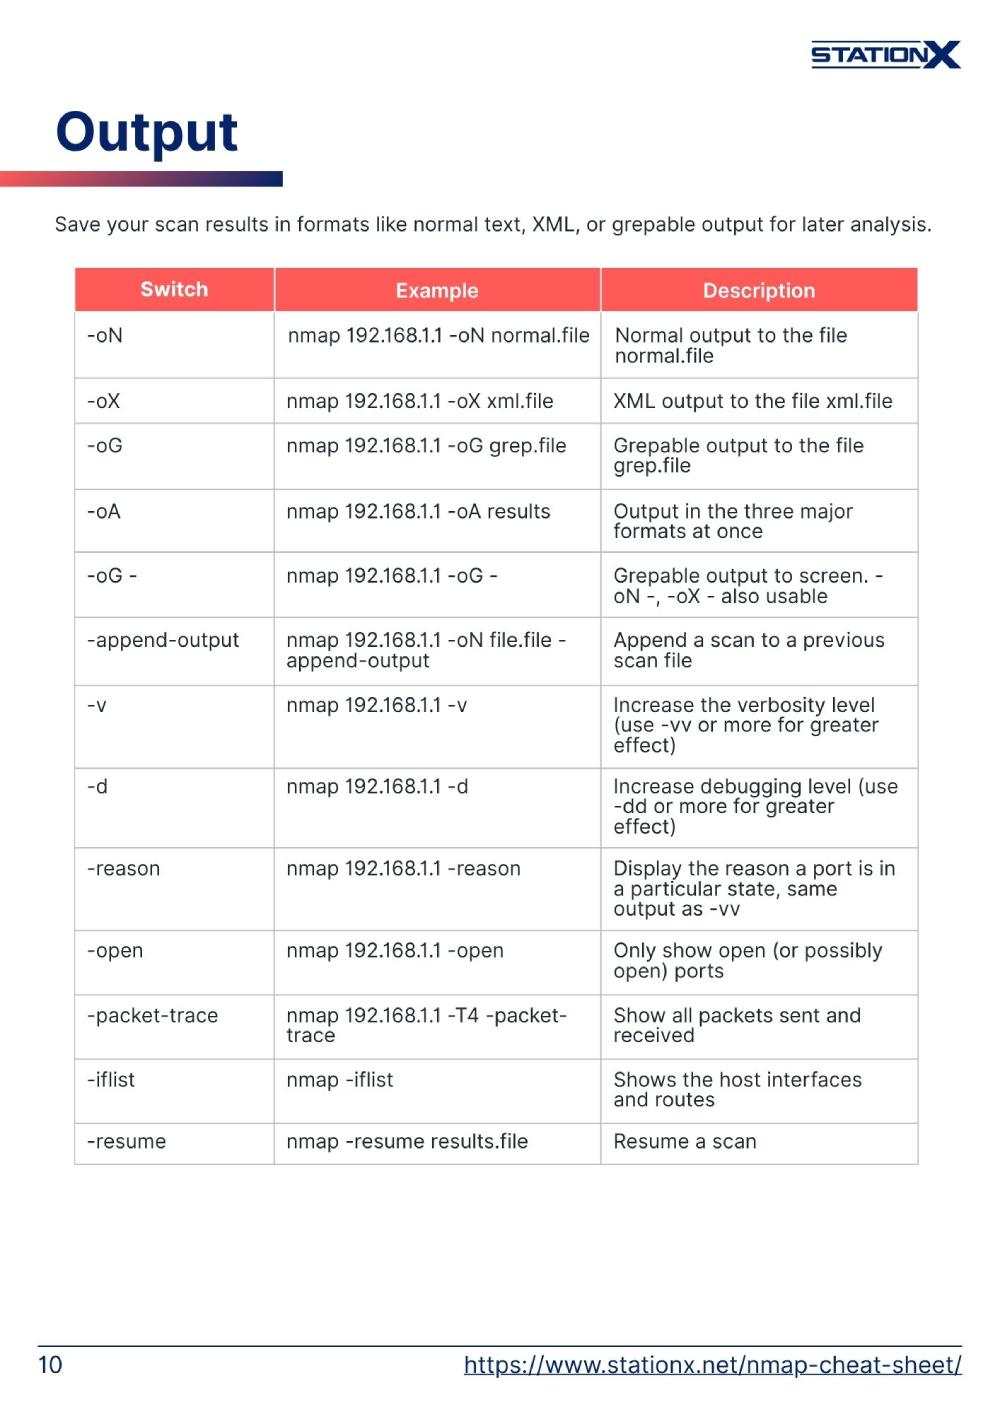
19. Save scan results in normal, XML, and grepable formats at once
nmap -oA <file>
Store Nmap scan results as three separate files, with <file> as the base file name and file extensions .nmap (normal), .xml (XML), and .gnmap (grepable). Like most programs, <file> may include a directory path, such as ~/folder1/foo/ on Unix or c:\folder2\bar on Windows.

20. Save the scan results to a normal format
nmap -oN <file>
Write the Nmap scan results to the given file name. Only use this command together with a valid Nmap scan command containing some <target> as shown in the example below (nmap --top-ports 10 192.168.1.1-10 -oN tenports.txt):

Conclusion
We hope this brief guide to the top 20 Nmap commands helps you in your IT or cyber security journey. Don’t forget to share this article with someone who needs it. To learn more about Nmap, check out our other articles on Nmap and courses on Nmap below. For access to over 30,000 courses and labs on all aspects of cyber security, join the StationX Master's Program today.
Purchase our Nmap Course Bundle below to get started with Nmap today. Click the banner below.
The Nmap Course Bundle includes:
Frequently Asked Questions

Guarantee Your Cyber Security Career with the StationX Master’s Program!
Get real work experience and a job guarantee in the StationX Master’s Program. Dive into tailored training, mentorship, and community support that accelerates your career.
- Job Guarantee & Real Work Experience: Launch your cybersecurity career with guaranteed placement and hands-on experience within our Master’s Program.
- 30,000+ Courses and Labs: Hands-on, comprehensive training covering all the skills you need to excel in any role in the field.
- Pass Certification Exams: Resources and exam simulations that help you succeed with confidence.
- Mentorship and Career Coaching: Personalized advice, resume help, and interview coaching to boost your career.
- Community Access: Engage with a thriving community of peers and professionals for ongoing support.
- Advanced Training for Real-World Skills: Courses and simulations designed for real job scenarios.
- Exclusive Events and Networking: Join events and exclusive networking opportunities to expand your connections.
TAKE THE NEXT STEP IN YOUR CAREER TODAY!


